-
Please be sure to read the rules and adhere to them. Some banned members have complained that they are not spammers. But they spammed us. Some even tried to redirect our members to other forums. Duh. Be smart. Read the rules and adhere to them and we will all get along just fine. Cheers. :beer: Link to the rules: https://www.forumsforums.com/threads/forum-rules-info.2974/
You are using an out of date browser. It may not display this or other websites correctly.
You should upgrade or use an alternative browser.
You should upgrade or use an alternative browser.
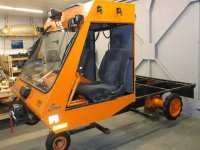
The continuing saga of Niksons 1402 IMP sn 129
- Thread starter turbinator62
- Start date
anthonydoldd
Member
I was considering the torsion axle conversion but for my use of my cat this is probably a much more suitable solution. I think I will order these as well when the cab comes off for paint and then these springs will go on as well. please take some before and after measurements and share the height you gain. I would think it would be in the neighborhood of 2".
Thanks for sharing!
Thanks for sharing!
That's my concern as well... will that small lift give me not enough track?
To be honest.... I haven't even looked at the track adjustment. I'm ASSUMING that the front small idler wheel has a rough adjustment on it.
In my defense.. all of my efforts have been removing my C4. It's headed for rebuild as soon as I get home.
JP
To be honest.... I haven't even looked at the track adjustment. I'm ASSUMING that the front small idler wheel has a rough adjustment on it.
In my defense.. all of my efforts have been removing my C4. It's headed for rebuild as soon as I get home.
JP
Snowtrac Nome
member formerly known as dds
looking at them they look like they are going to make for a rough ride. they look like short little trailer springs
turbinator62
Active member
I was considering the torsion axle conversion but for my use of my cat this is probably a much more suitable solution. I think I will order these as well when the cab comes off for paint and then these springs will go on as well. please take some before and after measurements and share the height you gain. I would think it would be in the neighborhood of 2".
Thanks for sharing!
Hi Anthony. The new springs are way stiffer than the stock ones. I may end up taking out the top leaf. We'll see. If you aren't in a hurry to do it, wait and see how mine works out. I should have it done by the end of May. I also have to pull the engine to replace the clutch. I'll take lots of pictures.
It should give a good 2" of increased lift which I could use in the heavy wet stuff we get here sometimes.
When I rebuilt my tracks I went with 55 grousers rather than 54 with the lift in mind. I figured I could always shorten them if necessary. I have a pneumatic idler at max forward position and 50 psi. (It should be 80) It did tend to slip in the turns this winter. A rough trigonometric guess would be that I would have to move the idler back 1" or maybe not at all in my case. Total cost for the springs was about 200 bucks with shipping.
One concern I have is that the higher arch will result in a center distance increase when the spring is depressed, with the posibility that the two center tires could touch. I don't think they will because these springs are way stiffer. We'll know soon.
turbinator62
Active member
looking at them they look like they are going to make for a rough ride. they look like short little trailer springs
That's pretty much what they are. Compared to the Snotracks and the 1450 (5 1/4" leaves on 10 wheels) the stock 1402 and 1404 springs are WAY light (3 3/16" leaves on 4 wheels) when adjusted for vehicle weight and wheel count. The slight lift will also put more weight on the bogies and off the solid rear sprocket (no suspension) which tends to run on the ground on a 1402 and drop center grouser equiped 1404.
I do know the lighter springs have been known to break. The best way to find out is to try it.
turbinator62
Active member
The post above should read (3 3/16 leaves on 8 wheels)
turbinator62
Active member
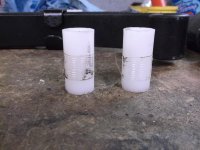
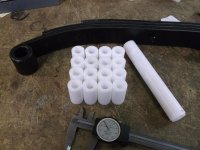
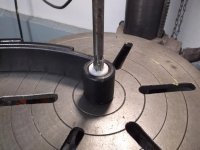
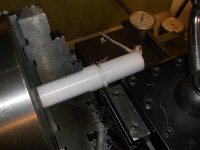
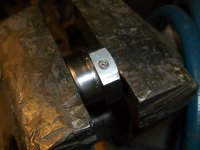
I got the spring bushings machined today. These are made from 1" diameter Delrin. A 3' piece of stock was enough. The eye in the spring is a nominal 7/8" but as you can see, the 9/16 id bushings that came with the springs were made from 7/8 stock and have tape wrapped around them to keep them tight. So the new bushings were machined .890 OD, .500 ID and 1.770 long. They were easily driven into the eye with a hammer, Then reamed with a .501 reamer. Plastic tends to distort when press fit, so the hole was finish reamed after assembly. The axle on the 1402 is a 1/2" bolt.
Not much more I can do till I get it home.
Not much more I can do till I get it home.
Attachments
PrecisionMarine
New member
Jeff, it's inspiring to see such meticulous and well thought-out work. Thank you!
turbinator62
Active member
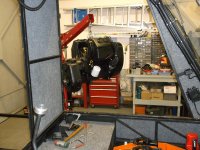
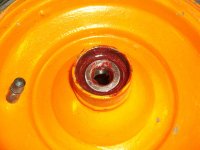
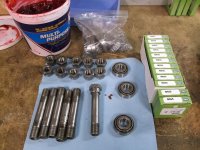
I got the cat in the hangar this week and partially torn down. The wheels and springs are off. I am going to replace all of the wheel bearings since they were a little rough. Found enough bearings to do all of them on EBay for 50 bucks.
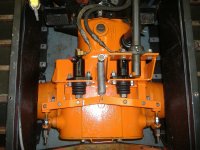
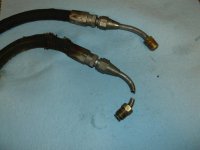
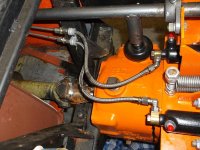
While adjusting the brakes I had quite a surprise. The transaxle on the 1402 is mounted on trunions and can rock side to side. While working on it I pushed down on one side and the left brake line broke in half! Whoa! The last time we drove it to the cabin we were 2 bumps away from having no steering or ability to stop.
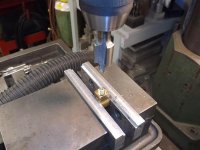
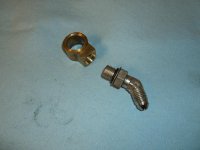
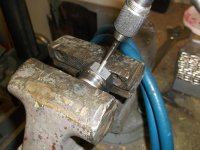
The old brake lines were in pretty bad shape so I replaced them with Aeroquip Teflon stainless braided hoses and AN-4 stainless swivel fittings. I machined the inverted flare part of the banjo fitting with a -4 MS porting tool and tapped it for 7/16-20. I used a 90 on the left and a 45 on the right. It should last till I'm dead. Had this not happened in the shop that may have come sooner than I expected. I should have inspected this more closely last year. If you have a 1402 or 1404 with this type brake line I would really suggest you check it very thoroughly. When the transaxle rocks there is a focused bending moment on the small diameter tubing section of the brake line. Eventually it fatigued and broke.
The swivel fittings are much stronger in an application with motion.
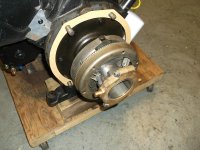
After the brakes were done I started the engine and checked the brakes out. I had had a problem with the clutch on the last trip. With the engine running in 4th gear I applied both brakes to try to kill the engine. The wheels stopped and the engine grunted a little but kept running. The clutch is REALLY bad. I think some of the lack of performance was due to the clutch. We're lucky we made it back from the cabin. I have a complete new clutch assembly but the engine has to come out to replace it. I'll try to get going on that this weekend. When that's done I'll get the new springs on and see how the track fits.
Attachments
turbinator62
Active member
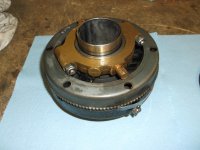
I got the new clutch in last weekend. The old one was slipping real bad. I was lucky to have found a complete new-old stock clutch assembly on ebay for about one third the price of new. When I got it back together I was able to easily stop the engine with the brakes in any gear.
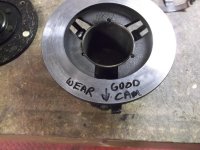
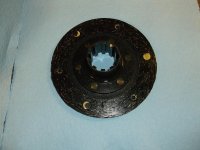
At first I could find no good reason for the clutch disk to have worn out so fast. It was literally down to the rivets and the adjusting ring was at its limit. Nik had replaced the disc when he rebuilt it last year. I know he had had to adjust it several times as did I. On close inspection of the old one I think I found the explanation.
The Wisconsin WC280 clutch has 3 lever actuated cams that press on an adjusting ring with great force to apply pressure to the disc. The pressure plate on the old clutch had one cam and actuator that had been so hot that they were blue. Plus the face of the pressure plate was worn in the area of the hot cam. This is a wet clutch and the oil was totally roasted as well. The cat only had about 8 hours on it since I changed the oil.
At some point the hardened steel pin that the cam lever rotates on had been replaced with a spring pin, but only that one. The other 2 still had a stock pin. The lever with the spring pin had very little play, but the other two vere very loose with a lot of axial play. The adjusting ring is slightly springy, but not enough to make up for the difference in wear on the cams. My theory is that the tight cam was the only one applying full pressure to the disc. Only a small percentage of the disc area was actually making full contact with the housing and pressure plate and was unable to absorb the full torque of the engine. Consequently it slipped, a lot of heat was generated and the disc wore out quickly.
I am more confident that the problem is fixed now that there is a rational explanation for the failure.
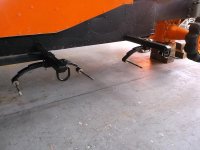
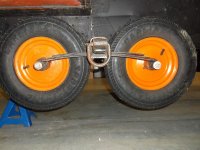
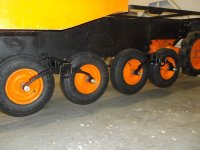
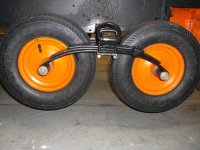
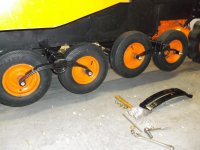
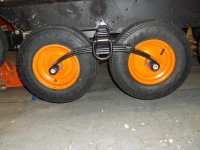
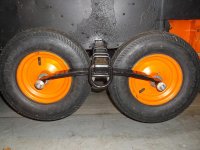
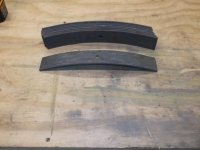
I did get the inner springs on today but I am waiting for grease seals to put the bogies back together with new bearings. You can see how much heavier and more arched these are than the old springs. The old springs are about the same size and thickness as the ones on my neighbors golf cart. My cat is also heavier than stock with the full cab, seats, equipment etc.
We're headed to the cabin for Memorial day for a week. I should have the parts to finish it when we get back. Then it's back to work on the plane.
Attachments
turbinator62
Active member
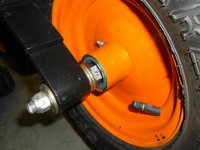
I got the new springs and bogie wheels back on today. When I tore the wheels apart, all of the wheel bearings were running loose. The bearing preload is adjusted with nuts on the axle tubes, but there is no way to lock them in place. I drilled them all for an 8-32 set screw to keep them tight once adjusted.
At some point in this cat's past, two of the bogies were replaced with wheels that are little different. The wheel bead is about 1/2" wider resulting in the tire being wider in the side wall. This caused the tire to rub the springs. When I tore it down, both wheels were on the left rear, and had spacers between the springs and axle tubes. I moved the heavier wheels to the left and right front bogie positions and re-drilled the spring locating hole for more width between the springs and added two thick washers on each side of the axle tube which also required a longer bolt. (10") I did this on all wheels to keep them in line with one another.
You can see that these springs are higher. When I get it down on the tracks, I'll re-measure the distance from the bottom of the rear end to the ground. It was 5 inches before, and should be about 7 now.
Compare the arch in the new springs with that of the last picture in the previous post.
Attachments
Last edited:
turbinator62
Active member
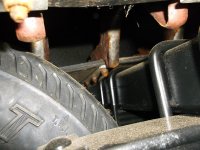
I am sorry to say my big idea is not going to work. Usually I am pretty good at anticipating problems that a modification will cause, but I missed this one. I installed new springs with a higher arch in order to achieve more ground clearance. What I didn't consider that as the wheels go lower, so does the top track. So low in fact that the tire guides hit the frame members that the springs are mounted on. That's bad. I considered installing an upper idler or a guide but finally threw in the towel and went back to the original springs. I rearched the old springs and doublers to get them all the same. You can see the difference between the stock springs and the higher ones in the pictures.
That time and money is down the crapper.
Any way, it is all back together and ready to go back to the cabin.
That time and money is down the crapper.
Any way, it is all back together and ready to go back to the cabin.
Attachments
turbinator62
Active member
Well, the forum came within about a half mile of having a 1402 Imp listed in the for sale page.
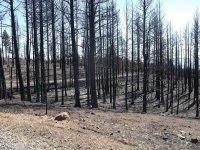
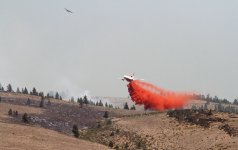
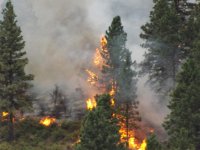
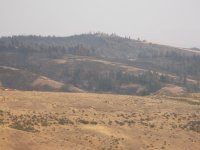
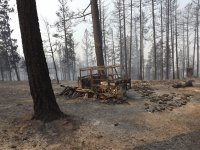
The Snag Canyon fire started on Aug 2 by lightning and quickly spread to 13000 acres. Fortunately for us the efforts of fire and air crews and a change of wind stopped the fires westward advance about 1/2 mile from our cabin. Unfortunately for many of our friends the fire destroyed their cabins and all of their timber, out buildings and equipment. The area literally looks like the surface of the moon with black toothpicks sticking up. One friend lost his cabin, a Spryte snowcat, backhoe, and 20 acres of timber. My cousins cabin had fire within 50 feet but was hit by 4000 gallons of fire retardant from a DC-9 and survived.(It is now pink). One family lost 4 cabins. It was a very scary couple of weeks.
The last picture is from our deck. A D-9 cat cut a fire line and a DC-9 tanker laid a strip of retardant down which stopped the fires westward advance. You can see red retardant near the two buildings on the left. There were about 10 helicopters, 4 MD-87 tankers and a DC-10 working at various times.
I had my snowcat at home in the hangar for maintenance and had not yet taken it back.
My heartfelt thanks to the many firefighters, tanker and helicopter pilots working in hazardous conditions and 100 degree heat to get this under control.
Attachments
Happy to hear your cat isn't being listed for sale. We only have about another month of this fire season to live through.
On the Corvallis, Oregon fire last friday (9-5-2014), we were pulling units from 60 miles away to staff the fire or back-fill stations. Even with that I needed another 5 units and 20 firefighters on my division to do the job right. Lucky for me, I "got away with it". But it meant that we had to let the main body of the fire go by and protect the structures. Our area is so lucky that we are not still not on that fire.
CT
Snowtrac Nome
member formerly known as dds
turbinator would it be possible to go with a larger diameter tire to get the clearance you are looking for
turbinator62
Active member
The 4.80-8 is about the limit. Any bigger and the tire would hit the cross frame.
Just thinking out loud here, while typing, looking at this. You obviously still have all of the parts on hand for your retrofit suspension. Going back and swapping it again would be a pain in the ass, but you are getting better & quicker at it each time. 
Is this possible:
Cut out the top leaf on your spring packs. With that cut out, your total thickness at the crossbar would only give you 1/16" additional clearance (for upper guides) over your old ones (2 x 1/4 vs. 3 x 3/16). But it would also soften up your new springs enough so that when it was sitting on the ground that upper clearance would increase even more. The two remaining leaves in that pack will probably still have more torsion than the original 3 leaf pieces.
Does that make sense?
David

Is this possible:
Cut out the top leaf on your spring packs. With that cut out, your total thickness at the crossbar would only give you 1/16" additional clearance (for upper guides) over your old ones (2 x 1/4 vs. 3 x 3/16). But it would also soften up your new springs enough so that when it was sitting on the ground that upper clearance would increase even more. The two remaining leaves in that pack will probably still have more torsion than the original 3 leaf pieces.
Does that make sense?

David
Alaska Snow Cat
Member
Some cats have plastic guides on top of the frame to keep the track from hitting. The Pisten Bullys I have use a plastic wheel with no real axel bearing that just rotates when contacted. Depending on a lot of different factors in temps, moisture content and depth of the snow, Ice and snow will build up in the frame area and keep the tracks higher off the frame too.
Great pictures btw. I am surprised how light duty the axel assemblies are, as well as the whole cat, and would imagine pre trip inspection and maintenance is very critical to keep it reliable.
Great pictures btw. I am surprised how light duty the axel assemblies are, as well as the whole cat, and would imagine pre trip inspection and maintenance is very critical to keep it reliable.
turbinator62
Active member
Just thinking out loud here, while typing, looking at this. You obviously still have all of the parts on hand for your retrofit suspension. Going back and swapping it again would be a pain in the ass, but you are getting better & quicker at it each time.
Is this possible:
Cut out the top leaf on your spring packs. With that cut out, your total thickness at the crossbar would only give you 1/16" additional clearance (for upper guides) over your old ones (2 x 1/4 vs. 3 x 3/16). But it would also soften up your new springs enough so that when it was sitting on the ground that upper clearance would increase even more. The two remaining leaves in that pack will probably still have more torsion than the original 3 leaf pieces.
Does that make sense?
David
Hi Dave. I did try removing the upper leaf. That only raised the wheels 1/4". The problem is the new springs have a much higher arch than the old, with a lot of the arch in the curvature at the ends. I could de-arch them a little, but because of the radius, the center to center distance increases and puts the center 2 tires and the front tire to idler too close together. I should have studied this a little closer before I tried it. Thiokol pretty much designed it to be what it is. Not much room for modification without major redesign.
To address Alaska Snow Cat, I did think about rollers or guides, but by the time you get 2 rollers in there, plus the support brackets, it puts the track very close to the floorboards. At that point I gave up and went back to stock which is what I should have done in the first place.
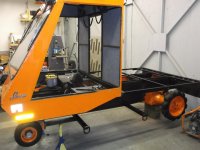
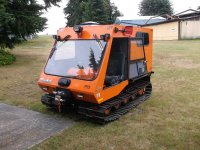
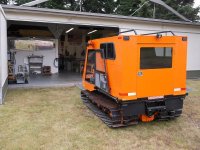
Yes this cat is small but that is what we needed. We use it for the 2-1/2 mile trip on a traveled snow road with 4 people and all of our gear from a metal storage container at the end of the plowed road to our cabin. It is easy to store and trailer and navigates our narrow roads easily. Just about every moving part on it has been rebuilt or replaced now. All in all its a nice little machine and Nikson did a great job making the new cab. We don't take it into remote areas. We have snowmobiles for that.
Last edited:
Alaska Snow Cat
Member
Yes this cat is small but that is what we needed. We use it for the 2-1/2 mile trip on a traveled snow road with 4 people and all of our gear from a metal storage container at the end of the plowed road to our cabin. It is easy to store and trailer and navigates our narrow roads easily. Just about every moving part on it has been rebuilt or replaced now. All in all its a nice little machine and Nikson did a great job making the new cab. We don't take it into remote areas. We have snowmobiles for that.
No doubt your Imp is very nicely done by both you and Nixon. I had never seen the actual axel assemblies on those early Imps and was surprised how they were assembled. I think one of the biggest issues keeping more people from using snowcats is the difficulty of transporting them which is a lot easier with your cat. Happy trails.
Randy
turbinator62
Active member
Took the cat back to our cabin this week. Hope we get more snow this year than last.
I got to looking at the spring assemblies some more. I think I can re-arch the springs to get about 1 more inch of lift without the tracks hitting the cross frames. This cat has 3ea 3/16 leaves. A 1404 has 4 leaves. My 1402 probably weighs about the same as a 1404 now with the cab and custom work. When I bring it home next spring for maintenance, I think I will get some spring stock from Gitt Spring in Seattle and make a helper for each assembly. That should get the suspension about the right height and stiffness for its weight.
I should have done that this year but hadn't considered adding a leaf. Plus I got discouraged after finding that the new springs wouldn't work.


