-
Please be sure to read the rules and adhere to them. Some banned members have complained that they are not spammers. But they spammed us. Some even tried to redirect our members to other forums. Duh. Be smart. Read the rules and adhere to them and we will all get along just fine. Cheers. :beer: Link to the rules: https://www.forumsforums.com/threads/forum-rules-info.2974/
You are using an out of date browser. It may not display this or other websites correctly.
You should upgrade or use an alternative browser.
You should upgrade or use an alternative browser.
Kristi KT7 restoration pictures
- Thread starter BigAl
- Start date
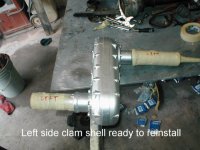
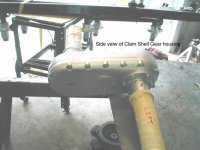
Finished the 2nd Clam shell today . It took much longer than the first one . Someone had been inside this clam shell and forgot to tighten up the 3/8 fine thread retaining bolt that holds the sprocket shaft to the gear to keep it from being able to travel back and forth about ¾” .They also forgot to reinstall a 2 ½” snap ring ! If they had ever made a really hard turn and the “pressed in” bearing had let go , the whole shaft with sprocket and all would have come off !
Some people should not work on equipment !!!
To access the 3/8 retaining bolt for the sprocket shaft you will find a 3” diameter inspection cover on the back side of the clam shell . This is for tightening the bolt .
Anyway ,it took me a couple hours to repair and tap out the shaft so it could accept a new bolt .The old bolt had no threads left on the end because it was just spinning around and getting hit by the shaft as it slid back and forth .
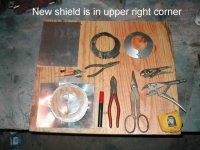
I also made new shields for the out drives as they exit the snow cat . Use a piece of 20ga sheet metal . Make a 6” outside circle and a 3 ¼” inside circle . Now bend the two end up about ½ “ back from the cut . Clamp it with a pair of Vise Grips and drill a ¼ hole for the bolt and nut that tightens it to the shaft . Glue and line the inside with a piece of flat rubber of the same size so it will not scratch the body . Here is a picture of the shield and the tools needed .
Hey !!! I just realize it is Miller time !!! Tomorrow the gear drives !
Attachments
Have you test fitted them yet? It looks perfect.
Snowcat Operations said:Have you test fitted them yet? It looks perfect.
Oh yea ! Fits like a glove .The old one in the picture is flattened out so I could copy the diameter correctly .


Help !!!!
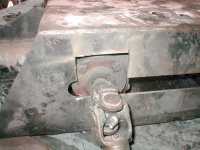
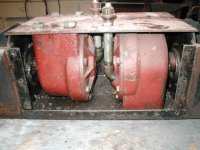
Ok , now I got a real problem . I started trying to remove the one u joint on the back of the Right Angle gear drive boxes . No Luck ! It is welded on “big time” because some idiot did not have 2 -3/8” allen head set screws to secure the u joint to the shaft so he just welded the hell out it . I got one off but the other is not moving !!!
I ended up cutting a square hole in the back of the Housing that holds the gears boxes so I could get the right angle gear unit out . The gear box does not have any name on it , just some numbers . Does anyone recognize this brand of gear box??? The number is WA67 01B/ . I am beginning to think I may end up cutting off the u joint and splined shaft so I can get a new gear shaft and reinstall it right with a new u joint knuckle if I can find out what brand it is .
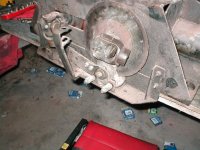
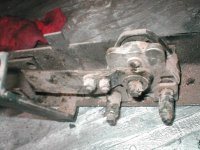
Also look at the next set of pictures . This is a cable operated emergency brake caliper . It has K -H engraved in it with the number 400M and also #1039 . I assume it is a Kelsy Hayes brake caliper ,but I can find no parts . The Brake pad is about the size of 4- 50 cent pieces stacked on top of each other .
There is suppose to be one on each gear box but someone has removed one in the past, so I would only have a emergency brake on one track and I would like to set up two again .
Can anybody help !!!!
Attachments
What was the application for those brake calipers? The original application? How did you find them with no part numbers?
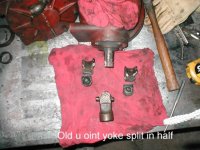
I learned something today . I cut two lines lengthwise with the splined shaft on the ujoint using a disc grinder . I did not cut all the way to the spline gear shaft itself but stopped short . I got a V shaped cold chisle and inserted it in the cut . Rapped it with a small ball ping hammer and the two halfs of the ujoint popped right off . The u joints from Spicer are cast iron !!! The spline shaft is fine other than at the front areas they attempted to weld. That will not affect the perfomace .The inside of the ujoint was spun out and no splines were left in it . So I am off to get two new spicer ujoints ,bearings, seals and I am back in business !!!
Sorry Big Boom , I'm keeping it now
 . I cut two lines lengthwise with the splined shaft on the ujoint using a disc grinder . I did not cut all the way to the spline gear shaft itself but stopped short . I got a V shaped cold chisle and inserted it in the cut . Rapped it with a small ball ping hammer and the two halfs of the ujoint popped right off . The u joints from Spicer are cast iron !!! The spline shaft is fine other than at the front areas they attempted to weld. That will not affect the perfomace .The inside of the ujoint was spun out and no splines were left in it . So I am off to get two new spicer ujoints ,bearings, seals and I am back in business !!!
Sorry Big Boom , I'm keeping it now

Excellent! I am glad to hear that nightmare is over with.
Damn... I was (in one way) hoping you found a show stopper.BigAl said:Sorry Big Boom , I'm keeping it now
I'll send more beer money to compensate for my lack of judgement.

Today started as one of those days that you dread getting out of bed . I was still wanting to kill or maimed whoever had welded on my right angle gear drive shaft and I was expecting the day to get worst as the hours went by.
I called the brake caliper manufacturing company and the lady directed me to a retailer that sold their products and gave me the new part number . $76 bucks later the missing brake caliper is on the way ! Hey not bad ,I think to myself!!!
I start calling machine shops to see who may be able to fix my welded gear shaft .The guy at a local machine shop says bring it down and he will take a look at it . I get there and the guy is busy but his helper tells me I should go see the “old boys” up at the local Logging company because they might know the name of the gear company that made this right angle gear and save me big bucks . I go to the logging company and the parts door is locked so I go around the side and run into a old guy ( about 60) who says he is not the parts guy but maybe he might know who makes it . He takes a look in the back of the truck says it is a “Wabco” or a “Rexroth” and has not seen one in years but he is sure they can fix it ! Things are looking up ! We go in the parts dept and another guy who is about 80 and looks like the Dad ,goes and looks and says it is some other brand and he thinks they can fix it too . Then they spend 15 minutes arguing and discussing the doohickey that is attached to the thingamabob so it must be a “whatucallit” brand
  . Ok!! These guys know there stuff ,I think ! Then the old guy (the older old guy) tells me to cut off the yoke and the shaft will be fine . Says he sees this all the time and he bets the u joint yoke has spun on the shaft , so get it off , clean up the splines and go buy a new yoke ! Sounds Good, I think , but I still don‘t think it will be that easy !
I then head to my friends welding shop and borrow this little neat power tool that has a little cutting disc in it and make two cuts lengthwise on the yoke . He comes over and cuts off the ears of the yoke with a plasma cutter . Man those things are neat !!! Anyway ,I finish making my cuts , grab a sharp cold chisel , put it in the cut and rap it with a hammer . The damn yoke just splits right in half !!!! I can’t believe it was that easy !
 I clean up the splines and go to the parts house and they order me new yokes and joints . $19 bucks a yoke!!! Oh YEA !!! Great day .
I make a mental note to go back and kiss the 2 old logging guys right on the lips later and “in private” as old logging guys are kinda funny about showing affection in public .
.
Come home and am feeling all warm inside . Decide to look over the engine closely . I then realize that someone at one time has had the heads off . HOLY Cow !!! The heads have been rebuilt sometime in the past !!! The rebuild sticker is still there !! YES<YES <YES , I do a little dance !
Life is good !!! Looks like the engine block may have been done also.
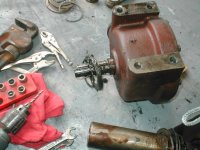
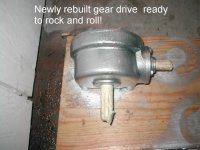
I sit happily at my work bench and rebuild one gear drive with new seals and bearings that last night I thought was toast !!!
Picture of rebuilt gear enclosed .
Have a nice day ! I am !!!
I called the brake caliper manufacturing company and the lady directed me to a retailer that sold their products and gave me the new part number . $76 bucks later the missing brake caliper is on the way ! Hey not bad ,I think to myself!!!

I start calling machine shops to see who may be able to fix my welded gear shaft .The guy at a local machine shop says bring it down and he will take a look at it . I get there and the guy is busy but his helper tells me I should go see the “old boys” up at the local Logging company because they might know the name of the gear company that made this right angle gear and save me big bucks . I go to the logging company and the parts door is locked so I go around the side and run into a old guy ( about 60) who says he is not the parts guy but maybe he might know who makes it . He takes a look in the back of the truck says it is a “Wabco” or a “Rexroth” and has not seen one in years but he is sure they can fix it ! Things are looking up ! We go in the parts dept and another guy who is about 80 and looks like the Dad ,goes and looks and says it is some other brand and he thinks they can fix it too
 . Then they spend 15 minutes arguing and discussing the doohickey that is attached to the thingamabob so it must be a “whatucallit” brand
 I then head to my friends welding shop and borrow this little neat power tool that has a little cutting disc in it and make two cuts lengthwise on the yoke . He comes over and cuts off the ears of the yoke with a plasma cutter . Man those things are neat
 !!! Anyway ,I finish making my cuts , grab a sharp cold chisel , put it in the cut and rap it with a hammer . The damn yoke just splits right in half !!!! I can’t believe it was that easy !
 I clean up the splines and go to the parts house and they order me new yokes and joints . $19 bucks a yoke!!! Oh YEA !!! Great day .
I make a mental note to go back and kiss the 2 old logging guys right on the lips later and “in private” as old logging guys are kinda funny about showing affection in public
Come home and am feeling all warm inside . Decide to look over the engine closely . I then realize that someone at one time has had the heads off . HOLY Cow !!! The heads have been rebuilt sometime in the past !!! The rebuild sticker is still there !! YES<YES <YES , I do a little dance !

Life is good !!! Looks like the engine block may have been done also.
I sit happily at my work bench and rebuild one gear drive with new seals and bearings that last night I thought was toast !!!

Picture of rebuilt gear enclosed .
Have a nice day ! I am !!!

Attachments
You are the luckiest man in the world! 


Heres to your good luck and excellent perseverance to do a great job.......
View attachment 5119
View attachment 5119
Attachments
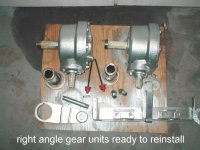
Today saw the 2nd gear unit get rebuilt . They are both ready for installation now .
Fed Ex finally showed up today with my sound /heat insulation so now is the time to bring in the lower body and frame ,back in the shop to start checking fit and setting up the new insulation /sound deadener.
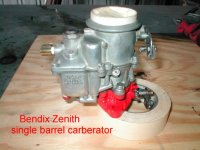
Snowcat Operations got me motivated and I rebuilt the single barrel Bendix /Zenith carb . I went ahead and polished out the throat ,all butterflies and ported the mating manifold to reduce fiction or drag on the air/fuel mixture as it is pulled into the intake manifold . Hey !!! It is a single barrel and I need all the power I can get so that’s why I did it !!!
Tomorrow ,I have about two hours of clean up and checking bushing & bearings on the rear lift ram mechanism and that’s it . At that point I start putting it all together . It will be nice ,as I am just about out of room in my shop now . The motor and hydro trans drives will be cleaned up and checked when I get some of these parts reinstalled . I have no room left to do a motor tear down if it becomes necessary .
Here are a couple of pictures .
Attachments
WOW aint she pretty! That carb is about as shiney as my gold capped front teeth! OK so I dont have gold capped front teeth but if I DID then they would be that shiney! Nice job. My rebuild kit has not arrived yet and I too am starting to get worried that it got lost in the whole delivery system! I was told Wednesday for sure. My carb is still on my CLEAN work area. I am also glad to hear you finally recieved your Sound insulation! About damn time!
Cleaned up the tools and put them all away . Swept Out the shop and got everything ready to bring in the lower body and frame tomorrow . Cleaned ,inspected and painted the last few remaining pieces of the hydraulic lift system .
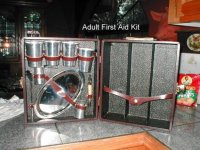
Also picked up my new "Adult First Aid Kit" for the KT7 . I can do anything including minor surgery after getting this baby set up . It can hold up to 3 bottles of assorted medicine . I am thinking Dr. Pepper , Rum and Brandy .
Hey Bob ,Eat your heart out .


Also picked up my new "Adult First Aid Kit" for the KT7 . I can do anything including minor surgery after getting this baby set up
 . It can hold up to 3 bottles of assorted medicine . I am thinking Dr. Pepper , Rum and Brandy .
Hey Bob ,Eat your heart out .


Attachments
Now thats my kinda First Aid Kit.. That and Kristi Cline (you remeber her) serving up a nice cocktail at the end of a hard run. Handing it to you as she sits on you lap. and------ Oh crap sorry got side tracked. Nice first aid kit!
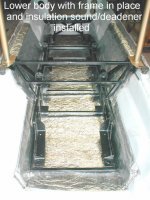
The body is sitting in the shop and the frame has been test fitted to the body so the sound/heat insulation can be laid out and glued in now . That will happen tomorrow .
It was a pretty good day . I spent a lot of time talking with Ford Power Products about the 104 cu. in . motor . I am very impressed . I wonder why Ford quit making the 104 V-4 ??? It is damn near bullet proof . Ran a compression check on the pistons today . Are you ready for this ???
#1 piston = 155 pounds
#2 piston = 155 pounds
#3 piston = 158 pounds
#4 piston = 160 pounds
Leak down test was also A Plus
The motor has been rebuilt sometime in the past , so it is just a matter of cleaning it up and checking starter , alternator, Dist, Etc .
Sorry guys , no pictures tonight .
It was a pretty good day . I spent a lot of time talking with Ford Power Products about the 104 cu. in . motor . I am very impressed . I wonder why Ford quit making the 104 V-4 ??? It is damn near bullet proof . Ran a compression check on the pistons today . Are you ready for this ???

#1 piston = 155 pounds
#2 piston = 155 pounds
#3 piston = 158 pounds
#4 piston = 160 pounds
Leak down test was also A Plus

The motor has been rebuilt sometime in the past , so it is just a matter of cleaning it up and checking starter , alternator, Dist, Etc .
Sorry guys , no pictures tonight .
Those are some pretty nice compression numbers! You see those on factory new motors! Seems we have both been lucky in the engine dept! 

mtntopper said:That engine is really well designed and almost bullet proof. Might be better off to not rebuild unless it really needs attention. Do you know how many hours are on the engine? One of the major problems I have seen with this motor are old gasket and seal problems. If everything else checks out good, I would consider just a reseal of the complete engine instead of acomplete rebulid. You may still want to do the valve and head work.
Glad the compression is good, you can save some bucks and still be comfortable that it is up to your standards.
 You may want to drop the oil pan and check some of the main and rod bearings with plastigauge to just assure yourself that everything is ok in the bottom end of the engine. You probably will still need to do the reseal and gasket of the engine as I mentioned in my prior quote above as this engine seems prone to various fluid leaks.
Thanks Mtntopper ,
At first ,I thought this motor had the hell ran out of it and was pretty sure I was looking at a complete rebuild . Now I realize that from where the Hydraulic tank sat and the difficulty in getting to the oil filter because of such a tight fit on the engine ,all that grime and grease was caused by other issues . The engine breather tube just dumps on the floor . I am adding boat "through hull" fittings to eliminate this problem . Hydraulic tank drain ,Radiator overflow and drain, Engine breather tube will all exit outside the vehicle and terminate underneath .
I also went down and talked with the owner of the local rental equipment yard yesterday about these motors . These V-4 Fords use to be in a lot of early 1970's type of equiptment . He gave me quite a bit of information on them and also told me about how reliable they are .
I have the rebuild parts all nailed down and recorded in my owners manual that I am making on the computer .If I ever had to do a engine rebuild , the cost is crazy ! I honestly think I would upgrade to a V-6 159 cu in Ford before I would spend the money to rebuild the 104 V-4 .Just a "Master Gasket set" is $177 plus tax !!! Ford must be real proud of their parts . If that motor ever has to come out in the future it will be a much easier job next time as I am setting up everything with quick disconnects on the wiring ,body panels,hydraulic fittings and gas lines .
The brake caliper people called back and told me the emergency brake calipers I ordered ,are 6 weeks out . That will slow things down a bit . I need them to correctly aline the new rotors on the drive line yokes before installing the Engine/transmission . I am going to see if I can go a different way . I may end up building my own 8 "rotors so I can slide them in place and weld them later when I get the new calipers .
Spent majority of the day cleaning parts , tapping and chasing threads .
The insulation has been installed where it needed to be , before the frame was reinstalled . This now makes the insulation one solid piece instead of a bunch of small pieces . Any seams were sealed with aluminum foil faced tape to add additional insulation value and give a better finished appearance . The insulation is about ½” in thickness and came in a 4’x48’ roll . It is foil faced so it can be wiped down should it become dirty in time and usage .

The insulation has been installed where it needed to be , before the frame was reinstalled . This now makes the insulation one solid piece instead of a bunch of small pieces . Any seams were sealed with aluminum foil faced tape to add additional insulation value and give a better finished appearance
 . The insulation is about ½” in thickness and came in a 4’x48’ roll . It is foil faced so it can be wiped down should it become dirty in time and usage .
Attachments
Very CLEAN work! A true sign of a professional. BigAl is that foils face sound insulation have an adhesive backing? Also when did you paint the roll bar? Looks very nice.
Thanks Mike . I ordered a "high temp" spray glue to use with it . A lot of "spray on glues" release their grip as they become warm, rendering them useless in this application .That would not be good in a engine compartment !
I painted the Roll Bar the other day after the black paint had finally gassed out . I still plan to give it one more coat of gold paint . It should go well with the Tan and Walnut interior .
I painted the Roll Bar the other day after the black paint had finally gassed out
 . I still plan to give it one more coat of gold paint . It should go well with the Tan and Walnut interior .
