• Please be sure to read the rules and adhere to them. Some banned members have complained that they are not spammers. But they spammed us. Some even tried to redirect our members to other forums. Duh. Be smart. Read the rules and adhere to them and we will all get along just fine. Cheers. :beer: Link to the rules: https://www.forumsforums.com/threads/forum-rules-info.2974/

Kristi KT7 restoration pictures

I told you that stuff is great!

Your results look terriffic. The color match is excellent, did you add rubber to your mix or just stick with the epoxy blend? The rubber is great for added wear protection and traction inside a truck bed, but unnecessary for your application unless you wanted the texture it provides. I've use the epoxy spray with and without rubber with great results and I think you will still be happy with the results long after you get that put back together.
 
B_Skurka said:
I told you that stuff is great!

Your results look terriffic. The color match is excellent, did you add rubber to your mix or just stick with the epoxy blend? .

Bob ,
I did not add rubber . I am soooooo glad I went this way . No one could do a custom color match like I wanted . In fact ,the paint salesman told me at first it could not be done . Then after we talked about a half dozen times and I told him what I was doing , he told me he would custom mix something up . I even got him watching the restoration now and they are wanting pictures for the store !!! These guys have been great and have really gone overboard on giving me needed advice . The nice part is the color goes all the way through so scapes or scatches should blend in and not show .
 
Here's a "before" picture ,when I was just getting started on the lower body ! A little bit of a difference .
 

Attachments

  • body 003.jpg
    body 003.jpg
    53.8 KB · Views: 313
WOW! Bob your advise was perfect. Allen Your work is PERFECT! Man that will be one nice bathtub when its done. Oh wait sorry I meant Snowcat. Nah just jokeing around. That is going to be the best looking Kristi snowcat EVER made!
 
Evening Folks ,:tiphat:
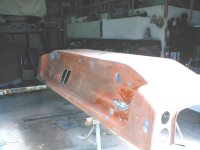
Well , I cleaned up the shop and had my son help me move the lower body outside . It will stay there until the frame is cleaned ,repaired , repainted and ready to be reinstalled .
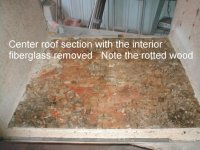
I bought in the center section of the upper body . On close inspection , I realized that the balsa wood center had decayed from water leaking through some old luggage rack bolt holes in the roof area .I had originally planned to replace the center cab section with a new “Formed” one piece of Aluminum because I thought the old cab was beyond repair .
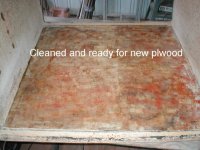
I took a 4” grinder and with a cutting disk installed ,cut out the inner fiberglass panel to inspect the damage . The wood was completely loose and rotten . I decided that I can install new plywood rebedded in fiberglass resin to restore it back to its original contour . This will be quite a savings over forming a new aluminum center . So tomorrow I will get the new plywood and glass it in place . Once this dries, I will repair the side where someone mounted a spare boogie tire and the same thing happened .
Here is a before and after shot of the rotted area .
 

Attachments

  • Center cab 001.jpg
    Center cab 001.jpg
    91.7 KB · Views: 295
  • Center cab 002.jpg
    Center cab 002.jpg
    90.6 KB · Views: 296
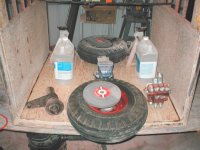
Ok ! New plywood is cut , installed and bedded in fiberglass resin . Biggest problem was getting the curve back in the roof correctly . I used any weight I could find to make the curve . Here is a list :
1 -48" 2x4 (doug fir works best )
1- 5" vise
2- 2 1/2 gallon jugs of thinner
2 Kristi boogie wheels with tires ( inflated to 35 pounds)
2- 8" x 3/4 " grinding wheels
2 cast iron jack stands

Hey !!! You use what you got !!! No pictures , but maybe tomorrow .
Oh Man! I almost forgot . I also used 1 -10" flat tip screwdriver !!
 
Hey Al, I think it was you that was asking in a thread about the logos on my upholstery, but it got deleted. I think Bob was asking, too.
The upholstery guy that did the seats has some software that can digitize any drawing and convert into a format for the embroidery machine. It was cheap, only $25CDN per seat. I just showed him the Snow Trac snowflake emblem and he took it from there. So any good upholstery shop or sign/logo/decal type place would be able to do that.
Sorry for taking so long!
 
Arlow said:
Hey Al, I think it was you that was asking in a thread about the logos on my upholstery, but it got deleted. I think Bob was asking, too.
The upholstery guy that did the seats has some software that can digitize any drawing and convert into a format for the embroidery machine. It was cheap, only $25CDN per seat. I just showed him the Snow Trac snowflake emblem and he took it from there. So any good upholstery shop or sign/logo/decal type place would be able to do that.
Sorry for taking so long!


Thanks Arlow ,
Good to see you visitin again . Yes that is a good price . I will see what I can do around here .
Al
 
Ok , I got another question for your consideration :confused: . The exterior of the center cab fiberglass section is embossed to look like a vinyl top material. There is quite a number of holes in the old section that need repair .I can see hours upon hours trying to dulicate that "fake vinyl top design" where the repairs are made . What about a real vinyl top ? That would sure make it easy and if I scatched it what would be the difference between paint or vinyl ? The new vinyl cloth material is pretty tough too. I think the Kristi manufcturers did this to break up the body lines a little . I have a vinyl top "sample" coming along with a color chart of all the colors avalible . If anyone needs a orginal vinyl top replacement you might want to inquire from these guys : www.smsautofabrics.com
 
Why not patch the holes and then spray it with the epoxy paint you used on the bottom side? It has its own texture, it can be put down heavy enough to create a look similar to the original look (multiple layers can be applied over the top of each other to build it up) so it would cover your repairs and cover the original texture. It would also match the lower body panel, the color is not just superficial so scratches won't show up easily. Just a thought.
 
Actually Bob that is a pretty damn good idea :thumb: . I may just do that . It would sure tie the lower and upper body sections together and I like the idea of the bedliner material color going all the through the liner . That way I could keep the upper body color exactly the same as the center section .Thanks !
The fake vinyl embossing is so deep that I think I would still fill it in with filler before shooting the bedliner though .
I wonder if they sell bedliner in 1/2 gallon amounts ???
 
Snowcat Operations said:
What brand bed liner are you using? Is it as tuff as a sprayed in bed liner?

It is a spray in type bed liner and yes ,I believe it is every bit as tuff as the stuff the bedliner shops spray :thumb: .I will go back out a little later and get the brand .
You guys thought I was kidding about the weight for the plywood replacement on the center section . Here is a picture to prove it . I also forgot to add one four valve assembly to my weight list . By the way ,the new plywood did the trick so I will be using the old center section for sure .
 

Attachments

  • Center cab.jpg
    Center cab.jpg
    87.7 KB · Views: 331
Inflating the bogie wheels to 35 pounds is what did the trick. If you had only inflated them to 25 pounds each, you'd have been 20 pounds light...:Whacky_To
 
Are the marks on the sides from wear?

I've never see light plane tires with side tread like that. (I've been wrong before though.)
 
Well they could be airplane tires as the wheel rims are airplane wheels . The owner of Kristi was a pilot so who knows ???:confused: The "dished in" marks on the sides are actually part of the side wall design .
While the center cab section fiberglass repaired area was curing in my shop ,I hauled the frame out to my buddy's welding shop . We ground out bad welds ,welded where there were no welds , added bracing and supports where they should have been but were not , rounded and radius sharp corners and filled drilled holes that had nothing mounted to it . The frame is a "ladder type frame" basically made of 1"x1" 1/8" square tubing.
Light weight but strong .
I also revamped the rear hitch set up where it had cracked in half and added cross bracing . Who ever the "knucklehead" was that did the welding on that hitch should have taken a basic course in Welding 101 or had his butt kicked . Talk about a mess!:pat:
So the frame is back home tonight and will get cleaned ,sanded ,primed and painted tomorrow . I'll try to grab a picture of the frame after it is painted .
 
Snowcat Operations said:
What brand bed liner are you using?

Mike ,
The bedliner material is made by a company called SEMS . It is the "Pro Tex" line .
It is also "tintable" to any color you want . The paint salemens may say it isnt ,but it can be done . I paid $250 for the liner material plus the custom tint color that varies in price depending on what color you want .
Al
 
Thanks BigAl. When you get a chance I would love to see some pictures of the frame. 1x1x1/8. Glad to hear you added extra reinforcment points. I can tell this Kristi will be the best Kristi to ever hit the snow. How many man hours do you have in it so far?
 
BigAl said:
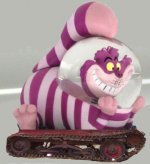
Ok I'm back. Lord I do love good drugs !!! I can't feel anything now !!!!Nothing broken but I will be moving pretty slow for awhile. I did a "triple Axel with a half pike twist combo" . I got scored pretty high by the judges ,but did not win anything . Going to head off to bed . The pretty little birds keep circling around the monitor but before I go I need to show you the latest progress with my paiting.

Damn, I can't get the photo to load. Guess I need to get some help form Bob again:pat:


Allen, no problem, you know I am always glad to help you :whistle:

Here is the photo you wanted loaded up. I do like the way you did stripes on the back of that thing.
 

Attachments

  • 0cheshire kristi.jpg
    0cheshire kristi.jpg
    107.4 KB · Views: 305
Hi All:tiphat: ,
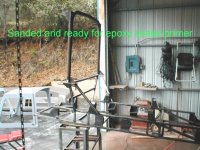
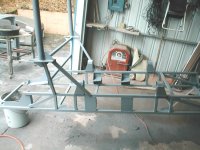
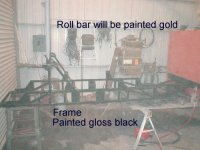
The frame got a good sanding and cleaning again this morning. I then shot a couple of coats of epoxy primer/sealer on it followed up by 3 coats of gloss black . The pictures show before,during and after . The last picture shows black paint still hanging in the air . Makes real nice black boogers . With the nose hair stuck in them ,they look like little spiders with legs:D ! Man ! I have got to find my mask !!!

Mike ,the frame is very strong and it is amazing it held up as well as it did with the past owner grooming trails with it .

The only areas that had frame breaks were where the knuckleheads had attempted to weld up a frame hitch setup and made "very cold" welds . I cut about 10 pounds of crap metal off it yesterday and rebraced the whole thing right .
 

Attachments

  • frame 008.jpg
    frame 008.jpg
    99.5 KB · Views: 299
  • frame 010.jpg
    frame 010.jpg
    92.7 KB · Views: 300
  • frame 011.jpg
    frame 011.jpg
    76.7 KB · Views: 299
B_Skurka said:
Allen, no problem, you know I am always glad to help you :whistle:

Here is the photo you wanted loaded up. I do like the way you did stripes on the back of that thing.

Hey Bob,
Why don't you ship that Snow Trac of yours to me and i'll put a custom paint job on it for you . A real "one of a kind" !!!:thumb:
 
Looking great! Someday perhaps I'll have your talent.....come to think of it, I'd settle for any talent!:pat:

Seriously though, keep up the great work and keep the pictures coming!:coolshade
 
Yes now I understand why it is so strong. I was picturing just a flat ladder type frame. The sides and roll cage really beef it up. Nice job Al
 
Al, At the rate you're going, you might have that Kristi up and running before the snow completely melts this season.....
Good job....

Gary
 
Snowcat Operations said:
How many man hours do you have in it so far?

Mike,
I have about 30 days into this project . I would guess I work a average of 4- 5 hours a day max. So I think somewhere in the neighborhood of 120 to 150 hours . But I have to tell you , a lot of that is sitting on my ass and trying to invision how I want something to turn out .I would say I easily spend 1 to 2 hours a day just thinking how to do what I want .:smileywac
 
BigAl said:
Hey Bob,
Why don't you ship that Snow Trac of yours to me and i'll put a custom paint job on it for you . A real "one of a kind" !!!:thumb:

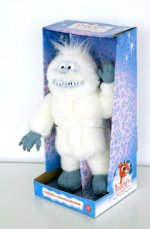
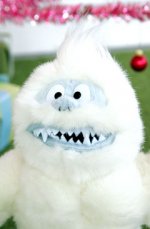
Allen, given the level of quality I see going into your restoration I would actually trust you to paint my Snow Trac. I was talking to the lovely Mrs_B yesterday and she suggested a blue background with snowflakes and a large image of "Bumble" the abominable snowman from the TV special "Rudolf and and the Land of Misfit Toys"

Can you airbrush some images of Bumble on the hood and each side? Or should I just go to a local graphics shop and have them do a "full wrap" of the Snow Trac? Or do I need to get some psychiatric help for the Mrs?
 

Attachments

  • p187172c.jpg
    p187172c.jpg
    19.4 KB · Views: 277
  • p187172f.jpg
    p187172f.jpg
    14.9 KB · Views: 286
B_Skurka said:
Allen, given the level of quality I see going into your restoration I would actually trust you to paint my Snow Trac. I was talking to the lovely Mrs_B yesterday and she suggested a blue background with snowflakes and a large image of "Bumble" the abominable snowman from the TV special "Rudolf and and the Land of Misfit Toys"

Can you airbrush some images of Bumble on the hood and each side? Or should I just go to a local graphics shop and have them do a "full wrap" of the Snow Trac? Or do I need to get some psychiatric help for the Mrs?

Yes ,we can shoot the blue. I would suggest you make a snowflake template and airbrush the outside "snow flake" edge very lightly in "soft white"and then let the center fade back to blue . Keep the top the same color "soft white" to give the appearance that snow is stacking up .

We could put a small "Bumble" under each window on the body and add the person's name under it ,who would usually sit at that location . Mrs B . of course, would have a dress on her Bumble image .Little Bumble images for the kids . A larger bumble would be on the hood with a snow cave in the background .

Bet I got you thinking now !!!:tiphat:

Lets see???? 2 men , 1 week , 4 cases of beer, Jar of beef jerky, a bunch of cut out snowflakes ,........ yep it can be done !!!!:beer:
 
Serious Bob ,
Some of the talent at local high schools is incredible . Call up a high school Art Teacher . They always have one student that is really gifted . I bet you could find one that could airbrush your Bumbles easily .I bet they would love to do it . The snowflakes are a no brainer even for me .
 
BigAl said:
2 men , 1 week , 4 cases of beer, Jar of beef jerky
Mr. President,

The quantities don't appear correct. What will we be eating/drinking after day 2? :(
 
Top