• Please be sure to read the rules and adhere to them. Some banned members have complained that they are not spammers. But they spammed us. Some even tried to redirect our members to other forums. Duh. Be smart. Read the rules and adhere to them and we will all get along just fine. Cheers. :beer: Link to the rules: https://www.forumsforums.com/threads/forum-rules-info.2974/

1975 Tucker 1544 - project and trips

Found it! Pretty big snap ring.
Have go buy a wider jaw tomorrow.
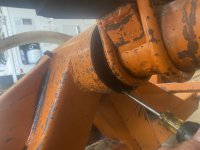
All the seal were good except one that ripped taking it off the spindle.
I should just buy 4 seals and do them all while it is all apart.
Thanks for the info.
 
Here it is.
 

Attachments

  • IMG_2918.jpeg
    IMG_2918.jpeg
    2.1 MB · Views: 73
Yes sir.

You won't regret new seals

use up a couple of cans of break clean on the rear tubes ( right where your screw driver is pointing ) tucker put a lot of heat in the tube right there and many tubes like to fail there on grooming cats.

it was very common to re journal tuckers. When folks changed journals it seems they doubled down in the heat cycling

don't take this as an alarmist sky is falling thing. it is in the day light and easy to peak at this point. there is no real torque out there as we don't have brakes but there is a ton of leverage on the out board design on the carrier.
 
YDPC,

The design of the journals is such that they are a steel-on-steel interface. Sure, you grease them, but the grease can migrate and the steel-on-steel contact causes wear. The new Tucker machines use a replaceable plastic sleeve that gets the wear. It is possible to convert a machine to the new system, but the parts from Tucker are Uber-expensive. If your journals show significant wear you can buy "bearing tape" which is adhesive backed UHMW plastic and it's available in different thicknesses and widths. By applying the tape to the worn surfaces you can correct the journal misalignment.

I know there are some forum threads that discuss it.
 
Looks good so far and slipped off nice and tight. I still have to clean up and get a good look.
Those snap rings are quite the challenge. I couldn’t find any pliers around town that worked so I ended up making pliers. They worked on the first try.
IMG_2920.jpeg
IMG_2919.jpeg
 
Looks good so far and slipped off nice and tight. I still have to clean up and get a good look.
Those snap rings are quite the challenge. I couldn’t find any pliers around town that worked so I ended up making pliers. They worked on the first try.
View attachment 164690
Look where your journals are dry, top left, bottom right, that is the spot(s) that never gets greased Because the the Jack it up part of the procedure is missing in the manual. the grease migrates away from, not to these areas. When they feel nice, they are nice in that position. in their working position those dry rusty areas in your photo are off a bit Tuckers price for the poly upgrade is / was 1400 per axle. I have not used tucker parts in some time.

When I get a customer that doubts they have wear, I just swing the carrier bogy, wheels up, and ask them to wiggle and compare to boggie wheels down. some of the axles I service have slot ground across the surface to take of accept the grease while weight on.
 
Looking great......
The Fancy wheels are definitely top shelf
Ahhhhh.....Maybe Chrome the Track carriers.....Waaaaaay cool :thumbup:
 
We live in a high snow belt area and the gang I hang out with have been building mountain sleds for decades. One important aspect for those under powered sleds was of course weight, and a big thing was the angle of attack of the track.
I also put tracks on my Polaris 1000 and learned how set them up to get around in the most snow they could handle.
Which brings me to looking at the track frames on my Tucker. The virtually flat lay out of the boogie wheels is not great for an attack angle in our snow.
So I’m thinking I should try raising the last boogie on the fixed end, and making it the lead boogie, which puts the tensioner at the rear on all four track frames.
The advantages of this I am well aware of as the lead boogie no longer acts like a coal mine wheel hits the face.
Lifting the front boogie 3” would make a huge difference in deep snow.

Has anyone had the time to look into this mod?

IMG_9564.jpeg
IMG_2975.jpeg
IMG_9167.jpeg

Looking great......
The Fancy wheels are definitely top shelf
Ahhhhh.....Maybe Chrome the Track carriers.....Waaaaaay cool :thumbup:
 
I have seen quite a few Tuckers of various track styles run some deep snow. When my rubber or steel tracks got stuck it was steep and deep drifts. The axle housings start to drag and even the tables and frame can plow snow. Attack angle wouldn’t have helped.

If you raise the wheel you will increase ground pressure like dropping a Tucker series 1700 to 1600 etc but keeping the weight.

Your blade and plow frame should hang you up before you run out of traction with the stock setup.
 
Your lead and lag wheel are already up 1 1/8 from the middle 3.

a lot of the shake goes away when you raise them even higher.

You are correct in your thinking, with a higher bite comes climb, tuckers do like to burrow. enjoy the mental gymnastics
 
I can tell you one thing for sure I had my tensioner wheel at the rear I also had a vibration that was going to tear the machine apart especially when under load. After chasing out a lot if things I switched assembly side to side which meant the tensioner wheel came to the front and vibration was gone. We played around a bit more and what we did find out is when it is on the rear the distance between the top slider for the track and wheeel become further apart due to the tensioning of the track. This increased distance allows the track to follow around the wheel more and actually runs into the leading edge of the top UMHV it does not transition onto it smoothly like when it is close to the fixed wheel as this distance does not change if there is no adjustment. If you are thinking about rear tensioners keep this distance in mind a small increase created a large vibration. When we installed new top sliders on mine we actually made them come very close to the rear wheel which reduced the vibration considerable even again from the factory tucker distance. Another issue was the tensioner bolt, rear wheel tension puts a lot more strain on this bolt and the normal rolling vibration from the tracks cause a lot of wear quickly on the bolt especially where it is bottoming out pushing on the track carriage to keep the tension on the track. we had actually broken a couple tension bolts and this wa the reason.
 
Do you have enough room to replace the bolt with a "Grease cylinder" ?????

Anchor the cylinder on both ends....

My 2100 has the grease cylinder track adjusters.....

These do not cause much issue.....Carry a grease gun and a couple tubes of grease....
 
I did find a broken tensioner on the back track frame on my Tucker this winter.
The rear track frame has the tightner on the rear, and the front track frame has the tightner on the front.
So the rear frames are probably taking more load as discussed above.
The hydraulic track tensioner might be good solution, now I need to find someone that has a source for hydraulic tensioner rams?
IMG_2712.JPG
 
Now how am I going to raise the front idler about three inches, and still keep the tensioner at the front of the frame? The other end of the frame would be so much easier, but probably start breaking tensioner bolt holders.
image1[7].jpegimage2[13] (2).jpegimage4[9] (2).jpeg
 
Mine was the exact same front tensioner was opposite of the rear Only rear ones broke on mine after I changed it no more vibration and no more broken bolts. They will not survive when they are tensioned in the rear nearly as well as tensioned in the front. maybe when the machine was new and the tube that slides into the carriage to allow you to tension the tracks is tight but as the machine gets older they stretch and wear causing more slop which plays havoc with the tensioner bolts
 
I had the hydraulic tensioners on my bombardier stick with the bolt tensioners the hydraulic ones end up leaking grease past the o-ring and loosing a bit of thension especially after the cylinder gets a little rust and some pits inside. They are also a pain in the ass and messy when you want to release the track tension. A bolt is easy to carry a spare and to change on the trail a hydraulic one not so much. Its not something you have to change very often so my thoughts are keep it simple especially when you are out in the middle of nowhere and it breaks
 
Been mulling over how to raise the front idler, and still keep the belt tensioner at the front of the frame as well.
Can’t realistically mount the front wheel above the tensioner. Issues with hitting the track frame with the grousers and getting too high for the sprocket.
So I’m thinking to move the tensioner from the top of the front slider box to the side of the box closest to the engine (inside). It will be behind the idler wheel now, but can be accessed through the track windows and a bent wrench for tightening the lock nut.

This location also has the advantage of the tensioner having an easier life as the push it does is closer inline with the work it is supposed to do.
Now my front idler can be relocated to sit flat on the top of the sliding box iron.
Cool eh?
 
Post a picture when you make the modification I will be interested to see how it helps you in the deep snow . If it works well i may copy your idea
 
Working on raising the lead boogie on the front track frames by about 3”.
The standard positioning of the first and last boogie is a lift of less than one inch.
You can see this in the picture with a board placed under the boogie’s.
IMG_3383.jpeg
 
Working on raising the lead boogie on the front track frames by about 3”.
The standard positioning of the first and last boogie is a lift of less than one inch.
You can see this in the picture with a board placed under the boogie’s.
View attachment 166086
The angle I should end up with is in this picture.
IMG_3382.jpeg


Instead of cutting apart the Tucker adjuster’s I decided to just make new ones and save the original ones in case I have made a bad move.
Here is some pictures of making the new Tucker Tip Toes.
IMG_3422.jpeg
IMG_3423.jpeg
IMG_3425.jpeg
IMG_3430.jpeg
IMG_3435.jpeg
 
Top