-
Please be sure to read the rules and adhere to them. Some banned members have complained that they are not spammers. But they spammed us. Some even tried to redirect our members to other forums. Duh. Be smart. Read the rules and adhere to them and we will all get along just fine. Cheers. :beer: Link to the rules: https://www.forumsforums.com/threads/forum-rules-info.2974/
You are using an out of date browser. It may not display this or other websites correctly.
You should upgrade or use an alternative browser.
You should upgrade or use an alternative browser.
Kristi KT7 restoration pictures
- Thread starter BigAl
- Start date
BigAl
Gone But Not Forgotten
Evening folks,
It was a slow day and not a lot got done . I finished all the plywood covers and they are ready to be covered in fabric or carpeting as required tomorrow .I also drilled the bolt holes for the seat layout .
So other than the arm rest with cup holders , which will be installed after the top is set in place the lower rear section should be done by tomorrow night . I used ¾” CCX plywood on all covers to add strength .
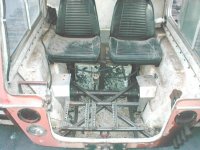
I have added a few pictures to record my efforts . There is also a before and after picture .
I am hoping by tomorrow night to have some great photos of the new interior.
Attachments
BigAl
Gone But Not Forgotten
Lyndon said:From your pictures it looks more like your building a space shuttle,with all that foil it looks like something I'd expect to see in a "Clean Room" at Thiokol's Rocket division. Your sure this thing is a Snow Cat?
Lyndon ,
I am not at liberty to say to much at this time . Goverment "hush,hush" and all that .But lets just say it will fit inside the Space Shuttle very nicely . Right now the biggest concern is finding me a space suit in XXXL . So far the only one they can find makes me look like the Michelin Man .
So who knows ,maybe some day soon "I will boldly go where no man has gone before".....

Hey Allen, let us know what the bottom of a snow drift looks like. I'm sure the view looking up at a bunch of Snow Trac units sitting on top of the snow will be an interesting view. Maybe we can lower a camera down to you and you can take a group photo us as we stand at the edge of the crater you make when that plastic tub plunges through the snow.BigAl said:maybe some day soon "I will boldly go where no man has gone before".....

BigAl
Gone But Not Forgotten
B_Skurka said:Hey Allen, let us know what the bottom of a snow drift looks like. I'm sure the view looking up at a bunch of Snow Trac units sitting on top of the snow will be an interesting view. Maybe we can lower a camera down to you and you can take a group photo us as we stand at the edge of the crater you make when that plastic tub plunges through the snow.
Tell you what Bob ,
Since by your own admission you and your Snow Trac buddies are afraid to go down to the bottom of a Snow Drift , I'll just use my camera ,take your picture and then drive back up and show you what a bunch of "Snow cat wanna be's" look like .


Good Morning and right back at you !!!


BigAl
Gone But Not Forgotten
Yippee Yahooooooo !!! 
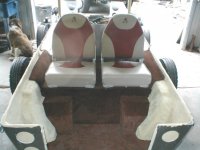
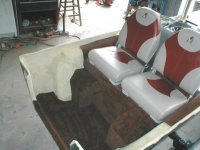
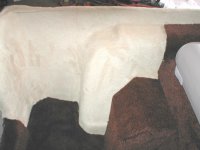
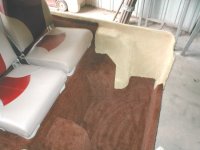
I got the back end of the KT7 all finished with carpet and upholstery . It turned out great . I used heavy fleece blanket cloth on the sides and Cabela’s Marine Grade carpet on the floors .Everything was set in place with a "special heat resistance spray on glue" . All I have left is to Scotch Gard the fabric and it is finished . The fleece hugged every corner and indention with no wrinkles whatsoever .
So tomorrow I turn my attention to the front section .
I also want to say a special thank you to my wife who helped or it could not have turned out as nice as it did ! THANKS HONEY!!
Here are a few pictures !!!

I got the back end of the KT7 all finished with carpet and upholstery . It turned out great . I used heavy fleece blanket cloth on the sides and Cabela’s Marine Grade carpet on the floors .Everything was set in place with a "special heat resistance spray on glue" . All I have left is to Scotch Gard the fabric and it is finished . The fleece hugged every corner and indention with no wrinkles whatsoever .
So tomorrow I turn my attention to the front section .
I also want to say a special thank you to my wife who helped or it could not have turned out as nice as it did ! THANKS HONEY!!

Here are a few pictures !!!
Attachments
BigAl
Gone But Not Forgotten
B_Skurka said:Al, can you explain the process of putting down the carpet and the fleece? Or do you have step-by-step photos for the rest of us? I've never done any real upholstry or interior trim work and am curious about the process.
I'll be glad to Bob ,
I started out by cutting new floor panels and a seat panel out of 3/4 " plywood. Seal the wood so any spills won't get absorbed and bleed later ! Try to leave about 1/4 " clearance around the panels where they butt up against anything else . This way you can roll the carpet around the ends and staple it down . I also use "spray on glue" to keep the carpet in place . TEST FIT EVERYTHING BEFORE GLUEING !!!
 I used scissors and a razor knive to trim the carpet .The panels were attached to the seat support rails before covering . The rails attached from the bottom so no screws or bolts show .
The Fleece was oversize cut for the area I wanted to use it in . Again test fit to make sure you have allowed for everything . At that point I sprayed the area I wanted to cover with the same spray glue I used behind the carpet . Starting at one corner start pressing the fabric into place . This is where you will need a second set of hands . Have your helper pull and keep the fabric tight as you use your "CLEAN" hands to press it into place . Work out all air bubbles as you go . Indentations will be the hardest but take your time and do not stretch the fabric to tight or it will later release . I usually give the glue about a minute to tack up before applying my fabric . This Fleece is strectchable and it is a great material to use where you have lots of turns ,humps and indentations . It gives the sofest,warmest finish that I know of .You can usually work it so no wrinkles show or cutting is needed to make it lay flat .IF you are using upholstered panels just pretty much follow the same rules as you would for carpet . Any hardware store should have the SS or chrome finish washers and screws that are used in securing the panels or you can make tiny cuts and screw everything in place then just press the fabric back down .Trim to fit and add a finish rubber molding , cord or whatever you have in mind .
The only other thing you need to do is figure out in what order to cover . Usually Fabric goes first than carpet ,as carpet will give you more room for errors in fit .
If you need to make a seam than try to roll the carpet edge or fabric edge under .It will make a better looking finish . Remember this is short loop marine carpet so seams are not easy to hide . I ordered oversize width carpet to eliminate this problem.
The only picture of the entire process that is omitted in the last post was the spraying of the glue which is nothing more than 1 coating of good spray glue .
It is easier than it sounds and if you mess up you can pull hard to release the glue , adjust as needed and keep going . The glue has a long working time so you can stay after one piece from 10-15 minutes with no problems .ON big pieces I sometimes lay the carpet or fabric in place ,fold it back ,spray glue on 1/2 , press it in place ,roll back the second half and do the same thing again .This keeps from getting wrinkles in the center because to work everything back out to the edge . You do not always have to glue down the carpet , but I did not want mine to move .
Vinyl is a little bit different to work with but the most important thing to remember is make damn sure it is warm . Cold vinyl is a son of a gun to work with and wrinkles will appear later on warm days if it was applied cold .
MY seats came from Cabela's and are high back 18" boat seats . They cost $69 each . The fabric and carpet I have used so far probably amounts to about $50 . That is a pretty cheap cost for a custom interior .Labor was about 2 hours total .
Now my disclaimer: "This may not be the way the pros do it but I have done cars , trucks ,boats and one snow cat with no problems so far .Your milage may vary "
Snowcat Operations
Active member
"BLING" "BLING" Hell BigAl you should be on "PIMP MY RIDE"!
Snowcat Operations
Active member
Boldly going where no PIMP has gone before!
BigAl
Gone But Not Forgotten
Snowcat Operations said:Boldly going where no PIMP has gone before!
Oh hell Mike ,
Lets just Snow pimp together
 . There are more than enough like Bob S around to use and abuse .
 I'll tell you what . When you get your "Mighty Mouse" all ready for interior ,you bring it back and will put Red Velvet and white carpeting in it . Talk about a real "Snow Cat Chick Magnet"

mtntopper
Back On Track
I do hope you are attaching a mud room pull behind trailer for boot removal so we do not track any snow or dirt on your nice new interior and carpet..... I really would not mind being the first to track a little mud and snow on the new carpet.... Super job BigUgly, almost too nice to put to work...

 Damn spell checker!!!!!!
 I really would not mind being the first to track a little mud and snow on the new carpet.... Super job BigUgly, almost too nice to put to work...

BigAl
Gone But Not Forgotten
mtntopper said:I do hope you are attaching a mud room pull behind trailer for boot removal so we do not track any snow or dirt on your nice new interior and carpet
Thanks for the comments guys ! I just believe that everything should look good once
 . I know the carpet will get dirty but I also plan to put down some rubber floor mats to help . But you know what ??? Its a snow cat not a show cat and I intend to use the poop outta it .I just enjoy taking something and making it as nice as my limited abilities will allow . I have no intention of sitting on the sidelines because it might get dirty . I just ain't that type of guy . I have always loved to take something and make it a little better and a little more comfortable .
Today I started on the front section and decided to do away with the orginial steering system . I am switching over to foot controlled steering I think . I will have a overhead console for switches and gauges and also a built in console on the door . Nothing in front of the driver but the window ! That should be interesting !!!
Lyndon
Bronze Member
A "Hall of Famer" Eh? More like a museum piece or "Hangar Qween". Still the average ST4 has already beat you out just by the mear fact that it has ALREADY traveled more than twice as far. The REAL Snow Cat guys will accordingly issue you a Junior Snow Cat operators permit. If you break down, get stuck or detrack the thing in the first 200 miles you'll have to go in for a Re-Test. Since many of the veteran operators have in the thousands of miles on there machines it's safe to say you won't be catching up to them anytime soon.
Snowcat Operations
Active member
BUT he will be doing those miles as a pimp! NICE work BigAl! Well off to MOnterey to pick up my daughter for summer vacation. I wont be around for a few days. BUT if anyone wants to visit the house while I am gone I am sure my Pitbulls would love the snack I mean company!
mtntopper
Back On Track
BigAl said:Today I started on the front section and decided to do away with the orginial steering system . I am switching over to foot controlled steering I think . I will have a overhead console for switches and gauges and also a built in console on the door . Nothing in front of the driver but the window ! That should be interesting !!!
I would question the foot control idea???? My experience in rough terrain and snow with foot controls (clutch, throttle and ect) is questionable. As you are tossed around in the cab by terrain conditions, what will happen with your foot controls? Feet are an anchor point to maintain stability in the rough terrain. Hand controls are more flexible and easier to adapt to rough conditions in my opinion. With the little effort required by most hydraulic control systems, hand controls work well.
Many of the newer snow cats use no foot controls. Are they telling us something? Pic below shows no foot controls. The throttle is also dash mounted as dial type gauge. Bar across windshield is to help prevent throwing bodies through the windshield in rough terrain conditions.
Just my opinion and nickels worth..........

BigAl
Gone But Not Forgotten
Lyndon said:A "Hall of Famer" Eh? More like a museum piece or "Hangar Qween". Still the average ST4 has already beat you out just by the mear fact that it has ALREADY traveled more than twice as far. The REAL Snow Cat guys will accordingly issue you a Junior Snow Cat operators permit. If you break down, get stuck or detrack the thing in the first 200 miles you'll have to go in for a Re-Test. Since many of the veteran operators have in the thousands of miles on there machines it's safe to say you won't be catching up to them anytime soon.
If you go way back in my post somewhere you will see that I already give my Junior operators badge and matching hats to "Mouse Ear Mike and Bogus Bob when they had the training wheels taken off their snow cats . It was a great day and everyone but me hugged and cried
 . Mike still gets emotional every time it is mentioned
  .
.Though you may be right about the KT7 becoming a museum piece someday . The Smithsonian Ins. has contacted me about donating the KT7 to them upon my passing . I do not know who or what I am passing and they would not say
 .
.It makes sense that the world would want to keep a perfect engineering example of what a true Snow Cat should be and is for future generations of little snowcatter's.

GOOD MORNING GUY"S & GALS

The coffee is on and the door is open !
BigAl
Gone But Not Forgotten
mtntopper said:I would question the foot control idea???? My experience in rough terrain and snow with foot controls (clutch, throttle and ect) is questionable. As you are tossed around in the cab by terrain conditions, what will happen with your foot controls? Feet are an anchor point to maintain stability in the rough terrain.
Thanks Bill ,
You make some good points . I had considered hand controls but would like one lever on each armrest for track control . I think now I will go back and reconsider . Thanks again as I only want to do this once .
wilkinsn1
New member
mtntopper said:I would question the foot control idea???? My experience in rough terrain and snow with foot controls (clutch, throttle and ect) is questionable. As you are tossed around in the cab by terrain conditions, what will happen with your foot controls? Feet are an anchor point to maintain stability in the rough terrain. Hand controls are more flexible and easier to adapt to rough conditions in my opinion.
I'll have to agree with mtntopper. I've had to drive steep terrains and encountered razorback drifts. It's difficult enough with hand controls, let alone keeping your feet stablized.
By the way Mtntopper, what type of snow-cat in your picture ???
Gary
BigAl
Gone But Not Forgotten

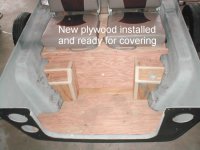
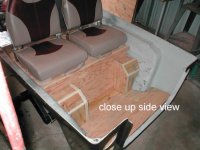
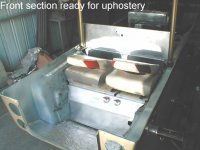
Spent the day putting the new plywood in the front seat area and cleaning up the old aluminum panels . These will all be covered in carpet .
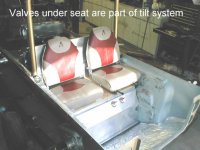
I also set up and installed the drivers seat on a sliding track system and it now has 6 “ of travel .
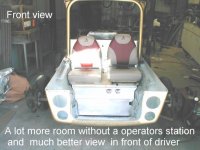
There will not be any operators control station in front of the drivers seat and after reconsidering the foot operated steering system , I have decided to use a hand control steering system . All engine monitoring gauges will be installed in the door or in the corner of the upper cab section .
I think this will make for a very clean looking and modern style operators area . The view should be much better and the KT7 should be very easy to enter and exit .
I will install the 2 oil coolers, Hydraulic tank and the hydraulic valve tilt control tomorrow . At that point it will be time to install all new hydraulic hoses and prepare to fire up the unit . I want to test the mechanics before installing the upper body sections .
Here are a few more pictures as the front interior section takes shape.
Enjoy !
Attachments
BigAl
Gone But Not Forgotten
Good evening Folks , 
Not a lot got done today . Just too many honey do's on the list .
I did manage to get the muffler system reinstalled . Kristi did a very clever thing when they exited the body with the exhaust pipe . They drilled an oversize 2" hole in the body and sandwich a 1 1/2" exhaust donut in between two metal inner and outer plates . The exhaust pipe slides through this and can not contact the body in any way . I've never seen this before but thought it was quite clever .I assume this is orginial and was not added at a later date . I can see this as a great solution for anyone needing to pass an exhaust pipe through a body , be it Snow Trac,LMC,VMC,TUCKER or Kristi . I also cut off the old steel extension exhaust pipe and will exchange this with a new stainless steel one . That should cut down on the rust . As per Snowcat Operations instructions , I will terminate it above the cab to lessen the fear of exhaust gasses .Thanks Mike !!
In another thread , Caroth from *************.Com made a suggestion that I look at an electric cooling fan and a smaller and more efficient altenator which may help to increase horsepower which is badly needed . The altenator is doable but all the Electric cooling fans I have looked at appear to be to deep in size to sandwich between the existing Fan mounting hub and the radiator core . Reversing the electric fan to the front side is also not a option . I have not given up but may just end up keeping the current arrangement for now on the cooling . Thank you Chris for the suggestion .
Mtntopper ??? Does your hydro control on your new snow cat have a brand name . I have not been able to fine one that small yet .Is it custom made ??? I am also looking at just coming up with my own 2 lever design ,but I like yours better !!
So all you fathers out there have a Good Fathers Day tomorrow .
On Monday I'll try to get back on schedule and attempt to get the hydraulic componants hooked back up .
Good Day

Not a lot got done today . Just too many honey do's on the list .
I did manage to get the muffler system reinstalled . Kristi did a very clever thing when they exited the body with the exhaust pipe . They drilled an oversize 2" hole in the body and sandwich a 1 1/2" exhaust donut in between two metal inner and outer plates . The exhaust pipe slides through this and can not contact the body in any way . I've never seen this before but thought it was quite clever .I assume this is orginial and was not added at a later date . I can see this as a great solution for anyone needing to pass an exhaust pipe through a body , be it Snow Trac,LMC,VMC,TUCKER or Kristi . I also cut off the old steel extension exhaust pipe and will exchange this with a new stainless steel one . That should cut down on the rust . As per Snowcat Operations instructions , I will terminate it above the cab to lessen the fear of exhaust gasses .Thanks Mike !!

In another thread , Caroth from *************.Com made a suggestion that I look at an electric cooling fan and a smaller and more efficient altenator which may help to increase horsepower which is badly needed . The altenator is doable but all the Electric cooling fans I have looked at appear to be to deep in size to sandwich between the existing Fan mounting hub and the radiator core . Reversing the electric fan to the front side is also not a option . I have not given up but may just end up keeping the current arrangement for now on the cooling . Thank you Chris for the suggestion .
Mtntopper ??? Does your hydro control on your new snow cat have a brand name . I have not been able to fine one that small yet .Is it custom made ??? I am also looking at just coming up with my own 2 lever design ,but I like yours better !!

So all you fathers out there have a Good Fathers Day tomorrow .

On Monday I'll try to get back on schedule and attempt to get the hydraulic componants hooked back up .
Good Day

mtntopper
Back On Track
BigAl said:Mtntopper ??? Does your hydro control on your new snow cat have a brand name . I have not been able to fine one that small yet .Is it custom made ??? I am also looking at just coming up with my own 2 lever design ,but I like yours better !!

Check out this link below. Let me know if this does not work and I can do more research. My VMC is tarped and in the shop. If you need more info, I can check mine out further and try to get a model number.
http://www.go2marine.com/go2_structure/8/1/2/8/81285F-mi.shtml
BigAl
Gone But Not Forgotten
Hi you all!
Ok , I sobered up , staggered outside and tried to get my tongue unstuck from the roof of my mouth . Hang on a minute … hack.. Cough..
 Spat … yuck ! Ok… thats better !
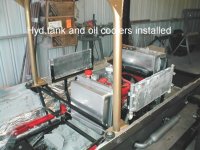
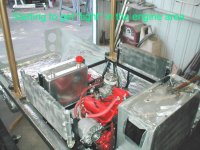
Anyway, got a late start on the hydraulic components , but they are now all installed . The little engine area is getting very full . It is time to load the little bath tub on a trailer and head to the Hydraulic hose shop to start having hoses made . I figure this is easier and better than making 742 trips back and forth to town as I try to get everything in the right length and order . Some of the hoses I have look fairly new , but as hard as they are to get to , I think I better change all of them out to new ones . I sincerely hope I get all these hoses back in the right order .As I said before , hydraulics’ has always been my weakest area . I had hoped to move the hydraulic tank to a new location to free up some room ,but there is just no place to put it without going outside the engine compartment .
This little rig uses two pretty good size oil coolers to cool down the hydrostatic transmission . You can see them in the pictures on each side of the engine compartment . One cooler is a little bigger than the other, so I think the factory may have tried to only use one and then realized they needed two to satisfy the cooling requirements and the excessive heat build up caused by the hydrostatic transmission .
I took a few pictures and other than adding the remote mount engine oil filter ,hydraulic hoses and electrical wiring , I believe this just about completes the engine area .
Have a nice day . I think I will just go stay out of trouble for awhile .
I am sorry Snow Trac Owners ,but I don’t even feel like throwing any insults your way .Maybe tomorrow
Ok , I sobered up , staggered outside and tried to get my tongue unstuck from the roof of my mouth
 . Hang on a minute … hack.. Cough..
 Spat … yuck ! Ok… thats better !
Anyway, got a late start on the hydraulic components , but they are now all installed . The little engine area is getting very full . It is time to load the little bath tub on a trailer and head to the Hydraulic hose shop to start having hoses made . I figure this is easier and better than making 742 trips back and forth to town as I try to get everything in the right length and order . Some of the hoses I have look fairly new , but as hard as they are to get to , I think I better change all of them out to new ones . I sincerely hope I get all these hoses back in the right order .As I said before , hydraulics’ has always been my weakest area . I had hoped to move the hydraulic tank to a new location to free up some room ,but there is just no place to put it without going outside the engine compartment .
This little rig uses two pretty good size oil coolers to cool down the hydrostatic transmission . You can see them in the pictures on each side of the engine compartment . One cooler is a little bigger than the other, so I think the factory may have tried to only use one and then realized they needed two to satisfy the cooling requirements and the excessive heat build up caused by the hydrostatic transmission .
I took a few pictures and other than adding the remote mount engine oil filter ,hydraulic hoses and electrical wiring , I believe this just about completes the engine area .
Have a nice day . I think I will just go stay out of trouble for awhile .
I am sorry Snow Trac Owners ,but I don’t even feel like throwing any insults your way .Maybe tomorrow


 get drunk !