
-
Please be sure to read the rules and adhere to them. Some banned members have complained that they are not spammers. But they spammed us. Some even tried to redirect our members to other forums. Duh. Be smart. Read the rules and adhere to them and we will all get along just fine. Cheers. :beer: Link to the rules: https://www.forumsforums.com/threads/forum-rules-info.2974/
You are using an out of date browser. It may not display this or other websites correctly.
You should upgrade or use an alternative browser.
You should upgrade or use an alternative browser.
Thiokol Imp 1402 OpenTop # 129 by Nikson
- Thread starter Nikson
- Start date
Nikson
Bronze Member
Pro Job ! What kind of training do you have ? You obviously know what you are doing.
Thanks Laurentian,
Not much training - Life has been the best teacher so far I guess... many props to my dad I guess for having me hold a 'wrench' since I can remember, helping him with various stuff in the garage (back in the Soviet times...).
So far my life's hobby has been modding and fabbing various things on my Jeeps... that kept me busy until this thing came along...
")
Stay tuned...
p.s. check out my YouTube channel - it tells a lot about things I do/did...
www.youtube.com/budnixon
Nikson
Bronze Member
You won't regret the upgrade to 30 amp. If you operate at night the lights will be more load than you think. Staying with leds inside helps lower the draw somewhat.
I'm staying LED all around...
but 30 definitely will be an upgrade... paid/ordered/waiting for it now..,
Northcoast
Member
awsome restore,thanks for the great thread ! You are definitly going to enjoy this winter. Can't wait to see the finished product in the snow.
Nikson
Bronze Member
awsome restore,thanks for the great thread ! You are definitly going to enjoy this winter. Can't wait to see the finished product in the snow.
Thanks... will definitely keep that updated and videos on youtube...
Nikson
Bronze Member
had rear end prepped for paint...

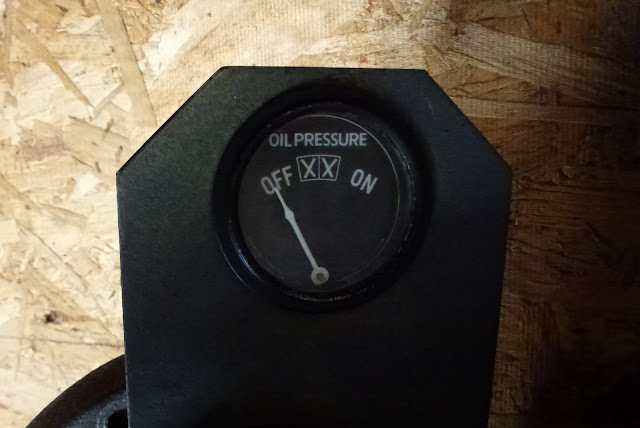
gauges... hmm... they supposed to be working, but I guess will need to add couple more to the dash.

one of the inner sleeves on the brake lever was missing, and a different size bolt was used.
I dropped by a local AutoParts store and picked up an alternator spacer that is a perfect fit, just needed to be cut down to the right length.

fits perfect for the 1/2 inch bolt opening, no all I need is to grease it up and good to go.

next on the list was rear end frame mounts.
front one seemed to be simply ripped out of the frame, so had to get up in to an easily accessible pose so to speak... I called it the "doggie style" LOL

not sure how well pictures actually show the damage...

after few minutes of TLC with a cutting wheel...

seems that most of the metal is still in tact and not to deteriorated/rusted.
will be reinforcing it with some 1/4 inch flat bar... will give it plenty of support for next few dozen years...

gauges... hmm... they supposed to be working, but I guess will need to add couple more to the dash.
one of the inner sleeves on the brake lever was missing, and a different size bolt was used.
I dropped by a local AutoParts store and picked up an alternator spacer that is a perfect fit, just needed to be cut down to the right length.
fits perfect for the 1/2 inch bolt opening, no all I need is to grease it up and good to go.
next on the list was rear end frame mounts.
front one seemed to be simply ripped out of the frame, so had to get up in to an easily accessible pose so to speak... I called it the "doggie style" LOL
not sure how well pictures actually show the damage...
after few minutes of TLC with a cutting wheel...
seems that most of the metal is still in tact and not to deteriorated/rusted.
will be reinforcing it with some 1/4 inch flat bar... will give it plenty of support for next few dozen years...


Laurentian
New member
Nice work !
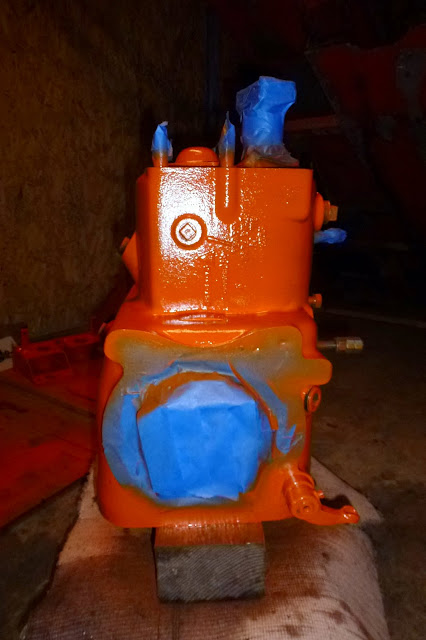
I'm surprised you put bedliner on the diff and then finish paint. Does the bedliner dry up hard or does it stay plyable ? I would of just went with primer and then two coats orange enamel. Not being a pest, just have not seen this before is all.
I'm surprised you put bedliner on the diff and then finish paint. Does the bedliner dry up hard or does it stay plyable ? I would of just went with primer and then two coats orange enamel. Not being a pest, just have not seen this before is all.
Nikson
Bronze Member
Nice work !
I'm surprised you put bedliner on the diff and then finish paint. Does the bedliner dry up hard or does it stay plyable ? I would of just went with primer and then two coats orange enamel. Not being a pest, just have not seen this before is all.
No probs...
What i've found in my personal practice is that this bedliner stuff is really "sticky"... in most cases on my Jeep bumpers/sliders, etc., I dont have to use primer, just prep it well with denatured alcohol...
bedliner dries up well, and has a little "tar-like" feeling to it, it doesnt crack, and holds onto the surface real well.
any paint over the bedliner usually sticks well too, thus is my way of applying the orange on top of the black...
Now that was my common practice on the Jeeps, will have to see if the cat is any different.
Nikson
Bronze Member

Laurentian
New member
I'll have to look into this for my '86 Toyota SR-5 truck !
Will try it on some undercarriage and see
Will try it on some undercarriage and see
Nikson
Bronze Member
I'll have to look into this for my '86 Toyota SR-5 truck !
Will try it on some undercarriage and see
Yep, should work just fine.
Talked to my mechanic, he said that in 80's Toyota put a 1.6l diesel into RWD Corollas n Tercels,
I'm thinking it would be a perfect setup for my engine swap in the Imp.
Laurentian
New member
Did you ever consider a 1.6D VW ? Non turbo, 52 HP. We have many in Canada and they go 250 - 500 complete with tranny. I drive MKII diesel VW's as dailys. Parts are easily available and there is nothing cheaper
to maintain.
http://www.vwdiesel.net/
to maintain.
http://www.vwdiesel.net/
Nikson
Bronze Member
Did you ever consider a 1.6D VW ? Non turbo, 52 HP. We have many in Canada and they go 250 - 500 complete with tranny. I drive MKII diesel VW's as dailys. Parts are easily available and there is nothing cheaper
to maintain.
http://www.vwdiesel.net/
I have been extensively researching on diesel options for my Wrangler, would like to get a little more torque to spin my 35s, n hopefully pull a heavier expo trailer.
As far as for cat, thinking that may be even Wisconsin engine will be enough, i dont plan to race or spin the tracks
I guess time will show...
Nikson
Bronze Member
8lb 6oz, 19 1/2 in. tall... that sounds like a keeper.
Congratulations....
Mike
What he said! Congrats.
Thanks felas,
She sure is a keeper, everything being great... My kids have been best, I sure cant complain about it.
Anyways, finished up the frame work today, got the rear end test fitted, everything checked out well.
just got to finish up cosmetics at this point, and get everything put back together, so I can get the tracks on and get the engine running...
Been an awesome & tiring project so far... but cant complain...

Nikson
Bronze Member
Re: frame repairs
Got the frame repaired over the weekend, front mount is in place now...

gone with 1/4 inch flat bar for the most support in this area...
wrapped it up and ran joints from 1/8 angle pieces to join up with the rest...


something like this...

I know its not "perfect" per say... but it sure is pretty sturdy, and I believe should hold up for another 50+ yrs

welding it from inside wasn't easy... but God has blessed me with 170lbs...

test fitted the OC-4
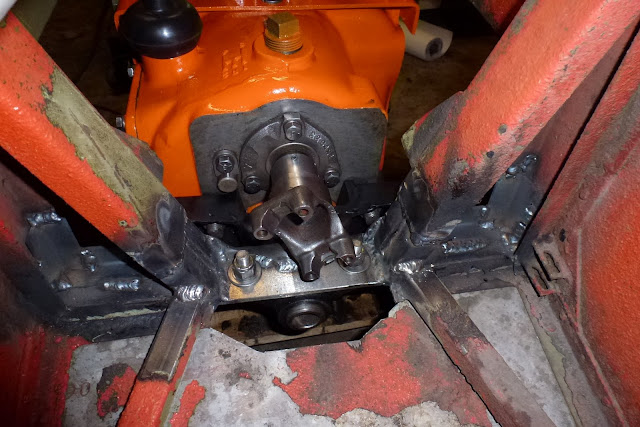
seems like there is no rubbing and everything should hold up just fine...
Thanks to Nancy @ SpryteImprovement... got the boots for the slave cylinders & the shifter... should keep the gunk away...

Bottom all painted and ready to be put together...

once these guys are joined up... and put together, put back process will start up...
I guess long weekends and nights in the garage are paying back after all...

Got the frame repaired over the weekend, front mount is in place now...
gone with 1/4 inch flat bar for the most support in this area...
wrapped it up and ran joints from 1/8 angle pieces to join up with the rest...
something like this...
I know its not "perfect" per say... but it sure is pretty sturdy, and I believe should hold up for another 50+ yrs
welding it from inside wasn't easy... but God has blessed me with 170lbs...
test fitted the OC-4
seems like there is no rubbing and everything should hold up just fine...
Thanks to Nancy @ SpryteImprovement... got the boots for the slave cylinders & the shifter... should keep the gunk away...
Bottom all painted and ready to be put together...
once these guys are joined up... and put together, put back process will start up...
I guess long weekends and nights in the garage are paying back after all...
Snowtrac Nome
member formerly known as dds
he's going to get that thing done before Big Al gets his krusty done
Nikson
Bronze Member
he's going to get that thing done before Big Al gets his krusty done
Plan is to have her ready or this winter...
Engine got put in today, some of the wheels with most of the leafs...
Almost ready to try the first start!!!

Nikson
Bronze Member
Re: wiper motors
These needed to be checked out.
After shopping around and seeing whats out there, decided it might be cheaper to get these back to life.
They are 1965 afterall...

not to bad for something half a century old... they knew what they were doing back than...

the numbers on the wheel - I guess they stand for the DEGREE the wiper arm will move???
if anyone knows otherwise, feel free to correct me.
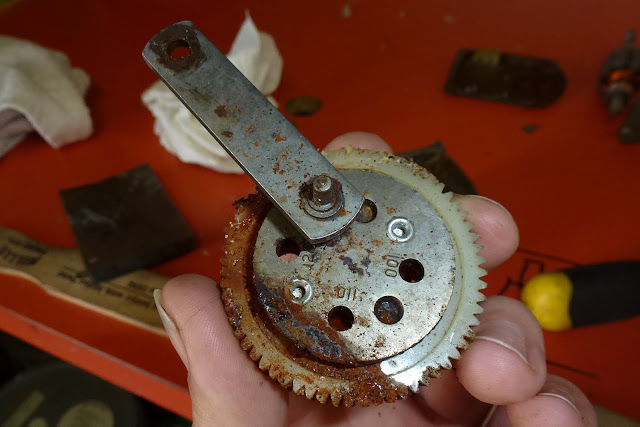

there was no movement what so ever when I connected the wires and turned on the switch... I guess the rust soft of explains why...
some WD-40 and elbow grease... we have a mechanically functioning wipers...

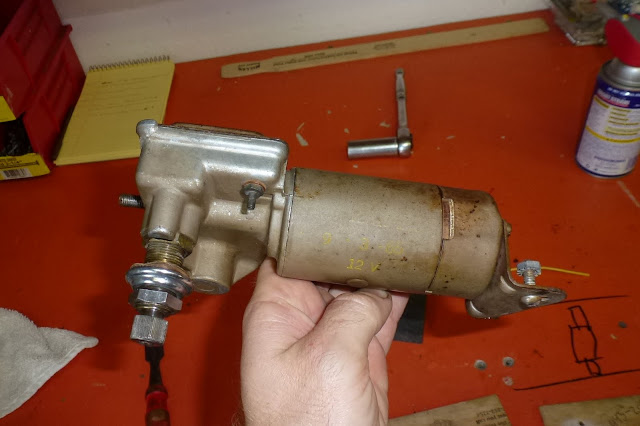
I figured just leave them with the factory paint and let them run this way to keep it all stock as much as possible.
Anyone knows what brand/make/model wiper arms will fit these???
These needed to be checked out.
After shopping around and seeing whats out there, decided it might be cheaper to get these back to life.
They are 1965 afterall...
not to bad for something half a century old... they knew what they were doing back than...
the numbers on the wheel - I guess they stand for the DEGREE the wiper arm will move???
if anyone knows otherwise, feel free to correct me.
there was no movement what so ever when I connected the wires and turned on the switch... I guess the rust soft of explains why...
some WD-40 and elbow grease... we have a mechanically functioning wipers...
I figured just leave them with the factory paint and let them run this way to keep it all stock as much as possible.
Anyone knows what brand/make/model wiper arms will fit these???
Nikson
Bronze Member
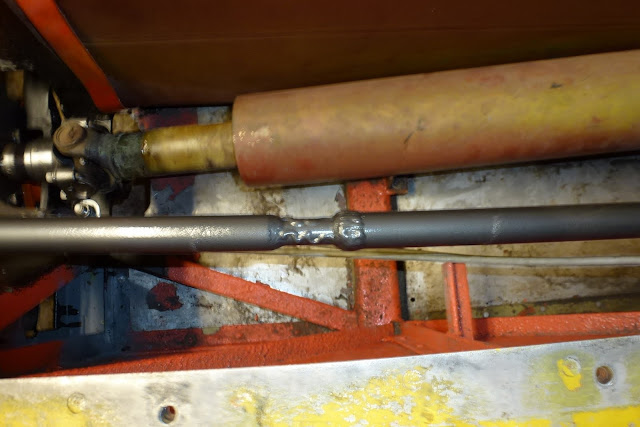
Re: rear end
once rear end got put back where it was supposed to (see previous posts about frame work), I got the rest of the drivetrain (driveline, brakes, etc) reconnected...
came up to one problem thou...
the gear shifter didnt align right, and it would shift as smooth as it was before all of the work on frame...
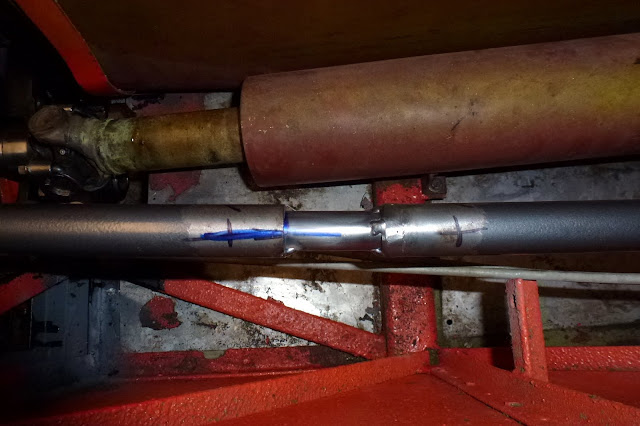
when I painted the gear shift rod, I noticed there was a weld about the middle of the rod, which sort of made me wonder "WHY" would a factory weld their rods...
wouldnt they just cut to the right size off the shelf for all of these? or was there a guy running around with a tapemeasure, trying to see what length rod tube he needs to cut for the next machine...
so I came up with "my" explanation of the weld mark on the rod...
Since the front mount got broken while back, probably previous owner didnt want to mess with the whole labor of taking it apart and redoing it the right way, since there was no WAY it would shift right when the axle was +/-2 inches forward... so they probably shortened it... and now I had to fix what they had broken...
Well... not much work here...
looked in the garages metal pile, found a piece of tube that would fit snugly inside the shift rod... measure it to where everything would be centered... welded it up... and now we are set to PERFECTION...
p.s. had to get a little personal there...


WHEELS ON... DUDE...

once rear end got put back where it was supposed to (see previous posts about frame work), I got the rest of the drivetrain (driveline, brakes, etc) reconnected...
came up to one problem thou...
the gear shifter didnt align right, and it would shift as smooth as it was before all of the work on frame...
when I painted the gear shift rod, I noticed there was a weld about the middle of the rod, which sort of made me wonder "WHY" would a factory weld their rods...
wouldnt they just cut to the right size off the shelf for all of these? or was there a guy running around with a tapemeasure, trying to see what length rod tube he needs to cut for the next machine...
so I came up with "my" explanation of the weld mark on the rod...
Since the front mount got broken while back, probably previous owner didnt want to mess with the whole labor of taking it apart and redoing it the right way, since there was no WAY it would shift right when the axle was +/-2 inches forward... so they probably shortened it... and now I had to fix what they had broken...
Well... not much work here...
looked in the garages metal pile, found a piece of tube that would fit snugly inside the shift rod... measure it to where everything would be centered... welded it up... and now we are set to PERFECTION...
p.s. had to get a little personal there...
WHEELS ON... DUDE...
Nikson
Bronze Member
Re: Engine Start - VH4D
Saturday was truly an epic day... Engine Start day...
Wisconsin VH4D took 4 quarts of oil...
Clutch behind the engine - 1/2 qt (pint)
Air Filter - oil topped off (just engine oil)
Rear end - gear box - 2 qt (50W)
Rear end - brakes/R&P - 4 qt (50W)
Brake lines bled... all seem to be working fine...

Talked to Tim in PA, he advised (over the phone) how to set timing properly. Did that...
So, just all basically was done per what VH4D manual says... timing marks... wires... distributor... etc...


some of you gonna say... "So it started on the first crank???"
of course not... keeping in mind that all fuel lines, pump, carb... etc... where dry and cleaned out... I had to crank it for couple of minutes...
once the lower (aftermarket) - see through filter got some fuel in it...
she started right up... I was pretty impressed by the smoothness of the engine.
and VIDEO...
[ame="http://www.youtube.com/watch?v=98jxU6CirSM&feature=plcp"]Wisconsin VH4D start - YouTube[/ame]

Saturday was truly an epic day... Engine Start day...
Wisconsin VH4D took 4 quarts of oil...
Clutch behind the engine - 1/2 qt (pint)
Air Filter - oil topped off (just engine oil)
Rear end - gear box - 2 qt (50W)
Rear end - brakes/R&P - 4 qt (50W)
Brake lines bled... all seem to be working fine...
Talked to Tim in PA, he advised (over the phone) how to set timing properly. Did that...
So, just all basically was done per what VH4D manual says... timing marks... wires... distributor... etc...
some of you gonna say... "So it started on the first crank???"
of course not... keeping in mind that all fuel lines, pump, carb... etc... where dry and cleaned out... I had to crank it for couple of minutes...
once the lower (aftermarket) - see through filter got some fuel in it...
she started right up... I was pretty impressed by the smoothness of the engine.
and VIDEO...
[ame="http://www.youtube.com/watch?v=98jxU6CirSM&feature=plcp"]Wisconsin VH4D start - YouTube[/ame]
Last edited:
Nikson
Bronze Member
Re: Front/Rear cab...
work cant stop now!!! - as most of you will say...
well, I could have an extra $10k to spend, and no responsibilities during daytime, but men has got to do, what men has got to do...
afterall, if we had all the money in the world, life would be boring, since we would not be able to set a goal that we could have much fun reaching...
anyways....
cut up the rear bed part... and started taking off the aluminum sheeting for the new cab... what will come of all of this - only God knows, since I dont have any game plan for this...
All I know is that I want a cab in the rear for my gear, and seating for 4 more people max...

Looks kind of funny without that rear bed, ha...?


work cant stop now!!! - as most of you will say...
well, I could have an extra $10k to spend, and no responsibilities during daytime, but men has got to do, what men has got to do...
afterall, if we had all the money in the world, life would be boring, since we would not be able to set a goal that we could have much fun reaching...
anyways....
cut up the rear bed part... and started taking off the aluminum sheeting for the new cab... what will come of all of this - only God knows, since I dont have any game plan for this...
All I know is that I want a cab in the rear for my gear, and seating for 4 more people max...
Looks kind of funny without that rear bed, ha...?
Helmsman38
Member Formerly Known As Kristi KT7
Can you make it to the Snow Cat Jamboree in Washington this Jan ?
Nikson
Bronze Member
Can you make it to the Snow Cat Jamboree in Washington this Jan ?
might be a bit of a long drive for me...
but i'll think about it.
whats the plan during that time?