• Please be sure to read the rules and adhere to them. Some banned members have complained that they are not spammers. But they spammed us. Some even tried to redirect our members to other forums. Duh. Be smart. Read the rules and adhere to them and we will all get along just fine. Cheers. :beer: Link to the rules: https://www.forumsforums.com/threads/forum-rules-info.2974/

Kristi KT7 restoration pictures

bczoom said:
GP,

I guess it depends on what your plans are for this light. For spotting wildlife, I find a handheld works better. If the game is moving, it's very hard to track with those electronic ones.

Those are kind of a bugger on uneven terrain since you need to change the up/down while you pan left/right.

I hav'nt planned on using it for spotlighting critters, but that is a option . My main use is to be able to adjust the light as I am hooking up to a stuck Snow Trac in a Soybean field .

Just got finished laying out the consoles for all the gauges ,switches,:blahblah: :blahblah: :blahblah: . I think I have a pretty workable plan now . I then went ahead and checked and replaced as necessary the panel lights for the gauges .

I have a question ??? If I hook up the hour meter backwards on the electrical ,will the meter run backwards or just short out ??? It is showing 64 hours and it does work, but I would like to run it back to zero .

Tying the intercom into the AM/FM/CD radio looks like it may be a challenge . It could end up being a "3 Drink Minimum":burp:


So this is where I stop for 2 weeks while I head back tomorrow to Idaho.

The little lady and myself have decided to have a "Country Thanksgiving" at the Ranch and enjoy the Elk herds and Deer before they move out for the winter grounds .

To all of You .
"Happy Thanksgiving"
This has been a interesting year and I personally have so much to be Thankful to the "Good Lord" for . May the "Good Lord" bless you all and keep you and your families safe...
So mote it be
 
BigAl said:
I have a question ??? If I hook up the hour meter backwards on the electrical ,will the meter run backwards or just short out ??? It is showing 64 hours and it does work, but I would like to run it back to zero .

I cant say for sure, but...

This one time we had rented a motorhome, and ya only get so many miles per day and the generator is charged by the hour.

OK, so this is a later Ford unit, so I call my buddy who worked for Ford and asked about disconnecting the speedo... "nah, dont do it, nothin's gonna work right, the only thing that might work is put a switch in the circuit so when ya get the thing up to cruising speed then you could turn it off, and that might not work either"

OK, scratch the speedo idea... so I look into the hour meter for the generator. Pry off the panel over the microwave.... first I reversed the wires...Hmmm, thats odd the generator died, WTF did I just do?....OK, blown fuse on generator (outside under motorhome) note to self, dont do a hot swap with the unit running.
Try again , making my connections with everything off...no deal, blows fuse again...

5 or 6 fuses later...

Ended up just disconnecting the hour meter and connecting the wires together, I think...

Saved a whole 20 bucks:pat: probly spent $5 in fuses

Eric
 
Big Als snow suit for Yetti:yum: :D :wave: :moon:
 

Attachments

  • pinkvader[1].jpg
    pinkvader[1].jpg
    26.6 KB · Views: 311
mbsieg said:
Big Als snow suit for Yetti:yum: :D :wave: :moon:

That is absolutely ridiculous ! Everyone knows my suit has a picture of me on the chest as I am my favorite super hero and it is lavender .

I have been up here at the ranch over the Thanksgiving holidays .So about Monday should find me getting started again on Yetti .We have received snow almost every day . The Elk are really working over the hay bales I placed out for them , 5 tons of hay and I believe it will be gone in another month.
 
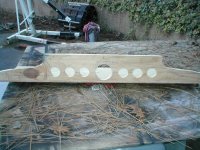
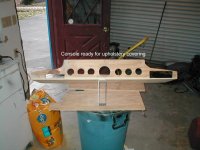
Finally got the back to ease up a bit and did a little work on the overhead console . I used 1/2" & 3/4" plywood to build the frame . Small wooden hardwood blocks were fiberglassed to the inside of the cab to support the frame work.
All switches, radio's and Gauges were laid out with a pencil and square to find problems before cutting holes . Lastly I used a hole saw and a jig saw to make my cut outs . This be be covered in fleece before gauges , radio's , etc. are installed .
I also use Elmer's glue with wood screws to fasten the two pieces together . This is the best glue I have ever used !!!It is sandable and expands to fill voids as it dries . More tomorrow.

Heres a few pictures in progress
 

Attachments

  • console.jpg
    console.jpg
    93.4 KB · Views: 267
  • console1.jpg
    console1.jpg
    85.3 KB · Views: 262
  • Elmer's glue.jpg
    Elmer's glue.jpg
    34.4 KB · Views: 264
Al, is that glue a polyureathane (sp?) glue? If so, it is great stuff. Waterproof and stronger than the wood it joins.

How are you going to fasten the overhead console to the top of the cabin?

Just from the standpoint of weight, had you considered using sheet aluminum or even steel? I suspect either would have weighed less than wood, but then again wood is pretty simple to work with and shape and if you are not adding too much to other areas then the overall weight gain would not be a big deal.

I was going to work on my Snow Trac today, but I got a call to go to Hooters for some beer this afternoon and, well, I have my priorities in line. Maybe the wiring on the ST4 will be done tomorrow?
 
Hi Bob ,
Yes it is that new glue you mentioned . Best damn stuff I ever worked with !
The console is pretty light weight ,maybe 2 or 3 pounds total . I used hardwood blocks ,glassed to the inside of the body to secure the console in place .
I went ahead and cut the radio,speaker, and light holes after the picture was taken . I should finish it all up tomorrow and have the covering and gauges installed .
I have made it one piece with quick disconnects so it can be removed easily .
 
Hi All:tiphat: ,
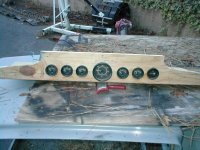
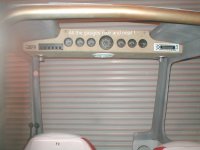
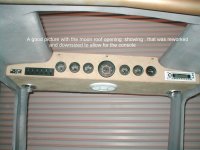
Well the console is installed :thumb: . With the help of the little lady it went quite well . She helpped me with the fleece covering and holding it in place as I screwed in the stainless steel wood screws . I think it turned out better than expected . :5boobs:
I guess my next adventure is to build the arm rest which will house 1 cup holder on each side along with throttle,choke and engine switch on the operators side . Don't quite know what it is going to look like until I get going on it :confused2:

Heres a few pictures
 

Attachments

  • console 001.jpg
    console 001.jpg
    101.6 KB · Views: 257
  • console 002.jpg
    console 002.jpg
    83.8 KB · Views: 257
  • console 003.jpg
    console 003.jpg
    97.1 KB · Views: 250
This overhead console contains my AM/FM/CD radio , Intercom radio , 2 overhead lights ,1 stereo speaker , all the engine gauges including hour meter and a 6 switch light illuminated "center" for all the add on stuff .
I will get a name plate made up at the trophy shop with all the switch functions engaved on it .
 
Only BigAl would have a cup holder on both arm rests so he could double fist the Dr.Rums:burp: but only install one STEREO speaker. I guess if all your going to do is listen to crackly old am/mono radio and the weather channel it will all sound just the same.:pat:
 
mlang2005 said:
Only BigAl would have a cup holder on both arm rests so he could double fist the Dr.Rums:burp: but only install one STEREO speaker. I guess if all your going to do is listen to crackly old am/mono radio and the weather channel it will all sound just the same.:pat:

Come on you guys !!!!:pat: Do I look and think like Bogus Bob ???:confused2: The KT7 is about 5 feet wide in the front cab, but 13 feet long . Kinda makes sense to put the second stereo speaker in the back huh !!!!! Good Greif ! Do I look like a snot trac owner ..........:horsepoop: :horsepoop: . Besides each set of headphones will have the stereo music piped through them . Think of the KT7 and the extra speakers as a boom box .When I get to where I am going .... Crank it up ,throw some Elk steaks on the ole barby and pour me a cold one . Maybe a little Nitty Gritty Dirt Band ??? :a1: Where its still ok to Rock and Roll .:rock: :rock: OH YEA... WE BAD !!!
 
mlang2005 said:
Tried one of those yesterday for the first time
It's a nice mix.

I would propose that the combination of Dr. Pepper and Captain Morgan be changed to Captain Pepper. He then out-ranks Sgt. Pepper and if in the Navy, will most likely outrank Dr. Rum.:cool2:
 
bczoom said:
Tried one of those yesterday for the first time
It's a nice mix.

I would propose that the combination of Dr. Pepper and Captain Morgan be changed to Captain Pepper. He then out-ranks Sgt. Pepper and if in the Navy, will most likely outrank Dr. Rum.:cool2:

Hey be careful there boys !!! That drink is one of my best kept secrets . Don't be changin the name or I won't know how to mix it . And the Dr. part of the name makes it sound more like a medience , which I need on a daily basis .:burp: .

OK On with the SHOW !!!!!

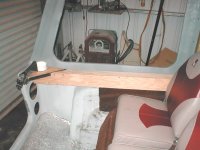
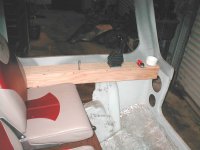
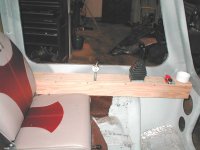
I eventually made my way to the shop to work on them there arm rest .I didn't really know what I wanted so I just started cuttin out plywood pieces . Did you know a electric jig saw can poke your finger about 500 times before you can let go of the trigger ??? Man that hurts Too!!! Never Drink and jig saw at the same time !!!!

Anyway ,I think I came up with a pretty basis design I like and it also gives me a wire chase to run any wires inside it . Take a look and let me know what you think . These will be carpeted and the cup holders will then be set in place . I also realize that the bottom of the armrest will need trimming to allow for the headlite covers to be installed.

And before you ask ..... Yes Bob , they are PVC end caps for 2 1/2" pipe .

The little dude with the hat was just sittin around and wanted in the picture !
 

Attachments

  • arm rest 001.jpg
    arm rest 001.jpg
    97.3 KB · Views: 230
  • arm rest 002.jpg
    arm rest 002.jpg
    87.5 KB · Views: 229
  • arm rest 004.jpg
    arm rest 004.jpg
    86.3 KB · Views: 225
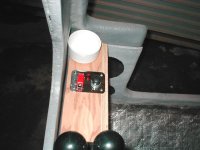
Here's a shot of my engine start set up . It is on the operators arm rest . I will also add the throttle and choke here too .I did not want any key to start my rig . :confused2: I lose stuff real easy and i don't feel like crawlin around in the snow looking for keys which eats up a lot of valuable Drinkin time .
 

Attachments

  • arm rest 003.jpg
    arm rest 003.jpg
    92.2 KB · Views: 225
Poobah,

A couple questions/thoughts.
I don't recall if there's a center console. If there is, does it have an arm rest? If so, is it the same height? It seems uncomfortable when you get in a vehicle and the armrests are at different heights.

For the steering controls, I assume you're going to be resting your arm/elbow on the armrest for stability and to reduce fatigue on your arm. Is it pretty comfortable or does the rear of the drivers armrest need something higher so you can rest your arm?

Big Boom
 
Good morning Boomer ,
The steering controls are automatic centering and will return to the neutral position anytime they are released . There is no console between the operator and passenger .I got in Yetti and tried the heigth of the arm rest a few times and it seems all right :confused2: . Maybe I can just rest my arm on my new travel mug :confused2:
 
Just returned from Sacramento picking up the new track belting . With the tool to punch the holes it came in right at $1000 . Does anyone know if the old Flexco fasters are reusable?? I am going to use channel design steel instead of straight square bar stock for the protectors over the wood cleats . I am checking into getting cold rolled steel which should be stronger . I figure it would protect the cleats more if the steel extended down the sides . It will require some routering on the side of the new cleats ,but I think it will be better . Has anyone ever tried using a power punch to make the holes ??? My friend has a machine that will pop holes right through 3/4 steel so I wonder if it would work ???
 
BigAl said:
I am going to use channel design steel instead of straight square bar stock for the protectors over the wood cleats .
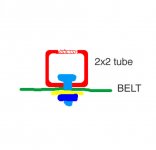
Ok this might be a totally silly question but what about using square tube steel instead of wood with a c-channel over the top of it?

Seems you could use something like 2" square tube, it would have rounded edges so it would not cut into the rubber. Your buddy with the machine shop could drill a large enough hole in one side to get a socket though and a smaller hole in the other side to get the bolt through.

Forgive my feeble attempt at artwork, but in the attached drawing, the green represents the belting, the yellow would be a flat backer plate, the light and dark blue would be a bolt/nut. Red is a piece of square steel tube, figure a 1.5" diameter hole on one side, and a 3/8" hole on the other side? Just a thought. . .
 

Attachments

  • grouser.jpg
    grouser.jpg
    14.5 KB · Views: 192
I see two problems with the round corner steel against snow. It will not bite and hold on ice or hard pack snow conditions. Bob's design will weigh more than the poor little VW or little Ford can handle when all of the 2X2's square tubes are packed full of snow and ice. The wood will bite the snow much better than a steel covered piece of wood and will require significantly less HP to turn the tracks......:hide: Just my .03 for what it is worth.....
 
Bill, you are correct that it would not grip on ice, no arguement from me. But then again, I figure that this is BigAl's snowcat so really it just has to make it out of the garage and up a ramp onto his trailer.

If it gets any farther than that I think there would be a celebration.:dancing:

Now as to the original design, it actually is pretty sound. It is a tapered piece of hardwood, trapazoid shaped, wider at the belt side and about 1" wide away from the belt. There is a flat piece of bar stock covering the wood with bolts that are left exposed. The bolt heads would provide good grip on ice, the steel bar stock would also serve as a cutting edge on ice.

The only weak link would be the wood. Perhaps it could be replaced with plastic.:confused2:
 
I am thinking of taking Plastic lumber and planning it down to the exact shape and size of the original wood cleats . Whatta you think ???:confused2: Will the plastic hold up ? Something like the TREX decking they use on house decks .
 
B_Skurka said:
Bill, you are correct that it would not grip on ice, no arguement from me. But then again, I figure that this is BigAl's snowcat so really it just has to make it out of the garage and up a ramp onto his trailer.

If it gets any farther than that I think there would be a celebration.:dancing:

If his ramps are metal, I hope his cleats are wood or he may not even make it up the ramp on to the trailer.

I went up the slight angled steel ramp on my trailer Saturday and slid the LMC right back to the ground. :eek: Steel on wet steel is like vaseline on a mirror, if it is even slightly wet or snowy. I went to town today for trailer modification materials....That is not going to happen next time. It was kind of fun backing up and hitting the ramps with enough speed to overcome the steel on wet steel and still landing on the trailer deck...If the wife would of seen the show, I would probably be grounded now..:yum:
 
BigAl said:
I am thinking of taking Plastic lumber and planning it down to the exact shape and size of the original wood cleats . Whatta you think ???:confused2: Will the plastic hold up ? Something like the TREX decking they use on house decks .
I am unsure about the TREX stuff, it is a composite of sawdust and resin. It is not designed for any stress loads, bearing, etc. It can be used for decking but I'm not sure if your application would be a good one. It might be, but I just don't know.

I'd consider a UV stabilized nylon or some other material that would hold up to very cold temperatures and water/freezing/thawing. I actually talked to my buddy with a machine shop about something similar for my Snow Trac. He pulled out some books and rattled off material types that were appropriate but I honestly don't recall what they were. I do recall that I could buy the material in sheets like you buy plywood, and it came in various thicknesses from very thin to very thick slabs and it could be cut with a table saw.
 
B_Skurka said:
He pulled out some books and rattled off material types that were appropriate but I honestly don't recall what they were. I do recall that I could buy the material in sheets like you buy plywood, and it came in various thicknesses from very thin to very thick slabs and it could be cut with a table saw.
Sounds like it could be UHMW or VHMW... bad news if ya ask me, if ya want slippery, just coat it with grease and save the $$

check Mc Master Carr and search UHMW... I had issues so I couldn't paste a link.... I'm not sure if its Firefox or Mc Master.
 
Do you have a pic of the wood cleats you want to protect? How tall are they?

I have a thought that consists of using rubber stall pads (for horses and cows). The rubber is 1" thick and can handle anything you throw at it. Not sure if these pads, cut into strips could do something for you. Maybe put strips on either side of the cleats. The rubber would give you the needed traction on steel or ice.
 
Boomer ,
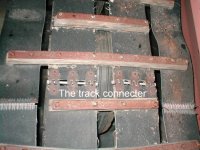
I know the rubber mating material you are refering too . I do not think it would work . Here is a picture of the original track set up from kristi . All I want to do is extend some steel protection down the sides of the cleats . that is why I thought of using channel . I also believe channel would have less chance of bending as some of these straight steel bars have . I guess I can always use Oak cleats , if nothin else . To bad I cannot import some Nespero wood out of Panama . Nothing can hurt that stuff !!!
 

Attachments

  • kristi KT7 014.jpg
    kristi KT7 014.jpg
    100.8 KB · Views: 274
bczoom said:
Would Uni-Strut channel work? :confused2:

I'm not familar with that:confused2: . I can get the channel at cost and I do believe it would outlast the flat bar .
 
BigAl said:
I'm not familar with that.
It may be worth checking out.
www.unistrut.com

In the top bar, click on products then select the width you want (1-5/8", 1-1/4" or 13/16"). Although not in the pics, they make it with holes pre-set in the stock. For an idea, they have some pictured in their fiberglass stock.

Actually, looking around their site, it's kind of lame. Do a google search for the product and you'll see all kinds of other accessories. If it doesn't work for the KT-7, it'll work nice in the shop.
 
Top