• Please be sure to read the rules and adhere to them. Some banned members have complained that they are not spammers. But they spammed us. Some even tried to redirect our members to other forums. Duh. Be smart. Read the rules and adhere to them and we will all get along just fine. Cheers. :beer: Link to the rules: https://www.forumsforums.com/threads/forum-rules-info.2974/

Kristi KT7 restoration pictures

Today I ordered up the GPS unit and the AM/FM/CD radios from Cabela's for "Yetti"

After looking at about a million different GPS units ,I decided to go with a detachable "portable" unit made by "Garmin" .It is just a simple "60" series ,non color screen, but I believe it will do all functions I will require very nicely . I also ordered a Garmin Mapsource"USTopo" to go with it . It will be dash mounted in its own carrier . That way I can transfer it between the different snowcats as I need it .

The AM/FM/CD stereo is a "Jensen CPM 505" made for boating and wet conditions so it should handle the rougher conditions and moisture it will be exposed too .

Tomorrow I will order the intercom system .

Hey ! Were gettin closer each day to finishing !!!:respect:


:tiphat: Enjoy your day !!!
 
Hi BigAl:yum:
I have owned and used both the black/white and color. Once you go colored you will never go back to the black/white. It is much easier to see and read in different light conditions. Mine have all been Garmin and I also utilize the topo series CD for various mapping applications.

But again if you can not get out of the parking lot, why do you need a GPS? Oh, I guess you can make your transport trailer home and you will always know where to walk to when the Kristi won't run or is stuck.:yankchain: :yum: :whistle: :moon: :rolleyes: Maybe a periscope might be a better idea......
 
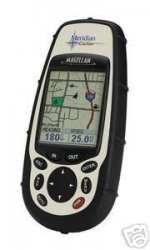
Allen, all jokes aside, once you go color you'll never switch back to a B&W display for the GPS unit. I have a small Magellin Meridian Color unit, it was fairly inexpensive and has the optional dash mount, and car power cord too. All combined I think I probably paid about $350 for everything. I've used it in a couple different cars as well as off road and even hand-held in the sunlight and been able to read the screen even in direct sun. Garmin also makes compact color units.

I would say any of the brands is probably good, but color makes a real difference in usability of any of them.
 

Attachments

  • fd_1.JPG
    fd_1.JPG
    10.7 KB · Views: 229
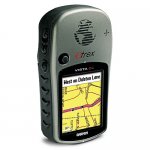
Al, here is an example of what I have been using (Garmin Etrex Vista CX). You can buy it for under $300.00 for the base unit. It will be easy for you to carry while walking or you can set it up to work in the snow cat as long as it can see the sky. Go for the color screen if you can as it will be much easier to see in all conditions.
View attachment 6353
 

Attachments

  • 0075375904918_500X500.jpg
    0075375904918_500X500.jpg
    51.5 KB · Views: 220
Thanks Guy's
Since I never owned one before , I never thought about a color screen . I just replaced my order with Cabela's .

Bill , I just reordered the same one you have .
Thanks Allen
 
BigAl said:
Thanks Guy's
Since I never owned one before , I never thought about a color screen . I just replaced my order with Cabela's .

Bill , I just reordered the same one you have .
Thanks Allen
I think you made a good choice and I doubt the cost upgrade will take too much of your beer money away. :burp:

I don't think the Meridian Color that I own is still produced.

I liked it for use in a car because the buttons are on the face of the unit making it easier to use while driving. The Garmin unit is probably a better unit, certainly more popular, with software that is as good or better than the Magellin software. I simply didn't like the buttons on the side, it relies on feel/tactile recognition over visual recognition. I'm sure it is easy to use, it just wasn't my preference for a vehicle mount, I am very picky about ergonomics and while driving I wanted the ability to see the buttons rather than having to feel them. I will admit that for a hand held unit, the ergonomics of the Garmin are probably better while walking with the unit in your hand.

Damn I over-analyse things :pat:
 
Evening Folks ,:tiphat:
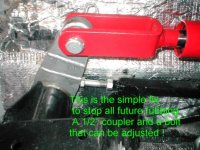
Today saw the first scratch in the Yetti :eek: ! The Clam shell housing on the hydraulic tilt was able to go past its intended stop point and scratched the body . It will be a simple fix to repair the scratch ,but it just shows a perfect example of Kristi engineers and designers and how stupid they could be !!! It would have been so simple to install a adjustable stop so this could never happen:confused2: . After this happened , I went looking at all three of my Kristi’ s and realized all three are damaged by the Clam shell housing moving to far:pat: . A simple ½ coupler and a 3½“ bolt solved the whole damn problem on my KT7 :thumb: !!! Maybe this is one reason why Kristi folded up !!! Sloppy work :confused: !!!

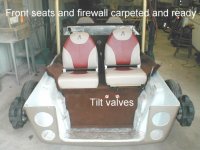
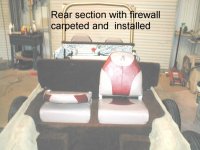
I also carpeted out the front seat area and fire wall today . The whole engine compartment is now completely surrounded by 3/8” foil “Class A fire rated insulation” with carpeting over that . That should help make it nice and quiet .

I also installed a master shut off switch between the seats to shut down all electrical power to the Yetti .


Tomorrow should see the ordering of the Steering control system and also the Intercom setup .


God Bless America , Happy 4th to all !
 
Hi Al,
First of all, Happy 4th of July to y'all!

After much research and internet consulting, I think I have come up with a diagnosis for your ailment. I've come to the conclusion that you have the same problem as me, "perfectionosis".:yum:

I have been trying to come up with a cure, and I think beer is the only answer :burp: .
Seriously though, excellent job, Al, and you work way quicker than I do. :applause:
I am curious as to what your hydraulic problem was. I guess I should have mentioned this earlier but if anybody has any hydraulic problems, that's what I've been doing for 35 years. I'd be more than happy to try and help.
 
Great to see you posting ! Yes I think I have a problem :smileywac . I just enjoy restoring machines of all types .Beer is good !:burp:
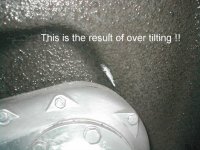

The problem was the Kristis Designers allowed the Clam Shell housing to rotate past its supposed stop point . I have corrected the problem now .
All seems to be going well . Knock on wood ! The thread will not let me post any pictures . I'll try later !!!
 
Pictures
 

Attachments

  • KT7 002.jpg
    KT7 002.jpg
    93 KB · Views: 217
  • KT7 003.jpg
    KT7 003.jpg
    97.6 KB · Views: 214
  • KT7 001.jpg
    KT7 001.jpg
    75.2 KB · Views: 213
"Mornin ya all":tiphat:

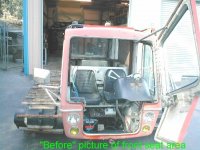
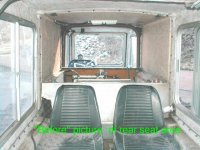
Here is a picture of what the front seat area looked like when I started !

There is also a before and after pictures of the rear seat area .

Just a little bit of a difference !:tiphat:


Coffee's on and the doors open !
 

Attachments

  • KT7-8.jpg
    KT7-8.jpg
    94.1 KB · Views: 284
  • KT7-11.jpg
    KT7-11.jpg
    86.7 KB · Views: 279
  • KT7 004.jpg
    KT7 004.jpg
    74.7 KB · Views: 282
BigAl said:
Here is a picture of what the front seat area looked like when I started !

Al, is there a cover for the engine compartment? Seems like it could get a little loud in there. I picture a nice fiberglass cover like you see on some I/O engine boats.
 
Yes ,there is a fiberglass engine cover . It is a little awkward to install it because it is one solid piece . I am going to place a piano hinge down the middle so I can fold it up before removing or reinstalling or when I check the engine oil . I also have a recessed area in it to install a "built in" small tool kit .

I also plan to install the heater in that area to disbuse the heat better , In the one front picture to can see it under the drivers feet . Not a good idea . I also have a nice set of 6" oscilating fans to move the heat around better in the cab , Along the same style as the big trucks have .
 
Allen, are you going to install seat belts on the driver & passenger seats? :confused2:
Or are you just figuring that the passengers will move into Mike's Snow Master when he pulls you around for your maiden voyage? :hide: :yankchain: :yum:
 
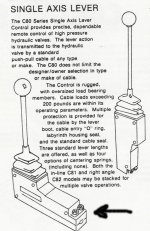
Well.... As bad as I wanted a single control steering lever ,the price and techology was too much for my little pocket book . I opted for a set of right angle single steering controls stacked side by side . This way I will have 100% control on each track at all times .They are self centering and return to neutral when released . It will be able to turn 360 degrees in its own footprint . Here is a picture . These will be built into the arm rest and only the levers will extend out .

I also ordered up the 4 place "SoftCom Stereo Intercom system" along with the matching head sets . If anyone wants a setup like this , let me know .These are the same as the private airplanes use . I am now a "dealer":eek: and will get them to you at my cost .I didn't plan this ,but once the guy found out what I was using it for , he told me to try it out and give you guys a intercom source if you want it too. I thought that was pretty nice of him . The whole set up ran under $500 wholesale complete including 4 headsets . Very reasonable !!!

Enjoy ,
Allen


clearpixel.gif
clearpixel.gif
[FONT=Arial,Helvetica,Univers,Zurich BT][SIZE=-1]Softcomm introduces the new family of Panel Mounted Intercoms for the owner pilot with all the many pilot-preferred features made famous by SoftComm's[/SIZE][/FONT][FONT=Arial,Helvetica,Univers,Zurich BT][SIZE=-1] ATC-2P (two passenger model), the ATC-4P (four passenger model) and the ATC-6P (six passenger model). [/SIZE][/FONT]

clearpixel.gif
clearpixel.gif
[FONT=Arial,Helvetica,Univers,Zurich BT][SIZE=-1]These intercoms are so compact that they fit almost anywhere in the aircraft's panel. They are designed to mount either horizontally or vertically, your choice. They are available in both[/SIZE][/FONT][FONT=Arial,Helvetica,Univers,Zurich BT][SIZE=-1]MONO [/SIZE][/FONT][FONT=Arial,Helvetica,Univers,Zurich BT][SIZE=-1]and[/SIZE][/FONT][FONT=Arial,Helvetica,Univers,Zurich BT][SIZE=-1]STEREO [/SIZE][/FONT][FONT=Arial,Helvetica,Univers,Zurich BT][SIZE=-1]versions. These Panel Mounted Intercoms will fit in any home built, business aircraft or general aviation aircraft in production today. They come with all necessary hardware for installation, a tested wiring harness, all audio and microphone jacks and mounting escutcheon plates.[/SIZE][/FONT]
 

Attachments

  • Steering control.jpg
    Steering control.jpg
    105.7 KB · Views: 272
Al, as for the steering will you have one lever for each hand? Or will both of them be mounted on one armrest?

I see advantages with both set ups. Having both next to each other will make it easy for forward and rearward travel because both could be operated with one hand. It would be somewhat more awkward turning because one hand would have to reach across to the opposite side for turning. However with one in each arm-rest, it forces 2 hand operation and would give great control in all situations except when you need to reach for the hydraulic tilt controls.

I wonder if an aircraft style yoke might be a good solution too?
 
Hi Bob,
The steering levers are close enough together that I can cover both levers with one hand . There is only 2 inches of travel from "stop to stop" so I should be able to just use my thumb and fingers to turn with no problems .

I still think this is a much better setup than the original yoke system .It sure will make a lot more room !

The tilt control is back about 4" behind the steering controls . I don't see me using it alot but if need be ,I can bump it left or right with my forearm if things get real busy steering Yetti .
 
BigAl said:
I opted for a set of right angle single steering controls stacked side by side . This way I will have 100% control on each track at all times .They are self centering and return to neutral when released . It will be able to turn 360 degrees in its own footprint . Here is a picture . These will be built into the arm rest and only the levers will extend out.[FONT=Arial,Helvetica,Univers,Zurich BT][SIZE=-1].[/SIZE][/FONT]

As Bob stated, I also assume you will mount them together (in one armrest) and have a free hand for other duties. If these controls function as properly intended, one hand with a finger only on each control lever will be sufficient to maneuver the cat. The lever stroke (forward, neutral and reverse) of the levers needs to be short to allow one hand even single finger operation. If this is not your intention we need to discuss this further via telephone. :argue: An even possible better mount is at arms length at the end of armrest. By resting your arm on the armrest you will keep from jerking the control levers too much in rough conditions. I have found it extremely easy with full hydraulic control in the snow cat to over compensate for what effort is actually needed for control.
 
OK Al, now I understand. But with only 2" of travel from stop to stop I wonder if it is going to be a little jerky controlling it? Then again it might be a real sweet machine to turn and control.
 
Bob, I have run both lever and aircraft style yoke controls on snow cat. Both require very little effort and are finger controls. Over compensation and to much effort does make for a jerky ride. I prefer the two lever control system as you are able maintain complete independence of the two tracks and more precise track movements is available. The yoke requires more elaborate mounting and space requirements. The Kristi looks to me to be more suitable to the lever controls.
 
mtntopper said:
An even possible better mount is at arms length at the end of armrest. By resting your arm on the armrest you will keep from jerking the control levers too much in rough conditions. I have found it extremely easy with full hydraulic control in the snow cat to over compensate for what effort is actually needed for control.

Hi Guys ! That is exactly what I intend to do . I feel the arm rest should give me a stable platform to steady my arm . I ran a couple pieces of equipment with this setup and it worked very well .
 
Sounds like it will be AWESOME when you get the controls set up. Should dramatically increase your forward visibility compared to the original set up (I went back and looked at some of the photos you posted and the aircraft yoke and control panel seemed to cover up the entire forward view in the lower half of the windshield) so the new set up should give you vastly improved visibility and it should also give you more interior room.

Great improvements!

Just another thought, but the lower half of the door is solid. Now that you will have greater visibility, you might want to cut a window hole into that area so you can see immediately in front of the machine. If you used a "deck hatch" like they use on boats, you could have the assurances it would be very strong and impact resistant, but it would also open so you could let in some air on nice days.
 
BigAl said:
Today I ordered up the GPS unit and the AM/FM/CD radios from Cabela's for "Yetti"

The AM/FM/CD stereo is a "Jensen CPM 505" made for boating and wet conditions so it should handle the rougher conditions and moisture it will be exposed too .

Tomorrow I will order the intercom system .

Hey Al,
Don't forget the laptop, plasma TV, and DVD player with 7.1 Surround ! :yankchain: :yankchain:

Great job you're doing.

Gary
 
wilkinsn1 said:
Hey Al,
Don't forget the laptop, plasma TV, and DVD player with 7.1 Surround ! :yankchain: :yankchain: Gary

Well... I think my wife may give me "lap dances" if I do a good job on the Yetti ,and she can keep her top on :5boobs: and the TV will be powered by 12 volts instead of blood . If the lap dance turns out good enough I don't think I will need the TV anyway !!!:moon: :moon:
 
B_Skurka said:
Just another thought, but the lower half of the door is solid. Now that you will have greater visibility, you might want to cut a window hole into that area so you can see immediately in front of the machine. If you used a "deck hatch" like they use on boats, you could have the assurances it would be very strong and impact resistant, but it would also open so you could let in some air on nice days.

Bob ,
I sat in the front seat yesterday and with that huge console removed ,the operators viewing area is incredible :thumb: ! It's like sitting out in front of the machine !!!

I found that while sitting in the operators station , I like resting my feet against the bottom portion of the door opening so I will carpet that to make sure it does not get scratched up ,by my big feet .

The side windows are huge and all four open ,so I should be able to get lots of fresh air in case you or Mike pass gas:fart2: :fart1: while I tow you home !!!
 
Hi Guys,
As Bob has already posted in another thread ,I will be taking off for awhile . I am headed up to idaho next week and then will be headed to Panama to work with the school children . My father is doing better and his doctor has told me to go now ! I'll grab lots of pictures .

I figure i'll be closing up the house here the next few days . If any one wants to show up in Panama ,email me at my main Email address and come down ! Bob S. has that email address .

I also just got some prices on Track belting and the prices really vary alot . Here is the pricing:

From Falline in Reno Nevada

Series 220 belting 6"x 27' 220 pound tensile strenght= $176 each
Series 60 belting 6"x27' 600 pound tensile strenght= $295 each

From Capitol Rubber in Sacramento Calif.
Series 220 belting 6"x27' 220 pound tensile strenght= $81 each
series ???* belting 6"x 27" 330 pound tensile strenght = $108 each

???*=== this belting is 3 ply or about 3/8 " thick

So give me some input here and tell me what you think . Capitol Rubber does not show a 600 pound tensile strenght belting that is that thin , but they are a heck of a lot cheaper for the Series 220 belting . It looks like about 3/8 is as thick as I want to use . This is prices for rubber only " no holes drilled "

I will need 8 pieces so those prices would be "cost Times 8" .

Thats almost $2400 plus tax for belting alone if I go with the Falline 60 series !!!:eek:
 
Allen, my thought is that you might want to take the economical choice as long as the specs are similar.

But I have another thought too. Since you figured out that the hydraulics can be over-tilted and you now have installed the adjustable bolt stop to prevent that, you may be able to make the "floppy" belts and not damage the sides of your KT-7. So you might want to get 4 of the belts a bit longer and re-create the original floppy belt pattern? I'm still skeptical on how much additional traction it provides since no other snowcat manufacturer adopted that system, however, it is a very distinctive look and if you think that it won't damage the sides of your machine it would give it the original look.
 
Top