• Please be sure to read the rules and adhere to them. Some banned members have complained that they are not spammers. But they spammed us. Some even tried to redirect our members to other forums. Duh. Be smart. Read the rules and adhere to them and we will all get along just fine. Cheers. :beer: Link to the rules: https://www.forumsforums.com/threads/forum-rules-info.2974/

Kitchen Reno

🤣 all seriousness. I survived a 4 month master bath reno followed by a 10 month kitchen reno. I need help. 😫

10 months is beyond extreme. Maybe you should get therapy? Or a "support dog" for remodeling induced PTSD?

We gutted and rebuilt Melen's 1500 sq ft condo in Chicago in far less time. Still took too long, but mostly that is because I would only work up there a few days a week. We did not touch her bathrooms, but every other square inch was re-done. I am looking at a master bath reno, somewhat smaller than your job, but I'm allocating 2 weeks (assuming I have all the parts). The fixtures and tile are not on order yet.
 
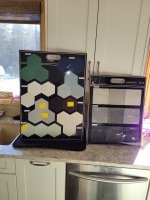
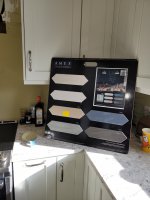
We finally got around to picking out a few samples for the backsplash. We didn't want the boring plain white subway tiles that most people nowadays seem to go with. So we chose a few different styles as options.

20240213_151804.jpg20240213_151847.jpg

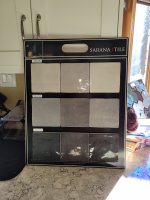
We are leaning towards the middle grey square tiles.

20240213_151938.jpg

We have decided to hire someone to install the tile as even though I could do it, my back won't allow me to be crouched down bent over all day. Same goes for the range hood. I could do it but lately I can't lift my arms above my shoulders. So I informed she who must be obeyed that I can't do it. At least we have a functional kitchen.

The final doors arrived a few weeks ago and were installed.
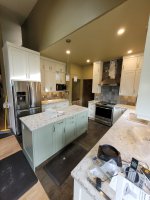
 
I love the "irregular edge" on the square tiles you are considering. The sharp clean edge on most subway tiles looks great in some situations but also can be tiring to see day after day after day. The casual/irregular edge breaks up the lines a bit and I think looks better.

If you go with one of the grey tones, what color grout will you use? Something that matches or something that contrasts?

I did my daughter's kitchen and service buffet in rectangular tile with an irregular edge similar to the tiles you are considering. But she chose an iridescent white. White tile with a glaze that has an irregular iridescent effect. The glaze gives it some character. I would have probably picked a light grey.

71562546504__4D295A1C-2105-4371-A834-B7ED99231215.jpeg
 
We aren't sure on the grout. Thinking of light grey? Seeing as the flooring is irregular grey slate square tiles which is the same as the fireplace in the living room, the middle grey square tiles would tie everything together nicely.
 
We ordered the tiles a few weeks ago and were waiting for the installer to come give us a quote and take measurements. That happened last week and he said most likely end of May beginning of June before they can begin install. Ok. That gives me a month to get the range hood mounting and venting sorted out. I had kind of avoided it as it involves crawling up through a small roof access to the attic space above the kitchen.

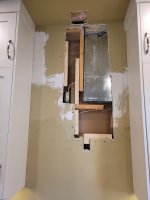
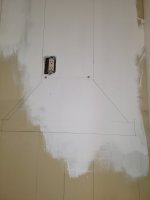
This morning, I was just about to head out to drive my daughter when the guy called and said he'd be here Monday morning. Crap....as soon as I got home I started hauling up everything I needed to begin construction including a collapsible extension ladder from downstairs and got to work. I sorted out the venting and will just bypass the venting in the wall and go straight into the ceiling. Ok. So I marked out where the vent will go on the wall and cut a couple of brace pieces to mount it to once the tile is done. But first I had to relocate the electrical outlet for the vent. I still have to throw in a few staples to secure the wiring before drywall and mud. It only needs to be primed as what isn't vent hood will be tile. Then of course I will have to clear the counters and remove the trim and electrical covers and once the tile is in place, add box extenders to each box to allow the receptacles to sit flush.
 

Attachments

  • 20240508_123650.jpg
    20240508_123650.jpg
    1.7 MB · Views: 4
  • 20240508_114412.jpg
    20240508_114412.jpg
    1.2 MB · Views: 4
  • 20240508_124255.jpg
    20240508_124255.jpg
    1.8 MB · Views: 4
  • 20240508_143437.jpg
    20240508_143437.jpg
    1.1 MB · Views: 4
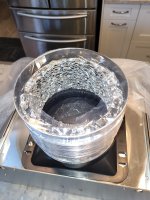
Ok. It looks like a tangled mess of 2x4s in there. I opted to leave the old venting in the wall and disconnect it up top in the attic where it connects to the insulated piping going outside. It's a 6" round flex exhaust coming up from the range hood. It'll go straight up through the hole in the roof to the existing insulated vent pipe going outside.


20240508_124255.jpg

20240509_081713.jpg20240509_130745.jpg
 
What kind of joint compound are you using?
I hope you used Durabond for at least the first coat or two, otherwise, regular joint compound cracks easily within a couple years.
 
I'll have to look at the brand of compound. It's the low dust quick dry stuff.

The end is in sight. Our tiles are being installed. I already measured marked and drilled pilot holes then installed lag bolts to mount the range hood after the tiles are done. I sanded and primed the mud yesterday.

20240513_083534.jpg


20240513_113834.jpg20240513_142459.jpg
20240513_151747.jpg

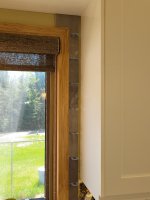
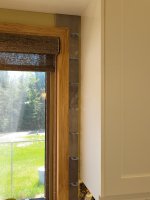
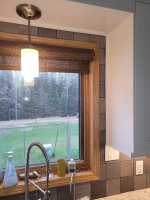
So if you look at the way the tiles lineup right of the sink, they're forced to cut them narrower which will leave a gap. Easiest solution I can come up with is grout the gap to the cabinet and once it's dry, come back with a piece of oak corner round trim along the edge of the cabinet opening.

20240513_151759.jpg
20240513_155350.jpg
 
Last edited:
We finally got around to picking out a few samples for the backsplash. We didn't want the boring plain white subway tiles that most people nowadays seem to go with. So we chose a few different styles as options.

View attachment 174581View attachment 174582

We are leaning towards the middle grey square tiles.

View attachment 174583

We have decided to hire someone to install the tile as even though I could do it, my back won't allow me to be crouched down bent over all day. Same goes for the range hood. I could do it but lately I can't lift my arms above my shoulders. So I informed she who must be obeyed that I can't do it. At least we have a functional kitchen.

The final doors arrived a few weeks ago and were installed.
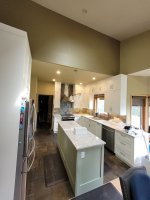
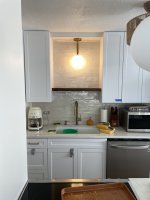
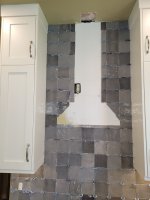
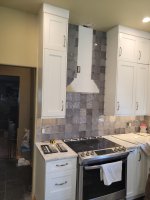
Here's the end result after tile installation. I also mounted the range hood but still need to plumb in the vent pipe to the attic.

20240515_161052.jpg20240515_161036.jpg
 
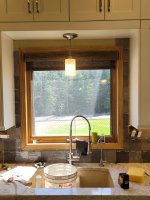
So around the sink presented a problem with the way the tiles lined up on the right side. To small of a sliver for tile and a big opening for grout. The tile guys were scratching their heads on what to do. My solution....
A trip to home depot and came back with door stop material to create a simple but effective trim to frame the tiles around the sink. I still need to paint it but it's an easy solution.


20240513_151759.jpg


20240516_075348.jpg
 
Beautiful kitchen. Seems like it's taken a long time but you had all sorts of product delays that were out of your control. Nice to see that it is almost done and that the outcome is gorgeous. I'm sure you and your wife will be happy when the last contractor has cleaned up his mess and moved out!!!
 
Thanks. It has taken a lot longer than anticipated. The cabinets and counters were all done at Christmas time. We just stalled on picking tile and actually getting the stuff ordered.

Of course we're at the finish line and discovered a chip in the quartz countertop that wasn't there last week. I spoke with the company that sold it to us and they'll repair it under warranty.
 

Attachments

  • 20240515_190243.jpg
    20240515_190243.jpg
    1 MB · Views: 3
  • 20240515_190442.jpg
    20240515_190442.jpg
    1.6 MB · Views: 2
As for the tile selection, we chose a medium grey square ceramic tile made in Spain. Each tile is individually crafted. They compliment the slate floor perfectly. We ended up choosing a dark grout that won't show the dirt and picks up the dark marbling in the counter. They also compliment the slate fireplace nicely.
 
Not 100% done yet but the finishing line is in sight. Lol

I've got the venting for the range hood sorted out but waiting for a buddy who does sheet metal work to come over next week to connect it.

In the meantime, the metal cover for the vent stack doesn't extend all the way to the ceiling but we knew that when we ordered it. It is about 3 inches short. So I picked up an 8ft length of 5" mdf and cut it to size. They come primed but I needed color match paint for it and the trim around the window. Holy F.... $46 for a small can of Benjamin Moore cloud white paint. Oh well. There's a white plastic over the stack to protect it until installing.

I first cut the trim pieces to size then went about creating an internal frame to mount it to.
 

Attachments

  • 20240524_101851.jpg
    20240524_101851.jpg
    1.3 MB · Views: 4
  • 20240524_104322.jpg
    20240524_104322.jpg
    1.6 MB · Views: 4
  • 20240524_110749.jpg
    20240524_110749.jpg
    1.8 MB · Views: 4
I'm now 99.5% done. All that's left is painting the trim around the top of the vent and window. It's been a journey. I learned a lot. This is my first time attempting a project this momentous. I kinda figures things out as I went and there were some mistakes along the way. As this is our forever home and our main floor is done as far as renovations go (she didn't hear that btw), I don't foresee doing another kitchen. It has taken a little longer than anticipated but considering that I did a lot of it without ever having previous experience. I became a plumber/carpenter/drywaller/hvac guy all in the past year. After watching the tile guys do their thing, I'm sure I could do that as well.
 

Attachments

  • 20240528_152144.jpg
    20240528_152144.jpg
    1.3 MB · Views: 7
  • 20240528_133336.jpg
    20240528_133336.jpg
    1 MB · Views: 5
  • 20240528_160547.jpg
    20240528_160547.jpg
    1.3 MB · Views: 5
  • 20240528_155143.jpg
    20240528_155143.jpg
    1.4 MB · Views: 5
  • 20240528_135031.jpg
    20240528_135031.jpg
    1.5 MB · Views: 6
Top