Want to build me one this winter when you can't work on the cat? For $$ of coarse.No worries on the Hijack......
If it is only light duty......
THE LATEST YEAR OF NON ELECTRONIC 700R
1993 WAS THE ODD YEAR.
Some were electronic some were not...
1990-92 a good bet as these have many factory updates in the design.
To get a 700 to live.
HD OIL PUMP (Front pump) ..... 13 vane pump is a must have.
Replace the sun shell with .....The BEAST Sun shell The factory ones break
The sprags are crap and need upgrading
The input drum (Has many of the clutch packs and the input shaft is pressed into it) An after market hardened steel ring is available that presses over the area of the spline to prevent cracking in the splines.
Unit needs as many clutch plates as can be fitted into each pack.....the 3-4 clutch needs help.
Reverse clutch needs work...
The 2-4 band needs to be upgraded to a much stouter piece.
Low gear in these is 3.06:1 When the shift occurs the band has to grab the drum and stop it to activate 2nd gear
Slippage will make things go away fast.....
Planetaries need upgrading.
There are a multitude of parts that need to be upgraded.
Since I was last through a 700R4 many many changes have been made in the parts available and what works to fix these boxes..
One area that is paramount in the conversion THROTTLE PRESSURE
The cable on the RH front of the box is the "TV" CABLE and must be adjusted properly to maintain the proper oil pressure.
On a factory rig...the adjustments are well documented as to HOW TO DO IT....
On a roll your own it becomes far more interesting and challenging to get the TV set correctly.
Many folks think that this cable is a "Kick down" cable.....Not so....The TV cable must be set properly to achieve the needed pressures to apply the clutches, band and such.
A low TV setting and these boxes will burn up quickly.......
When the electronics came onboard the TV was managed by the electronics......Also the shifts were all handled with solenoids controlled by the electronics......Sensors that monitor the engine load, throttle position, input and output speed sensors.....And on it goes.
My recommendation is a good performance rebuild oriented book on the 700R4 and have a look see at what all you need to do to make these boxes live....
The 700 is not hard to work on......The valve body is the most tedious.. (Not hard...just takes attention to detail)
A good shift kit...I prefer Transgo
A good upgrade on this box with attention to details and it should serve pretty good.....

-
Please be sure to read the rules and adhere to them. Some banned members have complained that they are not spammers. But they spammed us. Some even tried to redirect our members to other forums. Duh. Be smart. Read the rules and adhere to them and we will all get along just fine. Cheers. :beer: Link to the rules: https://www.forumsforums.com/threads/forum-rules-info.2974/
You are using an out of date browser. It may not display this or other websites correctly.
You should upgrade or use an alternative browser.
You should upgrade or use an alternative browser.
Astro van cat conversion
- Thread starter Snowy Rivers
- Start date
Snowy Rivers
Well-known member
Hmmmmmm.....Now there is a plan...
Actually...Unless you do not want to do your own ...There are several great builders in Cali that can do you a fine job....
Get a "How to do it book" online from one of a couple different publishers and go at it....
This book will let you build a good gear box......

Even if you have never touched an auto tranny in your life.....They are not the mysterious magic box many would have you believe....
I have read a few of the books by the publisher (Book linked to)
I helped a buddy do a TH200R4 a while back and suggested he get a book and learn to do it...
He got one from these guys.....I read it though.....Good stuff.....
A few things......CLEANLINESS IS AN ABSOLUTE MUST HAVE.
DO NOT USE RED RAGS TO WIPE STUFF (The lint can stick valves) Use lint free paper rags when doing the assembly
DO NOT USE TEFLON TAPE TO SEAL ANY FITTINGS (This stuff can and will find its way into the VB and cause issues)
Stack all the internals on a long dowel to keep the order.....Or place them in order on the bench.....Yeah...The big boys on you tube just toss parts in a pile.....BUT they have done a buttload of these boxes and can almost do an assembly blindfolded.....
Many valve body bolts are different length.....Pay attention......Take pics and keep stuff in groups .....Plastic baggies or small containers are great......
The special tools are minimal for a 700R
A spring compressor to disassemble the clutch packs.....I have made my own....A hydraulic press ...(Harbor Freight) is handy
Bushing drivers....(Harbor Freight)
Basic hand tools.....
Snap ring pliers
Gert the gear box done.....THEN DO THE VALVE BODY (My method....no reason....just how I prefer to do it)
If you get a "Buildable core" and it is toasted......Figure out why....then do the build....
A lot of miles and hardened seals....TV not set correctly.
WHATS IN THE PAN.....????? A thin layer of black sooty looking stuff in the pan is normal on a high mile unit.
A lot of metal flakes...NOT SO MUCH.....
Auto trannies chew up metal junk.....Clutch plate wear.....Gear wear....
Metal flakes....Bearing failures....Converter clutch failure......
Large chunks of crap .....Bad JU JU
Broken planet carriers....
Case damage......
Case lugs that are badly worn.....Junk case.....
Core suppliers can be a good source..
YOU PULL IT YARDS
Yank the stick.....If it smells like burnt dog poop....try a different one.
Craigs list
Same story
Yank the stick....Oil red or somewhat red..(Good thing)
DO NOT TURN THE BOX UPSIDE DOWN....
Remove the pan bolts and get the pan off with the case right side up.....
Then you can see whats in the thing.....Any piles of debris will likely be right under where it came from
Doing a good "Post mortem" can tell you a lot about your new little prize.......
If you flip the box over...any and all the junk in the pan goes into the gear train....Then it is harder to tell where the junk came from.....Rear planetary, front planetary ????? Clutches
Clutch plates are usually a paper material on the steel plates....Burnt clutch plates (BLACK and smell bad) and the steels all blue and chewed up (Source of metal)
Look the exterior of the case over (Bell housing) for cracks.....If I bell housing is cracked....It does happen....Usually only in 4x4 trucks that have been thrashed....and bad wrecks.....
Give a good look at threads in the case.....Tail housing, pan rail.....Stripped threads can be fixed with a helicoil easily....
With a good "How to book" and a weekend.. (Subjective) you should be able to whip out a good little tranny.
Do the Autopsy......Then decide how far you want to go....$$$$$$$$$$$$$
Get the parts ordered and then while stuff is coming...Get the unit all cleaned up and ready....
Don't mix and match shift kit parts......If the book you are using describes a particular plan of attack ....stick with how they did it......Drilling holes in passages to accomplish a particular oil feed remedy and then using a different shift kit can result in less than stellar results.....
At this late date....Many trannies have been apart....maybe multiple times...And gawd knows what was done to them
Many shops simply clean things, replace seals, clutches, band, thrust washers and such.....new gaskets and leterip...
This will/can restore a factory function.....But will not solve the many issues that need to be taken care of.
Thrust washers on some of these boxes were plastic.....The steel backed brass...BETTER.
Never use a used converter.
Get a unit that has been rebuilt by a reputable outfit.
The converter in the 700R is small inside....The lockup clutch can be upgraded to a much stronger piece.
Also the stator one way clutch needs to be upgraded...New torrington thrust bearings too...
Getting an "RV" TYPE converter with brazed fins is a real plus.
Wiggling and flexing of the fins in the drive and driven torus is what makes a lot of the fine metal "SOOT" looking stuff in the pan.....
A brazed fin converter is far better....
When they installed the lockup clutch the Drive and driven torus parts had to be made smaller to allow room for the clutch assembly......BIGGER PARTS ARE USUALLY STRONGER.....
NOW
There is another avenue you may want to look at.
The bigger 4L80E tranny.
Same bell housing bolt pattern....
An after market electronic controller will get the big box working.
The 4L80E is a TH400 with the OD added....Stout....even in factory trim......
Some options.
The big thing......
When you do your own build ....YOU KNOW what shape stuff was in and what you did inside.....
Besides this....IT CAN BE A LOT OF FUN ...AND SATISFACTION in doing it.....
Actually...Unless you do not want to do your own ...There are several great builders in Cali that can do you a fine job....
Get a "How to do it book" online from one of a couple different publishers and go at it....
This book will let you build a good gear box......
Gm Automatic Overdrive Transmission Builder'S And Swapper'S Guide~ 700R4 4L60 1932494502 | eBay
Find many great new & used options and get the best deals for Gm Automatic Overdrive Transmission Builder'S And Swapper'S Guide~ 700R4 4L60 at the best online prices at eBay! Free shipping for many products!
duckduckgo.com
Even if you have never touched an auto tranny in your life.....They are not the mysterious magic box many would have you believe....
I have read a few of the books by the publisher (Book linked to)
I helped a buddy do a TH200R4 a while back and suggested he get a book and learn to do it...
He got one from these guys.....I read it though.....Good stuff.....
A few things......CLEANLINESS IS AN ABSOLUTE MUST HAVE.
DO NOT USE RED RAGS TO WIPE STUFF (The lint can stick valves) Use lint free paper rags when doing the assembly
DO NOT USE TEFLON TAPE TO SEAL ANY FITTINGS (This stuff can and will find its way into the VB and cause issues)
Stack all the internals on a long dowel to keep the order.....Or place them in order on the bench.....Yeah...The big boys on you tube just toss parts in a pile.....BUT they have done a buttload of these boxes and can almost do an assembly blindfolded.....
Many valve body bolts are different length.....Pay attention......Take pics and keep stuff in groups .....Plastic baggies or small containers are great......
The special tools are minimal for a 700R
A spring compressor to disassemble the clutch packs.....I have made my own....A hydraulic press ...(Harbor Freight) is handy
Bushing drivers....(Harbor Freight)
Basic hand tools.....
Snap ring pliers
Gert the gear box done.....THEN DO THE VALVE BODY (My method....no reason....just how I prefer to do it)
If you get a "Buildable core" and it is toasted......Figure out why....then do the build....
A lot of miles and hardened seals....TV not set correctly.
WHATS IN THE PAN.....????? A thin layer of black sooty looking stuff in the pan is normal on a high mile unit.
A lot of metal flakes...NOT SO MUCH.....
Auto trannies chew up metal junk.....Clutch plate wear.....Gear wear....
Metal flakes....Bearing failures....Converter clutch failure......
Large chunks of crap .....Bad JU JU
Broken planet carriers....
Case damage......
Case lugs that are badly worn.....Junk case.....
Core suppliers can be a good source..
YOU PULL IT YARDS
Yank the stick.....If it smells like burnt dog poop....try a different one.
Craigs list
Same story
Yank the stick....Oil red or somewhat red..(Good thing)
DO NOT TURN THE BOX UPSIDE DOWN....
Remove the pan bolts and get the pan off with the case right side up.....
Then you can see whats in the thing.....Any piles of debris will likely be right under where it came from
Doing a good "Post mortem" can tell you a lot about your new little prize.......
If you flip the box over...any and all the junk in the pan goes into the gear train....Then it is harder to tell where the junk came from.....Rear planetary, front planetary ????? Clutches
Clutch plates are usually a paper material on the steel plates....Burnt clutch plates (BLACK and smell bad) and the steels all blue and chewed up (Source of metal)
Look the exterior of the case over (Bell housing) for cracks.....If I bell housing is cracked....It does happen....Usually only in 4x4 trucks that have been thrashed....and bad wrecks.....
Give a good look at threads in the case.....Tail housing, pan rail.....Stripped threads can be fixed with a helicoil easily....
With a good "How to book" and a weekend.. (Subjective) you should be able to whip out a good little tranny.
Do the Autopsy......Then decide how far you want to go....$$$$$$$$$$$$$
Get the parts ordered and then while stuff is coming...Get the unit all cleaned up and ready....
Don't mix and match shift kit parts......If the book you are using describes a particular plan of attack ....stick with how they did it......Drilling holes in passages to accomplish a particular oil feed remedy and then using a different shift kit can result in less than stellar results.....
At this late date....Many trannies have been apart....maybe multiple times...And gawd knows what was done to them
Many shops simply clean things, replace seals, clutches, band, thrust washers and such.....new gaskets and leterip...
This will/can restore a factory function.....But will not solve the many issues that need to be taken care of.
Thrust washers on some of these boxes were plastic.....The steel backed brass...BETTER.
Never use a used converter.
Get a unit that has been rebuilt by a reputable outfit.
The converter in the 700R is small inside....The lockup clutch can be upgraded to a much stronger piece.
Also the stator one way clutch needs to be upgraded...New torrington thrust bearings too...
Getting an "RV" TYPE converter with brazed fins is a real plus.
Wiggling and flexing of the fins in the drive and driven torus is what makes a lot of the fine metal "SOOT" looking stuff in the pan.....
A brazed fin converter is far better....
When they installed the lockup clutch the Drive and driven torus parts had to be made smaller to allow room for the clutch assembly......BIGGER PARTS ARE USUALLY STRONGER.....
NOW
There is another avenue you may want to look at.
The bigger 4L80E tranny.
Same bell housing bolt pattern....
An after market electronic controller will get the big box working.
The 4L80E is a TH400 with the OD added....Stout....even in factory trim......
Some options.
The big thing......
When you do your own build ....YOU KNOW what shape stuff was in and what you did inside.....
Besides this....IT CAN BE A LOT OF FUN ...AND SATISFACTION in doing it.....
Last edited:
Snowy Rivers
Well-known member
Some "White box" parts kits are fine....Better price .
The fancy lithography on the box does not make the parts better....
Overseas stuff....A crap shoot......
I use ebay a lot.....But I generally know what I am looking at...
Stick with name brand stuff....
This is one example....
I prefer to pick and choose parts so I don't have a bunch of extra stuff left over.
A good soft parts kit (Seals, gaskets)
2-4 BAND (High perf)
Sprags
Sun shell
Bushing kit
Clutch kit (New clutches and steels)
Shift kit
Updated servo parts
Many of the "Complete kits" are fine for a stock type build
Some kits have far more goodies ......
So you buy a kit
Then add a better 2-4 band ...So you have a band you paid for and that will hang on a nail in the garage.
When I was 17 I had a 1970 Dodge Charger with a torqueflite. For some unknown reason the valve body would only shift from park to reverse and would not go to neutral or any forward gears no matter how hard you pulled on the shifter or tapped on it, so I pulled the pan in the car. When I dropped the valve body a bunch of ball bearings fell out and I had no idea where they came from. That incident scarred me for life and never opened one again. If you want to build one for me we can do that, if your too busy I also understand that. There is a local trans shop that built a couple performance transmissions for me in the passed with good results and I can use them. Thought I would give you the oppertunity if you wanted to do it. I will research the 4L80ESome "White box" parts kits are fine....Better price .
The fancy lithography on the box does not make the parts better....
Overseas stuff....A crap shoot......
I use ebay a lot.....But I generally know what I am looking at...
Stick with name brand stuff....
This is one example....
I prefer to pick and choose parts so I don't have a bunch of extra stuff left over.
A good soft parts kit (Seals, gaskets)
2-4 BAND (High perf)
Sprags
Sun shell
Bushing kit
Clutch kit (New clutches and steels)
Shift kit
Updated servo parts
Many of the "Complete kits" are fine for a stock type build
Some kits have far more goodies ......
So you buy a kit
Then add a better 2-4 band ...So you have a band you paid for and that will hang on a nail in the garage.
Snowy Rivers
Well-known member
The little balls are not bearings....CHECK BALLS...These go in the channel casting in various places.
The build books all show where they go.....
I can understand you being a tad nervous....
NORMALLY...taking the VB off is done with the tranny on its back on the bench.
Doing them in the rig is no biggy....WHITE GREASE AND STICK THE LITTLE BUGGERS IN PLACE.
I stopped doing any tranny builds for hire years ago....Not that it would not be fun....I just can't guarantee my time frame...
I may work on my stuff....IF I FEEL LIKE IT ...I do not want a project in limbo and something happen to me.....
Just not a good way to do things....
Check out the 4L80E and see if that might be a good way to go.....The little diesel wont kill that box.
I
I checked out the 4l80E, I believe you are correct about the reliability over the 700r4. It costs a little more for the controller but I think worth it. 4L80E it is. Im currently working on multipul projects at the same time and really don't have the extra time to learn how to build the transmission. I have 1- 5.9 24v Cummins that I am freshening up and doing a p-pump conversion on. I just got done with the bottom end by rolling in new rod and main bearings and adding ARP rod bolts and main studs. its about 25% done then the B3.3. I have my hands full. The builds are in the car and truck section. Come on over and check it out. Im doing a 1969 power wagon to 3500 chassis swap and the 1970 2x sweptline that gets the little cummins.The little balls are not bearings....CHECK BALLS...These go in the channel casting in various places.
The build books all show where they go.....
I can understand you being a tad nervous....
NORMALLY...taking the VB off is done with the tranny on its back on the bench.
Doing them in the rig is no biggy....WHITE GREASE AND STICK THE LITTLE BUGGERS IN PLACE.
I stopped doing any tranny builds for hire years ago....Not that it would not be fun....I just can't guarantee my time frame...
I may work on my stuff....IF I FEEL LIKE IT ...I do not want a project in limbo and something happen to me.....
Just not a good way to do things....
Check out the 4L80E and see if that might be a good way to go.....The little diesel wont kill that box.
Snowy Rivers
Well-known member
Yes.
You do have your hands full...
I think you will be much happier with the 4L80E box
A few sensors and the controller.
Biggy will be to get a the Throttle position sensor set up with the linkage on the diesel.
Whoever you choose for a stand alone controller....Call them and speak with their tech guys.
Tell them all about what you are doing....Get their input on getting things set up.
The TPS (Throttle position sensor) tells the controller how much power you are demanding and this in turn controls the throttle pressure......( Hydraulic pressure to the clutches) Get this too low and the tranny burns up.
On older trannies a vacuum modulator was used (TH400 and TH350)
Cable control on the 700R4
The 4L60E has a TPS as does the 4L80E
You can set the TPS so at idle it is in the low spot...and at WOT the pressure will be the highest.
This is usually done with a volt meter ... Setup instructions will get you all squared away
Most all newer boxes use a TPS along with input from other sensors to tell the TCM (Transmission control module) what it needs to know......
The 4L80E will also have input and output speed sensors that will need to be wired into the controller....
The controller will come with a wiring harness and pretty much all you need.
To make life far easier....Do speak with the tech guys .....
Fun stuff
As far as a Speedometer goes.....Just another bug to work out......There are options
There is a couple ways to go, you can get a full control controller that does what you describe for $600-$1000Yes.
You do have your hands full...
I think you will be much happier with the 4L80E box
A few sensors and the controller.
Biggy will be to get a the Throttle position sensor set up with the linkage on the diesel.
Whoever you choose for a stand alone controller....Call them and speak with their tech guys.
Tell them all about what you are doing....Get their input on getting things set up.
The TPS (Throttle position sensor) tells the controller how much power you are demanding and this in turn controls the throttle pressure......( Hydraulic pressure to the clutches) Get this too low and the tranny burns up.
On older trannies a vacuum modulator was used (TH400 and TH350)
Cable control on the 700R4
The 4L60E has a TPS as does the 4L80E
You can set the TPS so at idle it is in the low spot...and at WOT the pressure will be the highest.
This is usually done with a volt meter ... Setup instructions will get you all squared away
Most all newer boxes use a TPS along with input from other sensors to tell the TCM (Transmission control module) what it needs to know......
The 4L80E will also have input and output speed sensors that will need to be wired into the controller....
The controller will come with a wiring harness and pretty much all you need.
To make life far easier....Do speak with the tech guys .....
Fun stuff
As far as a Speedometer goes.....Just another bug to work out......There are options
or a manual shift controller that gives full line pressure all the time and can only be shifted manually with a converter lock up switch. for a couple hundred?? choices choices.
Snowy Rivers
Well-known member
I looked at this option on the cat......
I have been as anal as I can be on not wanting magic boxes on this rig....
AAA does not make house calls into the snowy back country.....
For the speed I need the TH350 offered all that was needed......Very durable and about as BOMB proof as you can get....
Even an OD box is not going to make much difference in fuel mileage on this beast ......
I wanted the shorter box to fit in the cat.....Rugged internals and SIMPLE design.....
Getting the box out to service it means taking the cab off.....Engine and tranny must come out as a unit.......Arrrrrg.....Not a quick job......
For a Hwy rig.....Far different story....
Yessss...Choices...
I think I'm going with the full line pressure manual shift option. I had a hot rod with a shift kit set up that way and it didn't bother me, plus the full line pressure all the time keeps things from slipping.I looked at this option on the cat......
I have been as anal as I can be on not wanting magic boxes on this rig....
AAA does not make house calls into the snowy back country.....
For the speed I need the TH350 offered all that was needed......Very durable and about as BOMB proof as you can get....
Even an OD box is not going to make much difference in fuel mileage on this beast ......
I wanted the shorter box to fit in the cat.....Rugged internals and SIMPLE design.....
Getting the box out to service it means taking the cab off.....Engine and tranny must come out as a unit.......Arrrrrg.....Not a quick job......
For a Hwy rig.....Far different story....
Yessss...Choices...
Snowy Rivers
Well-known member
That should work fine.....
Shifts might be a tad stout....That will depend on a few other factors in the calibration of the tranny....
For sure you will be far happier with the end result...... The 4L80E is a very stout box.....
The 700R4 in it's wildest dreams does not even get close.....
Shifts might be a tad stout....That will depend on a few other factors in the calibration of the tranny....
For sure you will be far happier with the end result...... The 4L80E is a very stout box.....
The 700R4 in it's wildest dreams does not even get close.....
Thanks for the help on a transmission choice, I want to do it once and done.That should work fine.....
Shifts might be a tad stout....That will depend on a few other factors in the calibration of the tranny....
For sure you will be far happier with the end result...... The 4L80E is a very stout box.....
The 700R4 in it's wildest dreams does not even get close.....
Snowy Rivers
Well-known member
No worries....You betcha
Happy to help
I can assure you....After spending the money that it takes to get a 700R4 somewhat decent....And then kill it .(Been there done that) it leaves a bad taste....
The 4L80E will be a sweet box for your project..
Happy to help
I can assure you....After spending the money that it takes to get a 700R4 somewhat decent....And then kill it .(Been there done that) it leaves a bad taste....
The 4L80E will be a sweet box for your project..
Snowy Rivers
Well-known member
A lull in cat things right now....Getting ready for the long winter.
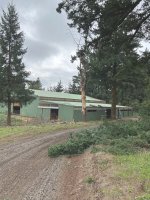
We had a big maple tree by the horse barn die and was shedding limbs ....A big threat to the metal roof.
We inquired with a few outfits about removing the tree.
Tree had a fair lean towards the barn.....Making a simple cut and drop job real sketchy...
Local outfit wanted $1400 to drop the beast....And no guarantee .....Arrrrrgh
The son in law and I decided to take matters in our hands.
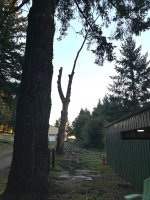
He rented a high lift (Not high enough) so the limbs could be removed....
One heavy long one was just too far over the barn and about 6 feet out of reach.
A commercial bucket truck would have made this a breeze.....None available...
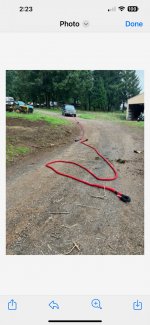
So I ordered up Three 30 foot long recovery straps (30,000 # rated)
We hooked them to the tree and the Suburban 4x4......
Tree is no longer an issue...
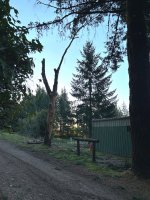
While the lift was here some other stuff got trimmed too.
A bit of serious reefing with the Burb.....
Firewood now....
Time to get back to cat work....
We had a big maple tree by the horse barn die and was shedding limbs ....A big threat to the metal roof.
We inquired with a few outfits about removing the tree.
Tree had a fair lean towards the barn.....Making a simple cut and drop job real sketchy...
Local outfit wanted $1400 to drop the beast....And no guarantee .....Arrrrrgh
The son in law and I decided to take matters in our hands.
He rented a high lift (Not high enough) so the limbs could be removed....
One heavy long one was just too far over the barn and about 6 feet out of reach.
A commercial bucket truck would have made this a breeze.....None available...
So I ordered up Three 30 foot long recovery straps (30,000 # rated)
We hooked them to the tree and the Suburban 4x4......
Tree is no longer an issue...
While the lift was here some other stuff got trimmed too.
A bit of serious reefing with the Burb.....
Firewood now....
Time to get back to cat work....
Attachments
Last edited:
Ihave done those before where they are leaning toward a structure, we used 2- 3 ton coma longs to triangulate it so it could not fall the wrong way, put a load on the coma longs and started cutting. front notch first then keep getting up on the coma longs while doing the back cut and it will come down where you want, I have a dead oak tree in front of my home in the same situation, I have been waiting for the weather to cool down to tackle.A lull in cat things right now....Getting ready for the long winter.
We had a big maple tree by the horse barn die and was shedding limbs ....A big threat to the metal roof.
We inquired with a few outfits about removing the tree.
Tree had a fair lean towards the barn.....Making a simple cut and drop job real sketchy...
Local outfit wanted $1400 to drop the beast....And no guarantee .....Arrrrrgh
The son in law and I decided to take matters in our hands.
He rented a high lift (Not high enough) so the limbs could be removed....
One heavy long one was just too far over the barn and about 6 feet out of reach.
A commercial bucket truck would have made this a breeze.....None available...
So I ordered up Three 30 foot long recovery straps (30,000 # rated)
We hooked them to the tree and the Suburban 4x4......
Tree is no longer an issue...
While the lift was here some other stuff got trimmed too.
A bit of serious reefing with the Burb.....
Firewood now....
Time to get back to cat work....
Snowy Rivers
Well-known member
Indeed.
When it is paramount that the tree falls correctly.....Tools are needed...
Having a close encounter with the barn was simply out of the question....
When it is paramount that the tree falls correctly.....Tools are needed...
Having a close encounter with the barn was simply out of the question....
Snowy Rivers
Well-known member
Between the domestics and catching the latest batch of crud that's going around....Not much cat work at all going on.
Hope to get back to the engine in a while...
The domestics of getting ready for winter take up time.....This old critter does not work fast or long any more...
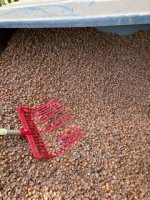
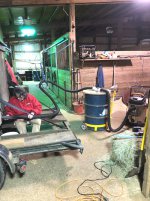
Had to get in the first two batches of winter heating fuel...(Hazelnut shells) We got a 2 day stretch of 60F clear weather and we took advantage of it.
Got all our storage filled up....Depending on how cold we get will dictate how many hauls we need to do.
3 yard dumpster will fill 10 barrels.....
Then we have to crush the 1/2 shells into stuff that the pellet stoves like...
So we use a little machine I built a few years ago...."Munchy"
We can heat the 2300 sqft shack for under $200 for the season....
Used to be much easier.....Now that we belong to the old GEEZER club it's not as easy....
Munchy was created out of dire need as the plants all switched over to newer processing tech that breaks the shells in 1/2
Nice little bowls....These are too big to burn well....Stuff needs to be the size of little finger nail (Give or take)
Munchy was tossed together with FUNCTION as the driving force.....
In the video...Munchy is being fed very slow....It can take scoops as fast as I can dip them...(Almost)
5 minutes to munch a barrel full of stove ready material...
Hope to get back to the engine in a while...
The domestics of getting ready for winter take up time.....This old critter does not work fast or long any more...
Had to get in the first two batches of winter heating fuel...(Hazelnut shells) We got a 2 day stretch of 60F clear weather and we took advantage of it.
Got all our storage filled up....Depending on how cold we get will dictate how many hauls we need to do.
3 yard dumpster will fill 10 barrels.....
Then we have to crush the 1/2 shells into stuff that the pellet stoves like...
So we use a little machine I built a few years ago...."Munchy"
We can heat the 2300 sqft shack for under $200 for the season....
Used to be much easier.....Now that we belong to the old GEEZER club it's not as easy....
Munchy was created out of dire need as the plants all switched over to newer processing tech that breaks the shells in 1/2
Nice little bowls....These are too big to burn well....Stuff needs to be the size of little finger nail (Give or take)
Munchy was tossed together with FUNCTION as the driving force.....
In the video...Munchy is being fed very slow....It can take scoops as fast as I can dip them...(Almost)
5 minutes to munch a barrel full of stove ready material...
Attachments
I am blessed/cursed with 6.5 acres of oak trees, that save me $600.00 per month in propane a month in the winter. It cost me about the same as you, a couple hundred in gas and oil for the chainsaw a season. A bit more work though, but keeps the trees trimmed up and the dead ones gone for the summer fire season, so I would have to do it anyway. I cut a little all summer in the mornings, hit it hard in the fall and build up a month or 2 in reserve so I don't have to cut in the rain all winter.
Snowy Rivers
Well-known member
Waaaaaay cool stuff....
We used to do firewood....But gave that up many years ago.
About 1992 I had a fella call me and inquire about hauling him a load of nut shells in my dump truck.
I grabbed the load at the plant and delivered them.
The guy had me dump them on a tarp in his driveway....They quickly covered them with more blue tarp...
A big ????????????????? WTF are you using his stuff for ????????????????? I asked....
He took me in the house and showed me the pellet stove in the corner burning away..
Less than two weeks later we had a new pellet stove in our place and a load of shells in barrels..
Having the dump truck made the job soooooooooooooooooo easy.
Nowhere near the physical work and a renewable resource.....
Now with the new breeds of hazelnut trees that are resistant to blight.....Tons of new orchards are going in.
The availability of cheap materials makes this a win win win scenario....
The only work is more just time than hard physical labor.....
8500 BTU per pound....
The stoves needed a little tweaking to optimize them for the shells....(Fuel delivery timing and combustion air adjustments)
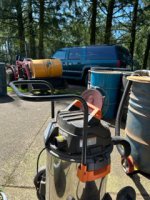
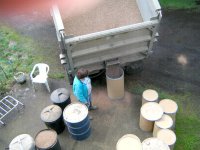
After retiring from dump trucking it became necessary to get creative to haul and unload the stuff..
Big shop vac creates the high amount of air flow to run the system.....
The plywood top on the barrel in the piccy (It seals to the barrel with a foam gasket) One hose into the vacuum and the the "Barrel master" (Wood cover) one hose that sucks the shells and fills the barrel.
Same principle that they use with the "Suck trucks" to clean storm drains and suck out septic tanks....
Not as fast as the ditch gate on the big rig.....but effective.....
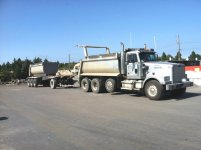
Pics of the old way....Easy and fast
The new outfit backed into the stable...Weather folks missed it and we just got it inside when the sky opened up...
We used to do firewood....But gave that up many years ago.
About 1992 I had a fella call me and inquire about hauling him a load of nut shells in my dump truck.
I grabbed the load at the plant and delivered them.
The guy had me dump them on a tarp in his driveway....They quickly covered them with more blue tarp...
A big ????????????????? WTF are you using his stuff for ????????????????? I asked....
He took me in the house and showed me the pellet stove in the corner burning away..
Less than two weeks later we had a new pellet stove in our place and a load of shells in barrels..
Having the dump truck made the job soooooooooooooooooo easy.
Nowhere near the physical work and a renewable resource.....
Now with the new breeds of hazelnut trees that are resistant to blight.....Tons of new orchards are going in.
The availability of cheap materials makes this a win win win scenario....
The only work is more just time than hard physical labor.....
8500 BTU per pound....
The stoves needed a little tweaking to optimize them for the shells....(Fuel delivery timing and combustion air adjustments)
After retiring from dump trucking it became necessary to get creative to haul and unload the stuff..
Big shop vac creates the high amount of air flow to run the system.....
The plywood top on the barrel in the piccy (It seals to the barrel with a foam gasket) One hose into the vacuum and the the "Barrel master" (Wood cover) one hose that sucks the shells and fills the barrel.
Same principle that they use with the "Suck trucks" to clean storm drains and suck out septic tanks....
Not as fast as the ditch gate on the big rig.....but effective.....
Pics of the old way....Easy and fast
The new outfit backed into the stable...Weather folks missed it and we just got it inside when the sky opened up...
Attachments
Last edited:
Thats an option for the cabin, I have an unlimited supply of wood , although what you are doing looks easier, I have to cut the wood anyway to keep the property cleaned up. 1- I like it cleaned up and 2- I don't want my homeowners to increase due to fire hazard.Waaaaaay cool stuff....
We used to do firewood....But gave that up many years ago.
About 1992 I had a fella call me and inquire about hauling him a load of nut shells in my dump truck.
I grabbed the load at the plant and delivered them.
The guy had me dump them on a tarp in his driveway....They quickly covered them with more blue tarp...
A big ????????????????? WTF are you using his stuff for ????????????????? I asked....
He took me in the house and showed me the pellet stove in the corner burning away..
Less than two weeks later we had a new pellet stove in our place and a load of shells in barrels..
Having the dump truck made the job soooooooooooooooooo easy.
Nowhere near the physical work and a renewable resource.....
Now with the new breeds of hazelnut trees that are resistant to blight.....Tons of new orchards are going in.
The availability of cheap materials makes this a win win win scenario....
The only work is more just time than hard physical labor.....
8500 BTU per pound....
The stoves needed a little tweaking to optimize them for the shells....(Fuel delivery timing and combustion air adjustments)
After retiring from dump trucking it became necessary to get creative to haul and unload the stuff..
Big shop vac creates the high amount of air flow to run the system.....
The plywood top on the barrel in the piccy (It seals to the barrel with a foam gasket) One hose into the vacuum and the the "Barrel master" (Wood cover) one hose that sucks the shells and fills the barrel.
Same principle that they use with the "Suck trucks" to clean storm drains and suck out septic tanks....
Not as fast as the ditch gate on the big rig.....but effective.....
Pics of the old way....Easy and fast
The new outfit backed into the stable...Weather folks missed it and we just got it inside when the sky opened up...
Snowy Rivers
Well-known member
I hear you loud and clear on the INS Premiums....
The nuts are a yearly crop and they have to be rid of the shells....$30 to fill my 3 yard dumpster
Since we are all set up and can handle them....Just works sweet....
A lot of the shells go for landscape now instead of bark dust....They last far longer....Cats hate them...Sharp on the kitty paws...
I miss the big rig....A full tub on the truck was 20 yards......
One haul with the Gray Ghost filled us for the season...
After my stroke I retired and sold the rig....
Even with light materials I could haul a lot.
Rock...Easy to load up to 105,500# with a touch over 34 tons on board.....500 Cat calling the shots with a big Fuller 18 speed tranny....Air lockers in the 48000# Eaton 2 speed rears..
Some serious gears in that rig...
Get things down in the low side rears and deep under in the main box....Damned thing could rotate the earth...ALMOST..OR BREAK STUFF....Did that.....
Those rear ends are pretty tough.....
The old girl was just a fun rig to drive 1995 Western Star
All the creature comforts to....
Seems like yesterday I was trucking.....End of August of 2012 was the last run....
Had 700,000 miles on the clock when I sold it..
Original engine....second tranny....power divider rebuilt shortly before I sold it...
Snapped the input shaft off in the planet unit.....That is a big shaft.....Made a helluva bang when that went away...
MOBILE Mech yanked the divider out and dropped in a new one...I had the rig on the road the next morning.
Not cheap.....not even....
Ah yess....fun stuff....
Last edited:
Snowy Rivers
Well-known member
Ahhhh....So I hijacked the thread a bit....
Time to get back on track with the 2100 Build...
Weather is a big influence this time of years for sure....The other day I decided to open the cab doors and see wassssup...
Passenger side floor was dry....Sweeeeeet
Drivers side....NOT TO MUCH....About a pint of water pooled on the floor.....
Drilled a couple 1/4" holes to drain this out.....
I had removed all the carpet and pad this past summer and burned it....Simply trash.
The passenger side floor padding was soaked with antifreeze....(Heater core issue....Replaced that unit early on)
Drivers side floor was soggy.....
Really did not search this out much.
The previous winter the cab was mounted on the 2100 tub but the front clip was off and I assumed water had entered around the steering column flange where it fastened to the cowl.....The gasket was real sketchy...
This summer I had swapped in the column from the donor S-10 Blazer as it was in decent shape and all the needed controls were good (Wipers, T signal switch, and the tilt wheel) Wiring and connectors all good....
The column mounting at the cowl was decent.....
Mounting the front clip was a tad interesting getting the entire assembly bolted on in one chunk...
I had left the cowl air vent grille at the base of the windshield off as things needed a little modification to get things all assembled.
Normally the hood is off or up and the cowl vent grille can go on as bolt in place....With the hood now part of the assembly the air vent grille can't just slip in and fasten to the cowl.....
I wanted the entire clip one piece to facilitate doing a tilt front end....
After getting the front clip all on and stable..... and the massive front nose fabrication done we had a great place to mount the old core support using it's original mounts.....
At this point it became real obvious that the area under/inside the wheel house on both sides provided all the needed access needed to service the engine......Tilting the front end was now a moot point and a waste of time and effort....
Left things as they were.....Good to go.
Sooooooooooo.....Back to the water on the floor.
The cowl vent grille also has a channel that the hood rear lip sits in and water is carried to each side and drains away from the engine bay and out to the ground.....
Grille is not there....area open....Possible cause of the leak...
I grabbed a couple rubber truck flaps and laid them across the hood and up to the base of the windshield to keep water out of the area...
Yesterday I took a peek (We had rain the night before) and there is a small puddle on the floor in the driver foot well...Maybe a couple spoon fulls.....
Sadly this is likely coming from the windshield....
The S series cabs use a urethane bonded windshield......
The glass has a rubber/plastic trim on the edge that meets the body.....Water is probably leaking along the LH side of the windshield and somewhere near the bottom the urethane has lost it bond to the pinchweld......
The glass is good too....
Before we get stupid crazy and start setting up to get the windshield replaced I think a good cleaning of the area and some temporary tape along the side of the glass and onto the body will be a good plan to see if we can isolate the issue....
POSSIBLY
If this proves the source or the leak we may be able to left the trim a bit and clean the area out good and wash it out....Squirt in some sealer and possibly be able to Dodge the cost of a new glass......
This plan is certainly not perfect.....But for the application may be a decent fix.......
The body has zero outer rust....The likelihood is that the urethane simply lost the bond to the glass over the years...
I am not a fan of the bonded windows.....But the Grommet type sets have issues as well....And can leak....
So this is where we are.....Next dry day will be a good time to try the tape trick.....
At any rate....This leak has to get fixed......
If the window must be replaced we can only hope the pinchweld is not rusty.....
There is some really good sealer and a DUCKBILL applicator that may be able to seal this side....
We will just see.....Always options......If the window had a crack....it would be a simple decision....
A side note....
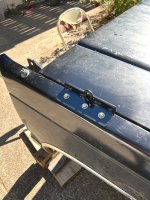
With the core support anchored well up front the clip can be assembled a piece at a time now.
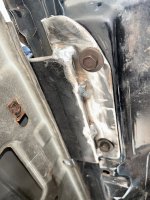
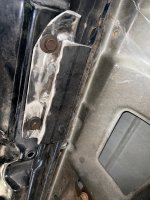
Each fender can go on and bolt up to the core support.....Then the hood can drop in and latch as usual and the rear bolts at the hinge (Modified to use the bolts but does not move)
The one small issue is the bolt in the hing/hood closest to to firewall on the passenger side.......It is not going to be easy to remove now as it is right over the heater box. PICCY 19 is looking up at the hinge bracket from the rear of the hood on the passenger side
The current assembly of things does not require both bolts at the rear of the hood as the hood is not being raised on the hinge.....Hood simply lays on the remnants of the hinge that is now bolted to the fender.....One bolt on each side will be fine,
The cowl grille slips down into the vent area and hooks at the rear most part of each fender and has a leg that sits on the top flange of the fender where it bolts to the cowl....Two bolts fasten each fender at the cowl (Two more bolts bolt the fender to the vertical mounting points between the door and the fender...One more bolt with a shim at the rocker panel to secure the lower part of the fender and align things for a decent fit....
Actually the plan really came together quite well....If not for the damned leak....things would have been 100%
But this is only a minor annoyance....
Some pics of the modified hood hing and the new bracket
The piccy shows the two bolts that fasten to the hood....
The bolt at the gently curved part is the one closest to the firewall and will need to be left out on the passenger side.
At present the original AC box is on the firewall....I have the non AC heater box that was purchased to clean this area up..
Getting the AC box out of the way makes a buttload more room in there.....The AC core is long gone but I wanted the area covered until I found the heat only box (Tough to find at the yards....The V8 swap guys buy these up quickly)
I finally scored one...
I had fitted the box to the S-wagon prior to discovering that the Skid steer could not handle the weight of the entire Blazer body....And the chop job followed....
A Chinese puzzle or sorts....
The driver side is easy to get to..........The hood latch is as it was from MA GENERAL....Trip the latch from under the hood standing in the wheel house area.....Hood can lift off easily
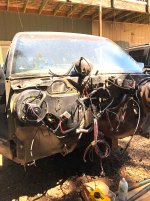
Time to get back on track with the 2100 Build...
Weather is a big influence this time of years for sure....The other day I decided to open the cab doors and see wassssup...
Passenger side floor was dry....Sweeeeeet
Drivers side....NOT TO MUCH....About a pint of water pooled on the floor.....
Drilled a couple 1/4" holes to drain this out.....
I had removed all the carpet and pad this past summer and burned it....Simply trash.
The passenger side floor padding was soaked with antifreeze....(Heater core issue....Replaced that unit early on)
Drivers side floor was soggy.....
Really did not search this out much.
The previous winter the cab was mounted on the 2100 tub but the front clip was off and I assumed water had entered around the steering column flange where it fastened to the cowl.....The gasket was real sketchy...
This summer I had swapped in the column from the donor S-10 Blazer as it was in decent shape and all the needed controls were good (Wipers, T signal switch, and the tilt wheel) Wiring and connectors all good....
The column mounting at the cowl was decent.....
Mounting the front clip was a tad interesting getting the entire assembly bolted on in one chunk...
I had left the cowl air vent grille at the base of the windshield off as things needed a little modification to get things all assembled.
Normally the hood is off or up and the cowl vent grille can go on as bolt in place....With the hood now part of the assembly the air vent grille can't just slip in and fasten to the cowl.....
I wanted the entire clip one piece to facilitate doing a tilt front end....
After getting the front clip all on and stable..... and the massive front nose fabrication done we had a great place to mount the old core support using it's original mounts.....
At this point it became real obvious that the area under/inside the wheel house on both sides provided all the needed access needed to service the engine......Tilting the front end was now a moot point and a waste of time and effort....
Left things as they were.....Good to go.
Sooooooooooo.....Back to the water on the floor.
The cowl vent grille also has a channel that the hood rear lip sits in and water is carried to each side and drains away from the engine bay and out to the ground.....
Grille is not there....area open....Possible cause of the leak...
I grabbed a couple rubber truck flaps and laid them across the hood and up to the base of the windshield to keep water out of the area...
Yesterday I took a peek (We had rain the night before) and there is a small puddle on the floor in the driver foot well...Maybe a couple spoon fulls.....
Sadly this is likely coming from the windshield....
The S series cabs use a urethane bonded windshield......
The glass has a rubber/plastic trim on the edge that meets the body.....Water is probably leaking along the LH side of the windshield and somewhere near the bottom the urethane has lost it bond to the pinchweld......
The glass is good too....
Before we get stupid crazy and start setting up to get the windshield replaced I think a good cleaning of the area and some temporary tape along the side of the glass and onto the body will be a good plan to see if we can isolate the issue....
POSSIBLY
If this proves the source or the leak we may be able to left the trim a bit and clean the area out good and wash it out....Squirt in some sealer and possibly be able to Dodge the cost of a new glass......
This plan is certainly not perfect.....But for the application may be a decent fix.......
The body has zero outer rust....The likelihood is that the urethane simply lost the bond to the glass over the years...
I am not a fan of the bonded windows.....But the Grommet type sets have issues as well....And can leak....
So this is where we are.....Next dry day will be a good time to try the tape trick.....
At any rate....This leak has to get fixed......
If the window must be replaced we can only hope the pinchweld is not rusty.....
There is some really good sealer and a DUCKBILL applicator that may be able to seal this side....
We will just see.....Always options......If the window had a crack....it would be a simple decision....
A side note....
With the core support anchored well up front the clip can be assembled a piece at a time now.
Each fender can go on and bolt up to the core support.....Then the hood can drop in and latch as usual and the rear bolts at the hinge (Modified to use the bolts but does not move)
The one small issue is the bolt in the hing/hood closest to to firewall on the passenger side.......It is not going to be easy to remove now as it is right over the heater box. PICCY 19 is looking up at the hinge bracket from the rear of the hood on the passenger side
The current assembly of things does not require both bolts at the rear of the hood as the hood is not being raised on the hinge.....Hood simply lays on the remnants of the hinge that is now bolted to the fender.....One bolt on each side will be fine,
The cowl grille slips down into the vent area and hooks at the rear most part of each fender and has a leg that sits on the top flange of the fender where it bolts to the cowl....Two bolts fasten each fender at the cowl (Two more bolts bolt the fender to the vertical mounting points between the door and the fender...One more bolt with a shim at the rocker panel to secure the lower part of the fender and align things for a decent fit....
Actually the plan really came together quite well....If not for the damned leak....things would have been 100%
But this is only a minor annoyance....
Some pics of the modified hood hing and the new bracket
The piccy shows the two bolts that fasten to the hood....
The bolt at the gently curved part is the one closest to the firewall and will need to be left out on the passenger side.
At present the original AC box is on the firewall....I have the non AC heater box that was purchased to clean this area up..
Getting the AC box out of the way makes a buttload more room in there.....The AC core is long gone but I wanted the area covered until I found the heat only box (Tough to find at the yards....The V8 swap guys buy these up quickly)
I finally scored one...
I had fitted the box to the S-wagon prior to discovering that the Skid steer could not handle the weight of the entire Blazer body....And the chop job followed....
A Chinese puzzle or sorts....
The driver side is easy to get to..........The hood latch is as it was from MA GENERAL....Trip the latch from under the hood standing in the wheel house area.....Hood can lift off easily
Attachments
Last edited:
Snowy Rivers
Well-known member
Hope everyone had a great Christmas and New year.
Nothing Cat going on....
Weather sucks....
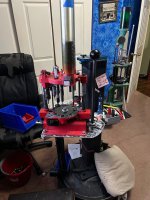
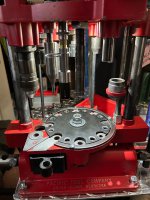
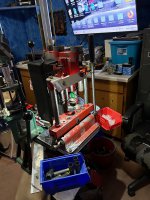
For Christmas I wanted to get a couple of 12 gauge shot shell reloading presses rebuilt for my Grand son.
He got into trap shooting this fall in the high school league....
Then he joined the club and it has been off to the Rodeo ever since.....
I had been into cowboy action shooting and we quit that after my stroke....
I sold the Mec 9000 press as we did not need it...
So now the work station has a Hornady 366 and a Hornady 266 mounted on it.
Both needed work.......The 366 is working sweet...Almost done with the 266....I was a sweet unit....But was damaged in shipping from NC.....Basically a frame off resto mod.....
And teaching the kid how to run the stuff.....
Waiting for new tubes for the charge hoppers.
Got a 5 foot piece coming....Be here tomorrow.....
Fun stuff
Nothing Cat going on....
Weather sucks....
For Christmas I wanted to get a couple of 12 gauge shot shell reloading presses rebuilt for my Grand son.
He got into trap shooting this fall in the high school league....
Then he joined the club and it has been off to the Rodeo ever since.....
I had been into cowboy action shooting and we quit that after my stroke....
I sold the Mec 9000 press as we did not need it...
So now the work station has a Hornady 366 and a Hornady 266 mounted on it.
Both needed work.......The 366 is working sweet...Almost done with the 266....I was a sweet unit....But was damaged in shipping from NC.....Basically a frame off resto mod.....
And teaching the kid how to run the stuff.....
Waiting for new tubes for the charge hoppers.
Got a 5 foot piece coming....Be here tomorrow.....
Fun stuff
Attachments
Snowy Rivers
Well-known member
HI
I have been lurking.
Fooled with the shotgun stuff for the grand kid....
My health has headed down a lot since last summer.
The dream is still there but the old bones just says enough......
I am not going to lie.....chances are not good that I can finish the cat....
I have a few projects planed for this summer and they are all domestic stuff.......
The 406 short block rotating assembly is together ....Heads are done and lots of the needed parts are on the shelf...
Not much more to say.....
I had hoped I could get this wrapped up before the body gave out.....
Ah well....Been fun though....
sorry to hear, I think everyone was rooting to see your vision of a snow cat on the snow, kicking snowflakes and taking no grousers, peace be with you
Snowy,HI
I have been lurking.
Fooled with the shotgun stuff for the grand kid....
My health has headed down a lot since last summer.
The dream is still there but the old bones just says enough......
I am not going to lie.....chances are not good that I can finish the cat....
I have a few projects planed for this summer and they are all domestic stuff.......
The 406 short block rotating assembly is together ....Heads are done and lots of the needed parts are on the shelf...
Not much more to say.....
I had hoped I could get this wrapped up before the body gave out.....
Ah well....Been fun though....
As I recall a couple years ago your health wasn't great (cancer?) and you beat that, and came back like gangbusters. I hope you are able to summon the strength and make another comeback!
You will be in my thoughts and prayers.
Snowy Rivers
Well-known member
Thanks crew.
I appreciate all the well wishes.
I can't give you anything specific.....What we do know is that a medication that was given after my stroke does have a dark side....In some folks it causes an auto immune response that goes after muscles and creates a neurological type issue like ALS.
It is not ALS.....But similar symptoms.....
that sounds wonderful. ( lame attempt at humor) I am a frequent seeker of prednisone and the dark side is kidneys, I live in fear of the dialysis machine some day.Thanks crew.
I appreciate all the well wishes.
I can't give you anything specific.....What we do know is that a medication that was given after my stroke does have a dark side....In some folks it causes an auto immune response that goes after muscles and creates a neurological type issue like ALS.
It is not ALS.....But similar symptoms.....
I will seek aspirin and an energy drink to kick start my dynamo, I hope you find a patch or work around....