-
Please be sure to read the rules and adhere to them. Some banned members have complained that they are not spammers. But they spammed us. Some even tried to redirect our members to other forums. Duh. Be smart. Read the rules and adhere to them and we will all get along just fine. Cheers. :beer: Link to the rules: https://www.forumsforums.com/threads/forum-rules-info.2974/
You are using an out of date browser. It may not display this or other websites correctly.
You should upgrade or use an alternative browser.
You should upgrade or use an alternative browser.
542 Cab Forward Restoration
- Thread starter GMoose
- Start date
olympicorange
Active member
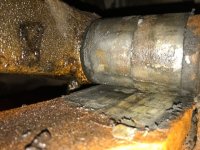
Then the bearings were drilled and tapped for the grease zerks, and a new bottom shield plate identical to the original one was attached.
View attachment 118445
View attachment 118446
….. nicely done ,... love the ''reinforcement'' pieces ,... the right tool for the job , makes for a much better finished process.... which helps for long Gevity … love your thread....

Built the new thrust washer this weekend for the front of the trunion pin. Also built a thin washer for the aft end of the pin to take up axial slop and give a better thrust area than the back side of the trunion hold down clamp was doing.
Here is the pin before the washer was installed, I had to machine the fillet weld down a bit so I could get a good perpendicular thrust face on the angle head of the trunion pin.
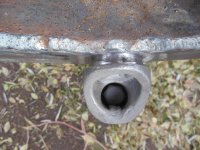
Here is the new thrust washer:

Here it is installed:

Here is the thin washer on the aft end, just next to the roller bearing, everything is tight now, but not to tight, slop is gone and good thrust faces are now in play:
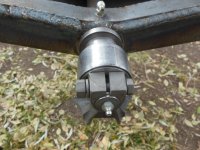
Here is the pin before the washer was installed, I had to machine the fillet weld down a bit so I could get a good perpendicular thrust face on the angle head of the trunion pin.

Here is the new thrust washer:

Here it is installed:

Here is the thin washer on the aft end, just next to the roller bearing, everything is tight now, but not to tight, slop is gone and good thrust faces are now in play:

as much as I like to restore to original specs, I would not put the box back on, but rather create a storage area in the coffin and have a hinged door in the floor of the flatbed, the coffin area is just wasted space, unless you take the fuel tanks out of the cab and built a custom tank in the coffin area, thus giving you more room in the cab, that would be the best choice IMHO.
thank you for posting the photos of the restoration.....
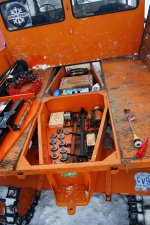
Agreed on this. That is a massive amount of Sno-Cat to only be able to carry two people inside. This is 'coffin' option:
Attachments
My recommendation would be to use a wear metal for the thrust washer surfaces for long term service.
That current setup if all the same material will wear your fine work over time causing you to redo it all. Although maybe not until the next lifetime.
McMaster Carr should have what you need like a bronze or hardened bronze.
Check out my 1443 thread for what I used.
That current setup if all the same material will wear your fine work over time causing you to redo it all. Although maybe not until the next lifetime.
McMaster Carr should have what you need like a bronze or hardened bronze.
Check out my 1443 thread for what I used.
Built the new thrust washer this weekend for the front of the trunion pin. Also built a thin washer for the aft end of the pin to take up axial slop and give a better thrust area than the back side of the trunion hold down clamp was doing.
Here is the pin before the washer was installed, I had to machine the fillet weld down a bit so I could get a good perpendicular thrust face on the angle head of the trunion pin.
View attachment 118711
Here is the new thrust washer:
View attachment 118712
Here it is installed:
View attachment 118713
Here is the thin washer on the aft end, just next to the roller bearing, everything is tight now, but not to tight, slop is gone and good thrust faces are now in play:
View attachment 118714
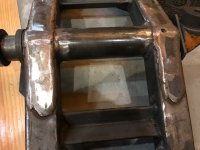
If you are looking for bomb proof, here is another idea to beef up the trunnion cross member. Also, turn another trunnion roller to decrease the wear on the fifth wheel. Better to have two rollers, as shown, as they will revolve at different speeds. One long one works too. Splitting of the hair.
Attachments
Maybe a nice sacrificial wear plate under the split roller setup to protect the table for the ultimate heirloom tucker?
My recommendation would be to use a wear metal for the thrust washer surfaces for long term service.
That current setup if all the same material will wear your fine work over time causing you to redo it all. Although maybe not until the next lifetime.
McMaster Carr should have what you need like a bronze or hardened bronze.
Check out my 1443 thread for what I used.
I like this idea, did think about it a little but all I had on a rainy Saturday was a piece of carbon steel. I now have a good pattern to go with, I will round up a piece of bronze and make another one. Appreciate the help and good ideas, keep them coming.
Actually I was surprised that this pin was so sloppy in the trunion, I looked at the frame I have for the 1969 543 and it is all tight and better machined. I guess they were learning as they went along, much like I am.
If you are looking for bomb proof, here is another idea to beef up the trunnion cross member. Also, turn another trunnion roller to decrease the wear on the fifth wheel. Better to have two rollers, as shown, as they will revolve at different speeds. One long one works too. Splitting of the hair.
That is a great idea, I will look into it. No guarantees I will do it but you never know. Thanks for the help and ideas. Please keep them coming.
Agreed on this. That is a massive amount of Sno-Cat to only be able to carry two people inside. This is 'coffin' option:
That "coffin" option is way cool, I now understand. This one I am going to have to think about. One issue I have is this is where the exhaust pipe and muffler were located, if I go with this option I will have to figure out a new path for them. Now for my personal dilema: I want to keep this unit close to original, that is what I did with the Frandee. After 8 years of working on the Frandee to keep it original (as well as I could) it has tainted me. I don't want to ruin this machine by making significant modifications. When I get in it to drive I want to feel like I am still driving the same unit they made back in 1966. Sappy, ya, but that is the way I am. Also, this may sound crazy, but eventually I want to make a camper I can place on the bed. I think that would make for a great adventure rig. Take the Tucker and the Frandee, leave the Tucker as base and drive the Frandee around, or whatever. Dreams dreams dreams.
Now for these great ideas that have been coming my way like the "coffin" and the improved trunion, and whatever else may pop up, well I bought the Tucker frame from the 543 this spring up in Washington, then I bought the 500 series pontoons from the Tucker factory. Now it looks like I may not be using many of the parts from either of these purchases on the 543CF. So what does this leave but the makings for a custom Tucker like snowcat from these extra parts, hmmm the ideas, I need to get retired so I have time for all of this.
nice progress and willingness to consider thinking outside the pontoon
first, Tucker Never Built 2 Machines the same,
as for original, from my perspective, originally is the holy grail, but when it comes to tucker, the company left so many ideas on the table, and the vast majority would have made the snow cat so much better.....
so, any bolt on item is good way to go, in creating a better function, like more room the in the cab and removing a gas tank from the passenger compartment is a good thing, as for exhaust pipes, the factory ran them every which way, preferred, is to go up above the cab, and out of the way, with much reduced exhausted getting into the cab, neither of these changes would in any way affect the vintage driving feel...
do not let the love of originally get in the way of good ideas that the factory should have done in the first place.
stay orange and tucker on
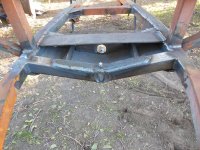
Cut out the rear center supports of the bed, the bottom side of both had spots where they had rusted through (they were full of "dirt" from where I have no idea, there was not that much internal corrosion). Also cut out the angle iron cross braces that support the plywood deck, they had bad pitting on the top surfaces where they were in contact with the wood.
Old one:
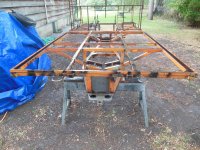
New one: This one also shows where I replaced the cross member where the transmission sits. The previous cross member had been cut out, presumably to support clutch replacement. The replacement was in very poor condition where they attempted to weld it back in. I also welded a "T" section back in just above the cross member, they had also cut it out, but never welded it back in.

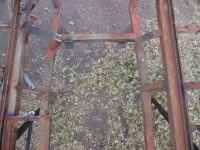
Then welded in new members plus added a center cross brace with two legs which went down to the lower frame work. There was about a 5 foot span with very little support, thought this might help. The original did not have this support, however at one time someone had added a very crude one.
Old one:

New one:

Old one:

New one: This one also shows where I replaced the cross member where the transmission sits. The previous cross member had been cut out, presumably to support clutch replacement. The replacement was in very poor condition where they attempted to weld it back in. I also welded a "T" section back in just above the cross member, they had also cut it out, but never welded it back in.

Then welded in new members plus added a center cross brace with two legs which went down to the lower frame work. There was about a 5 foot span with very little support, thought this might help. The original did not have this support, however at one time someone had added a very crude one.
Old one:

New one:

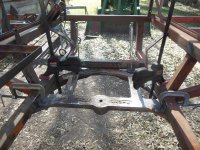
The brackets which hold the top half of the front fifth wheel (rear fifth wheel on standard Tuckers) were in very very poor shape, bent with cracked welds. Cut old ones out, fabricated new ones, drilled out the egg shaped holes in the fifth wheel plate, fabricated new bushing inserts and bolted it all together for reinsertion. Here it is with the new supports ready to be welded in. Could not weld yet because it was windy all day Sunday (blows the cover gas away). I will show more of the fifth wheel repair later when I do all of the fifth wheel repairs.
Old ones:

New ones, ready to weld in.
Old ones:


New ones, ready to weld in.

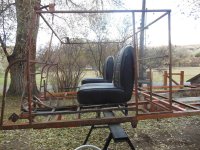
The frame work around the perimeter of the bed had heavy pitting on the top surface, otherwise they were structurally sound. Decided to replace the entire section. Here it is cut away, forgot to get a picture of it all re-fabricated and tacked in, still need to weld it all together (wind issue). It is currently all covered up to keep it dry so I do not have to do to much cleanup prior to welding. It is currently getting covered by snow as I write this, got about an inch so far this evening. Will post pictures of the finished section of frame once I get it welded in, hopefully next weekend (running out of dry weather here in Idaho).
Pitting on surface:

Cut away frame:

Pitting on surface:

Cut away frame:

mikemikelle
Active member
In the vintage car world, that is the equivalent of "Unobtainium" on the patina scale.
Whats the stone sub-surface building with a chimney...back entrance to the bat cave or a speak easy?
Whats the stone sub-surface building with a chimney...back entrance to the bat cave or a speak easy?
olympicorange
Active member
…… looking good , the transfer case assy. is not a complicated unit... each shaft has a ''preload'' spanner nut for adjustment... I fabricated a socket to fit spanner's ,... is that an old JD 1010/1020 ?? in the background ...

In the vintage car world, that is the equivalent of "Unobtainium" on the patina scale.
Whats the stone sub-surface building with a chimney...back entrance to the bat cave or a speak easy?
I think I will pass on the patina, but if you would like some I have some for sale.
The stone building is my well house, built around 1941, rebuilt roof and interior walls a few years ago. The "chimney" is actually the access to the well head, I pull the cap off and can pull the pump and pipe straight out. I live next to the Mink Creek, the well is only 18.5 feet deep now, water is just about 5 feet below the well head.
…… looking good , the transfer case assy. is not a complicated unit... each shaft has a ''preload'' spanner nut for adjustment... I fabricated a socket to fit spanner's ,... is that an old JD 1010/1020 ?? in the background ...
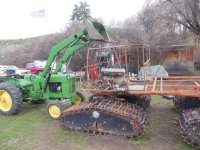
Yes, that is a 1964 (same model year as me) JD 1010 I rebuilt several years ago. It is my main work horse, could not rebuild these snowcats without it.
…… looking good , the transfer case assy. is not a complicated unit... each shaft has a ''preload'' spanner nut for adjustment... I fabricated a socket to fit spanner's ,... is that an old JD 1010/1020 ?? in the background ...
Now I have some questions for you, if you don't mind helping out a bit, or if anyone out there has some helpful info I would very much appreciate it.
For the transfer case, I am researching what preload to put on the bearings. It appears the newer 2000XL model uses .001 to .003 inches of clearance for the bearing endplay between races. My research using the TIMKEN manual indicates .004 to .010 inches of clearance. I thought about calling Clyde at Tucker and seeing if he would provide what they suggest for a 1966 transfer case. The research indicates you want to have near zero endplay once the transfer case is warmed up to operating temperature. I imagine that the slow speed these gears turn that the case does not heat up much. Therefore, I am leaning toward an endplay of around .003 to .004 inches. When I took the case apart one of the bearing races for the center shaft had a couple of small spots where the race had spalled off. It also looked like the nut used to set the preload (move the race in) had backed out slightly, as the center gear had started to touch the aluminum case. Damage/wear is minimal and inconsequential.
The two case halves were assembled without use of any sealant. I see on the newer cases the factory uses silicone sealant, I am not sure I like this idea. I have had some bad luck with silicone before on this type of seal. I am considering using some different Permatex form-a-gasket type material, even thought about using copper coat. Any suggestions.
I am working to calculate the torque I want to use on all the fasteners and the tightening steps and sequence. Should have that figured out before to long.
Planning to order the bearings and seals this Friday. Still have to get the races out of the one side of the case, figured I would weld a bead around the internal diameter of the race to shrink it and free it up.
I have the wrench to adjust the nut which is used to preload the bearings about 80% built, should work well. Will attach a picture of it when I get it completed.
If you look to the far left center of this picture the center bearing race damage can be seen.
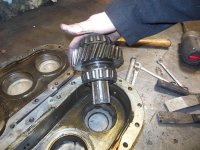
Here is the minor wear on the other side of the case where the endplay was to much and allowed the gear to travel into the case. This preload nut was found to be loose when disassembly was being performed.


olympicorange
Active member
Yes, that is a 1964 (same model year as me) JD 1010 I rebuilt several years ago. It is my main work horse, could not rebuild these snowcats without it.
View attachment 119066
…… very nice, we had one on the old farm yrs. ago,... never seen one with a loader,... I too , use an AG tractor for many tasks. i'm an Allis-chalmers brand , my A/C 160 has a 3 cyl. perkins ( the type you can get parts for ...ha.). hard to beat the ''orange Kool-Aid '', in any brand...lol
olympicorange
Active member
Now I have some questions for you, if you don't mind helping out a bit, or if anyone out there has some helpful info I would very much appreciate it.
For the transfer case, I am researching what preload to put on the bearings. It appears the newer 2000XL model uses .001 to .003 inches of clearance for the bearing endplay between races. My research using the TIMKEN manual indicates .004 to .010 inches of clearance. I thought about calling Clyde at Tucker and seeing if he would provide what they suggest for a 1966 transfer case. The research indicates you want to have near zero endplay once the transfer case is warmed up to operating temperature. I imagine that the slow speed these gears turn that the case does not heat up much. Therefore, I am leaning toward an endplay of around .003 to .004 inches. When I took the case apart one of the bearing races for the center shaft had a couple of small spots where the race had spalled off. It also looked like the nut used to set the preload (move the race in) had backed out slightly, as the center gear had started to touch the aluminum case. Damage/wear is minimal and inconsequential.
The two case halves were assembled without use of any sealant. I see on the newer cases the factory uses silicone sealant, I am not sure I like this idea. I have had some bad luck with silicone before on this type of seal. I am considering using some different Permatex form-a-gasket type material, even thought about using copper coat. Any suggestions.
I am working to calculate the torque I want to use on all the fasteners and the tightening steps and sequence. Should have that figured out before to long.
Planning to order the bearings and seals this Friday. Still have to get the races out of the one side of the case, figured I would weld a bead around the internal diameter of the race to shrink it and free it up.
I have the wrench to adjust the nut which is used to preload the bearings about 80% built, should work well. Will attach a picture of it when I get it completed.
If you look to the far left center of this picture the center bearing race damage can be seen.
View attachment 119068
Here is the minor wear on the other side of the case where the endplay was to much and allowed the gear to travel into the case. This preload nut was found to be loose when disassembly was being performed.
View attachment 119069
View attachment 119070
…. so, your research has pretty well ''nailed'' it … the 'OL rule of thumb for roller brgs. is … .003''-.005'' for oil clearance . you don't want too much/minimal ..''axial'' endplay.. a few thousands , so you don't have any ''binding'', heat, slop, ''noise/whine'',... etc. your ''spanner'' adj. nuts should be fine thread, ''split'' , with a small set-screw , which screws into the split, to lock the spanner nut , from moving. the real important detail here is the threads,....all of them. the spanner nuts need to thread in & out , freely & smoothly ,... by hand. no drag/burrs, etc. because , if not, it gives you a ''false pre-tense'', of the actual pre-load,... or not , the lack there of... so, that may have been part of the issue , as to why the middle one was ''backed off''. or missing the set-screw?? the case halves hardware, should be 5/16'' NF …. so standard torque is usually ; 25-28 ft./lbs.,.. using a ''criss-cross''...X … torque pattern, like a cyl. head. I agree, silicone is job specific. what I like to use here, in this application is ...''flange'' sealer,... sometimes called … liquid gasket maker,... kind of smells like ''thread lock'',... usually ''red'' in color..... also important, as in any assembly; prelube brg. & races....gives you a better /real feel when pre-loading... I have a short section on the transfer case , in the 1542 blog,... I just don't know how to ''attach'' and drag it here...hope that helps,.. ''clear as mud '', as they say. from following your blog, you have this under control.. nice work,...

olympicorange
Active member
Yes, that is a 1964 (same model year as me) JD 1010 I rebuilt several years ago. It is my main work horse, could not rebuild these snowcats without it.
View attachment 119066
…. can't quite see your powerplant,... whatcha got there....
Sno-Surfer
Active member
Sure enjoy this thread and your work is so thorough. Thanks for documenting it. After seeing the Frandee, expectations are high. 

…. can't quite see your powerplant,... whatcha got there....
I am assuming you are talking about the JD, it is a JD 4 cylinder gas engine. The one that the cylinder sleeves all come out together as one unit.
Thank you very much for the transfer case rebuilding information.
olympicorange
Active member
…… hello G,... yes, the 1010 is one of the rare engines , that all 4 sleeves are attached to the top plate ,... when we did ours, we had a hell of a time getting them out, pretty sure it hadn't been apart before,.... I was actually asking about the engine you had hanging off the loader ….I am assuming you are talking about the JD, it is a JD 4 cylinder gas engine. The one that the cylinder sleeves all come out together as one unit.
Thank you very much for the transfer case rebuilding information.


