• Please be sure to read the rules and adhere to them. Some banned members have complained that they are not spammers. But they spammed us. Some even tried to redirect our members to other forums. Duh. Be smart. Read the rules and adhere to them and we will all get along just fine. Cheers. :beer: Link to the rules: https://www.forumsforums.com/threads/forum-rules-info.2974/

"Snowzilla": A Comprehensive Tucker 1643 Project...

Thanks for the replies and pics....

Our objective is a nice, clean repair that's essentially undetectable. I think that’s what both Rob Miller and YDPC were after as well. I have seen some Tuckers listed for sale that have had the same issue, and the “repaired” grousers had the tombstones very roughly hacked out - and not welded back in after the broken bolt was replaced. They looked horrible, and one couldn’t help but look at that level of “workmanship”… and extrapolate it to the rest of the snowcat. At that point I lost all interest in buying the machine.

What we decided to do was along the lines of YDPC’s method. We take an angle grinder and cutoff wheel, and make a vertical cut in the grouser’s supporting angle plate, just inside of where the bolt is. Then another cut along the grouser’s face that intersects that supporting angle plate. Next, we pry the cut section of the angle plate back to expose the welded bolt head. At that point Scott uses his acetylene torch to remove the welded portions of the bolt head. Then it’s driving the broken bolt out, inserting a new bolt, welding the bolt head to the grouser. What’s left to do now is bend the free end of the supporting plate back into position and weld up all the cuts. A little weld cleanup with an angle grinder and it’s done. For increased strength and weld penetration, Scott used his stick welder for all the grouser welding. I thought it was going to be more of a process than it turned out to be. It actually went considerably faster than I expected it to. When does that ever happen?

Pics:

The cut and bent angle supporting plate with the broken bolt removed.

View attachment 163721

New bolt welded in position with the cuts welded.

View attachment 163722

The repaired grouser.

View attachment 163723

YDPC,

I’ve seen a few Tuckers with a two-belt vs four-belt setup. A number of years ago I wondered about that in terms of pros and cons and I was told a big reason for the four-belt setup is that it has better side hill holding ability. Just an FYI… I don’t know if that’s true, or how much of a difference it makes.

Snowy,

Your point about safety glasses hit home. Half a lifetime ago I had a job running a turret lathe and one day I was making a part that had a tapped hole in the end. The tap broke and part of it came up and shattered the left lens of the safety glasses I was wearing. There is zero doubt that without the safety glasses I would have lost the eye. Over the years since, I’ve thought about that, and wondered how different my life would have been had I not been wearing safety glasses. After returning to college and graduating, I went into the USAF for about 8 1/2 years, and that led to a career in aviation. Neither would have been possible….
Oh yesssssss.
Having worn glasses since I was about 20 YO they have saved my eyes many times.

I worked in several machine shops over the years running lathes, mills, radial arm drill presses and on and on......

Safety glasses were not necessarily required back in the day....Always recommended but the rule was not enforced much...

I have been hit by flying chips while walking by large milling machines and hot sparks from carbon arc scarfing and on it goes.

I proudly wear the scars of a lot of different incidents.....But still have both eyes and all of my fingers....

You work in industry and or around machining, welding and fabrication CHIT HAPPENS.......It is always there and can get you any time.....

Having good eyesight is a blessing....But having to wear prescription glasses was not a bad thing.....Good quality lenses that can also act as protection and is a good thing.

Drills shatter, taps shatter......Red hot chips fly off the mill/lathe cutter and are always a serious hazard.......

Using a simple tool like a hammer......Swat a punch and a piece of metal flies up and bingo.....A gotcha.....

I was digging a broken tap out of a part years ago.....Tap shattered and a piece the size of a BB flew off and went between the nose piece and the upper bar of my glasses.....Stuck into the bridge of my nose.

I thought it had just nicked me.....Left a little knot that was there for years.

Finally got tired of it being sore from time to time.....Had the Doc look at it.....He dug it out.....Damned chuck of tap....

Had this been an eye.....Game over.........

Safety gear is a good thing.

Another item that sooooo many folks do not think about......"Mechanics gloves" YESSSSSSSSSSS....The amount of chemicals that we can get into such as Gasoline, solvents, antifreeze, greases, oils And much more can all penetrate the skin and in small amounts get into our bodies.

I pretty much use the mechanics gloves when working with these things.....Aside from keeping your paws clean....They help stop the harmful affects of the various chemicals.

After having a kidney removed back in 2013 (April 1st 2013) due to a huge azz tumor) I have way more thought to this stuff.

Another batch of materials are paint supplies, thinners and other nasty stuff...

Many guys seems to think it's only the sissy with well manicured nails and prissy skin use these.....The stuff that can hurt us is a vast amount of stuff.....

Absorption through the skin is real.......And the kidneys are in charge of clearing that crap out......After you lose one to cancer.....YOU THINK ABOUT IT MORE

Grinding off (Sanding) old paint is another nasty job......This stuff goes into your lungs and can do harm.

Good dust protection masks are a good thing.

Painting....especially with multi part paints requires a good respirator system.....
I will not touch that stuff without fresh air mask and a full protective suit.

I am sensitive to the chemicals in it and even a bit on my skin is an emergency......

We use so many things in our cat hobby that can hurt of kill us if we are lax in using protection.

Am I scared....Not even.....I use the protection required.

Just my 2 Cents worth...
 
No significant progress to report, but there is a name change from Putri-Zilla….

Folks who have followed this thread from the beginning may remember the original name given to this Tucker Sno-Cat project: Snow Zilla. That was a great name, but after The Infamous WBJ1 decided he wanted it painted a very ugly shade of green, Snow Zilla was no longer appropriate. For a time, I referred to the color as “pea soup green”, but “baby shit green” won out. At some point I started calling it Putri-Zilla; in honor of the putrid color.

After a recent private text exchange, it’s been decided to call it TUGS. (TUG (singular) was the name of a DMC 1450 project that Scott and I sold earlier this year.) TUGS (plural) is also an acronym, and it’s short for The Ugly Green Snowcat. It seems spot-on accurate.
I think the forum needs to vote on the name change! I suggest TLGS " The Legendary Green Snocat" and here's why.....

This cat will have been built and painted by two legends - The Legendary Blackfoot Tucker AND Pontoon Princess herself! On top of that this cat then inspired an entire organization now known as "The Green Snocat Mafia". A cat built/painted by two legends and inspiring folks! This cat is making a real difference in the world! So all in favor of TLGS, raise your hands!!

And don't give in to the pressure to vote orange or let this vote be stolen! We've had enough of that the last few years!!
 
As the owner, and one of the prime builders of this machine, I believe naming rights are mine. Were this to become a popularity contest, I have zero doubt that The Infamous WBJ1 would stuff the ballot box in an attempt to sway the election.

The relatively recent story of the naming of a British polar research ship seems illustrative:

The British government had decided to build a new and very expensive ship for polar research and they decided to let the taxpayers suggest a name for the vessel, though he governmental agency responsible for the ship, the National Environmental Research Council (NERC), said they would not be bound by the results of the vote.

Among the thousands of suggested names was Boaty McBoatface, suggested by a public relations guy. The name was in reference to an adopt-a-bird program in which an owl had been named Hooty McOwlface. Well, the popularity of Boaty McBoatface took off and the suggester later apologized to the NERC - as his suggestion had been in jest. But after voting closed, Boaty McBoatface was the winner by a wide margin.

The NERC decided to ignore the vote, and named the ship Sir David Attenborough.
 
as a stake holder, I would like to enter a third choice for the new name for that damn ugly green thing, this comes from BFT

CHUGSzilla,

C-chad
H-Hullander's
U-ugly
G-green
S-snowcat
ZILLA

if CHUGSzilla wins, free beer for all, provide by Chad Hollander at snow cat serenade 2024, we all can chug one to celebrate CHUGSzilla first outing, the green is ugly, the beer is free

remember to vote and vote often!

long live CHUGSzilla
 
Last edited:
I say Kermit because if this thread has taught us anything it’s that “it ain’t easy being green!”
90082EF7-DB40-451F-98EA-44AF5A2D6F20.jpeg
 
I like it's original name
"SNOWZILLA" Ir looks great forest green
For those that don't know, "SRT-1" is none other than my snowcat partner-in-crime, Scott. Better known as "The Gorilla". That's his 4VL in his avatar.

Here's a better pic of man and machine. (BTW, that sucker is fast!)

DSC00818.JPG


Clearly, he is under the influence of the Green Tucker Mafia. I can report with 100% sincerity that when I first opened the can of green paint his exact words were "My God, that's a hideous color"....
 
In a similar vein in the early 1980's the Canadian federal/territorial governments decided it was about time to give the North West Territories (NWT) a real name. With a nod to inclusivity and all that crap the government pays lip serve to, the public was invited to suggest an appropriate name.
The most popular name by a huge margin was BOB.
No one knows anyone named Bob, but it resonated with the NWT population that figured the government was taking itself too seriously.
The government decided to not rename the NWT after all, and it is still the NWT today. Don't mess with the people.
 
I remember a post about wiring up the CHUGSzilla.
Would you have a schematic of that wiring?
I am running a GM alternator, Sniper EFI and electronic distributor, but my issue is the amount of current that goes through the ignition post on the key.
I'm thinking that I need to clean up the wiring and use a relay to trigger 12v power from the key on.
That way I don't fry the ignition component by having everything from high pressure fuel pump, heater/defrost, back up cameras, etc go through that one ignition on post..
 
you better take it out before all the snow turns into water , and runs down the mountains

it looks great
 
I remember a post about wiring up the CHUGSzilla.
Would you have a schematic of that wiring?
I am running a GM alternator, Sniper EFI and electronic distributor, but my issue is the amount of current that goes through the ignition post on the key.
I'm thinking that I need to clean up the wiring and use a relay to trigger 12v power from the key on.
That way I don't fry the ignition component by having everything from high pressure fuel pump, heater/defrost, back up cameras, etc go through that one ignition on post..
YDPC,

We didn’t make a full wiring diagram for either CHUGSzilla or Thundercat but I think I have some papers with the circuit breaker layout. I’ll look for those and post them. Do you have the Tucker wiring schematic? I have one dated 1979, so it may be different than your wiring setup, but it also might be helpful.

Tucker used self-reseting circuit breakers and they are roughly 3/4” wide and maybe 1 1/8” long. If your circuit breaker panel is out of real estate as far as adding circuits, you can buy narrow profile circuit breakers also featuring studs. As I recall, John Deere uses these. IIRC, they are half the width and slightly shorter.

One of my best friends installed a Sniper system and he told me that the Sniper system’s power requirements are crucial to system performance. He wired both the power and ground wires direct to the battery.
I do have an original Tucker wiring harness for this Tucker, but the wiring requirements in the Tucker today are much different, so not very useful anymore. Good summer project, between gold panning and camping!
IMG_2739.JPG
 
So it’s back to work on CHUGSzilla. We’re in the process of reassembling tracks with all new belting (as explained in the belting thread: https://www.forumsforums.com/threads/track-belting.95647/).

I don’t know why, but Tucker has used several styles of backing plates over the years. I know of four different styles off the top of my head, and I’m sure there are more. For whatever reason, I don’t think any Tucker I’ve bought has had all the same style of backing plate on the tracks. There are always at least a handful of a different style of backing plate. On CHUGSzilla, the vast majority are made from 1/4” x 1” flat bar. Some have rounded ends while most had squared-off ends. The squared-off ends were sheared rather than cut, and the shearing process leaves a sharp end with pointed corners. Scott felt it was worth it to modify the squared off ones, and I had to agree. Why would you want sharp corners around the rubber track belting? I have a heavy-duty combination belt/disc sander setup at home, so it became my project to radius the ends.

A backing plate with square ends.

IMG_3013.jpeg


Side view.

IMG_3015.jpeg


After radiusing the corners. The plates are stacked five high, so that’s 262 backing plates.

IMG_3016.jpeg


This is the other style backing plate installed on CHUGSzilla.

IMG_3017.jpeg


Scott also suggested (AFTER we had assembled one and a half complete tracks) that we should paint the backing plates. Uh…NO. Of course as part of his standard BFT poking, he suggested we paint them… you guessed it… green. Fat Chance!

I mentioned this to The Infamous WBJ1 and he was enthusiastically in favor. So, I kindly offered to take the backing plates off the assembled tracks and put them all in a box and ship ‘em to him. It would make for a great father-son project to paint all 496 of them. His enthusiasm for painting them vanished... in half a nano-second!

Scott has an Ironworker machine at his shop that does both shearing and punching. We decided to make some new backing plates to match the ones made of flat bar, and I took them home to radius the ends to match the others. For almost all aspects of our projects Scott portrays me as "the picky one”, while he is concerned about mechanical functionality. Well, despite having almost 40% of the track assembly process completed, he really wanted to paint the backing plates. This is major role reversal!

Of course the plates themselves have a bunch of rust on them, and the new ones have mill scale from the steel mill, and all that stuff has to come off before painting. The chances of me taking all 496 plates home to individually media blast them in the blast cabinet are between Slim and none, and Slim left town. Not to be deterred, Scott came up with an alternative solution....

Here’s The Gorilla. Note how all the backing plates have been removed from this previously completed track assembly. This is called moving backward, or negative progress, if you prefer.

IMG_3021.jpeg


Outside at his shop is an old (ancient?) cement mixer with an electric motor, and that mixer hasn’t moved in years. Scott remembers using it with his Grandpa as a small boy, so it’s at least 50 years old. (It looks like it mixed a lot of cement in its day.) So we dumped maybe half the rust and mill scale covered plates in the mixer, added some gravel and turned it on.

The backing plates be a tumblin’... and it’s loud.

IMG_3023.jpeg


After a few hours the electric motor quit. Scott was able to get it going again, but this merely prolonged its death as it quit again, and could not be resuscitated. He rummaged around to find another vintage electric motor, and we installed that. The mixer was back in action, though the pulley size was a bit larger and the mixer was faster. The last of the backing plates have now been tumbled.

We still need to use his Ironworker to punch the holes in the new backing plates, and then we’ll be spraying them... BUT NOT GREEN!!!

Of course the next time Scott groans about my quest for excellence I’ll be sure to mention the backing plate escapade….

There is no doubt The Infamous WBJ1 is enjoying this…immensely.
 
maybe the much darker BRG green and a yellow stripe? Thinking of doing a Tucker in Gulf livery.
 

Attachments

  • D8ABD372-E151-4177-9EA9-69B0160314F6.jpeg
    D8ABD372-E151-4177-9EA9-69B0160314F6.jpeg
    523.6 KB · Views: 53
  • 2B9C4F98-A0C8-4B20-BB13-5BDF5CFFA8F2.jpeg
    2B9C4F98-A0C8-4B20-BB13-5BDF5CFFA8F2.jpeg
    15.9 KB · Views: 51
Last edited:
PP, You are absolutely correct!

Vintage Bike, As a general rule I don't care for green, but a forest green or a British Racing Green do look nice. Toyota's Army Green? BLEECCCHH!

Here’s a pic of Scott at the Ironworker in the process of punching the holes in the new backing plates. He is normally completely uncooperative when I try and take his picture. I guess I caught him at a moment of weakness... Note the tumbled finish on the backing plates.

IMG_3034.jpeg


Once that was done, it was time to lay out the backing plates for painting - and then spray them. I think Scott is hoping to be drafted for membership by The Green Tucker Mafia, because at just about every opportunity he would get in a little jab about painting them green. The thing is: Scott is mostly color blind, so any positive comments about a color come from someone with limited-at-best color credibility.

Most fortunately though, they are not green, they are BLACK, actually semi-gloss black. We sprayed one side the first night and flipped them over and sprayed the other side the next night.

Talking about numbers of backing plates doesn’t give you the same feel as seeing just how many of them there really are. (We did make a few extras.) Once they’re installed, CHUGSzilla will have all matching backing plates! It's surprisingly time consuming to lay out all the plates in close alignment, and then you get to do it all over again to paint the other side. But laying them out in that fashion minimizes over spray and wasted paint. We had just enough black to do the job.

Here’s a pic after spraying the first side.

IMG_3035.jpeg
 
Can you see how over worked I am. Working while he is taking it easy and taking pics.
you do seem to be a happy warrior...

massive amount of work, well done!

done right is priceless and just making do will give you priceless experiences in the back country
 
Last edited:
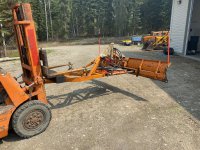
In my case the blade frame attached to the blade was good, but the blade vertical and longitudinal attachments were terrible.
The frame that bolts under the axle tubes and has the horizontal slider was cracked and in bad shape generally.
I didn’t have the wherewithal to do the frame part so I had a shop do that one, and I had a buddy help with the blade pin bosses.
Everything is tight now but I am not impressed with the blade hydraulic system as it is very slow unless the engine is receding up.
So have came up with an idea to use an electric snow blade system, with the motor mounted under the lift hydraulic.
I’ll post when I have something to show.
IMG_2954.jpeg
 
In my case the blade frame attached to the blade was good, but the blade vertical and longitudinal attachments were terrible.
The frame that bolts under the axle tubes and has the horizontal slider was cracked and in bad shape generally.
I didn’t have the wherewithal to do the frame part so I had a shop do that one, and I had a buddy help with the blade pin bosses.
Everything is tight now but I am not impressed with the blade hydraulic system as it is very slow unless the engine is receding up.
So have came up with an idea to use an electric snow blade system, with the motor mounted under the lift hydraulic.
I’ll post when I have something to show.
View attachment 166319
I’m not a hydraulic expert by any means, but if the speed of the hydraulic cylinder actuation is the issue, then it sounds like a volume problem. However, looking at the photo of the blade system on the forklift, the raise - lower cylinder has been replaced and the replacement cylinder is a significantly larger diameter. It takes substantially more hydraulic fluid volume to move a larger diameter cylinder.

Imagine a 2” diameter cylinder and you need to move the cylinder’s piston 6”. Mathematically, it takes 18.85 cubic inches of fluid. Now let's go to a 3” diameter cylinder and see how much fluid it takes. That answer is 42.41 cubic inches - more than twice the amount of fluid. That example is on the side of the cylinder with no piston rod. On the side with the piston rod, which would be the raise side the way your cylinder is positioned, assuming both cylinders had a 1” diameter piston rod the 2” cylinder would need 14.14 cubic inches of fluid to move 6” whereas the 3” cylinder would need 37.70 cubic inches of fluid. That’s almost 3 times more fluid volume.

I strongly suspect if you installed the original size cylinder, your raise and lower functions would be much faster.
 
Yes, larger volume = slower speed when the same amount is being pushed into the cylinder.
 
Top