-
Please be sure to read the rules and adhere to them. Some banned members have complained that they are not spammers. But they spammed us. Some even tried to redirect our members to other forums. Duh. Be smart. Read the rules and adhere to them and we will all get along just fine. Cheers. :beer: Link to the rules: https://www.forumsforums.com/threads/forum-rules-info.2974/
You are using an out of date browser. It may not display this or other websites correctly.
You should upgrade or use an alternative browser.
You should upgrade or use an alternative browser.
602 Restore
- Thread starter dlmorindds
- Start date
dlmorindds
Junior Member
There must be something with my PC because that frame looks orange to me & NOT USAF blue, I guess I will have to take this thing in and have it looked at
Nice jobthose brake bands look so pretty you almost don't want to hide them in that OC15
Too bad it will be a while before they see any service! Hey--I like orange--goes well with my tractor

dlmorindds
Junior Member
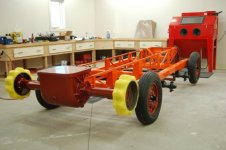
Kind of a end of summer update. Replaced torsion axles back on frame. Had to re-manufacture the insert bushings for each Axel. Replaced races, bearing and seal on all the hubs. Reassembled the OC-15 with newly relined brake bands thanks to Snowcat Pat. While it was apart I replaced both the pinion bearing and the pinion shaft bearing. I had to have a transmission shop reset the proper pinion depth. All differential seals were replace along with drive Axel bearings and seals. Been inhaling way too many paint fumes too!



dlmorindds
Junior Member
Mainer
Boggie likes our museum
funkay colors and awesome work.
Do you have a mocked-up/photoshop'd rendition of the cat-color/paint-scheme to be or are you going to make us hold out and wait to see the final product? I'm really curious what you're up to now that you painted her sweet spot an orange-alternate....or is your plan to go orange but give that hot-spot some focus of the different color?
Do you have a mocked-up/photoshop'd rendition of the cat-color/paint-scheme to be or are you going to make us hold out and wait to see the final product? I'm really curious what you're up to now that you painted her sweet spot an orange-alternate....or is your plan to go orange but give that hot-spot some focus of the different color?
grizcty
New member
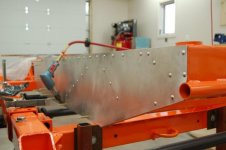
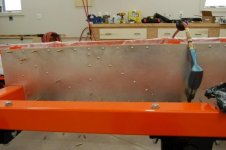
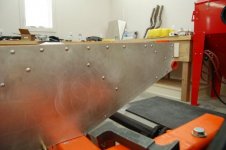
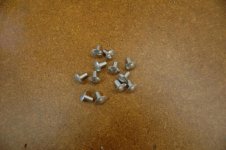
The original engine cowling was quite abused with a hole in the top surface. You can see that the heater vent had been highly modified on both sides and the front. I had a new engine cowing made along with the heater vent. There probably was a reason why this vent was so highly modified
View attachment 37844
View attachment 37845
View attachment 37846
View attachment 37847
Just found your restore page.
Looks great.

Keep up the great job!

Between you, and wetherby.
The two of you should start a business, restoring these 601/02's.

Hell Bells, just maybe.
You will have a set of extra worthless/useless/just taking up space "not so perfect brake lines", just laying around.

Like weatherby, when your done!

dlmorindds
Junior Member
Thanks grizcty--weatherby has been a great help! I'll look around the shop and see if I find any spare brake lines

weatherby
Member
Thanks grizcty--weatherby has been a great help! I'll look around the shop and see if I find any spare brake lines
OOOH.....GOD...Those brake lines
 ..............
 BOBCATTTT
Bobcat
Je Suis Charlie Hebdo
dlmorindds
Junior Member
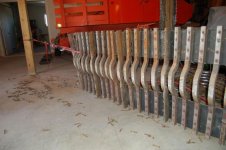
Starting to dismantle the tracks. We positioned the track on thier side and one person ran the impact wrench on one side while the other held an open ended wrench on the other--took about 4 hours to remove all the grousers on the one track. I included a couple pictures of grousers I am culling from the restore due to excessive abuse, wear and poor workmanship in repair


NorthernRedneck
Well-known member
ooohhh.........that brings back painful memories from two years ago when I did the ones on the lamtrack.
dlmorindds
Junior Member
ooohhh.........that brings back painful memories from two years ago when I did the ones on the lamtrack.
It really hasn't been too bad--I put my youngest teenage kid on the impact wrench and keep yelling "lets do like we are in NASCAR" Afer about 2 hours he keeps asking if he can go and do homework


NorthernRedneck
Well-known member
We didn't have the luxury of using an impact. We had to go all out and use the cutting torches. Our cat's previous owners thought it would be a good idea to tach weld each nut to the backing plates so they wouldn't come loose. Good thing we had all new backing plates and nuts/bolts to use.
Mainer
Boggie likes our museum

Starting to dismantle the tracks. We positioned the track on thier side and one person ran the impact wrench on one side while the other held an open ended wrench on the other--took about 4 hours to remove all the grousers on the one track. I included a couple pictures of grousers I am culling from the restore due to excessive abuse, wear and poor workmanship in repair
View attachment 37981
View attachment 37982
View attachment 37983
Wow. I've never seen 6-series tracks worn like that before. Surprising given the machine is in better condition than what corresponds to the tracks. Must have been run in the dirt or spent a lot of time pulling Kristi's out of the deep stuff.

Mainer
Boggie likes our museum
OMG!You actually think a 6-series could venture into 'the deep stuff'?!?!

Nah, not deep powder...but rather deep swamp, deep mud, etc... you know, those other mediums that the 6 laughs at but some cats may think it's time to sprout a pair.
Of course the 6 isn't a stellar performer in deep powder... but it does great in mid-West/Eastcoast high density 'deep sutff'.

MNoutdoors RIP
Gone But Not Forgotten
Did that machine that had those grousers on, have air or foam filled tires?
dlmorindds
Junior Member
Did that machine that had those grousers on, have air or foam filled tires?
The tires were air filled. I pulled 6 grousers from one track that had crazy wear and crack reapir. The rest of the grousers looked pretty good with the interior wear pads and welds still intact. The weird deal is that there is both 30 inch and 32 inch grousers on the machine.

NorthernRedneck
Well-known member
Wow. I've never seen 6-series tracks worn like that before. Surprising given the machine is in better condition than what corresponds to the tracks. Must have been run in the dirt or spent a lot of time pulling Kristi's out of the deep stuff.
And just what makes you think Kristi's can make out to the deep stuff to start with.

dlmorindds
Junior Member
weatherby
Member
"Possibly" somebody at some point in time, traded those (or switched those) "damaged" grousers off of another machine for some good ones off of your machine once it was known your machine was going up for sale. The rest of your grousers look to good to have just several very bad grousers.The tires were air filled. I pulled 6 grousers from one track that had crazy wear and crack reapir. The rest of the grousers looked pretty good with the interior wear pads and welds still intact. The weird deal is that there is both 30 inch and 32 inch grousers on the machine.

dlmorindds
Junior Member
"Possibly" somebody at some point in time, traded those (or switched those) "damaged" grousers off of another machine for some good ones off of your machine once it was known your machine was going up for sale. The rest of your grousers look to good to have just several very bad grousers.
Ya--I think you are probable right weatherby. Most of the grousers look pretty good. The bottom wear pads show almost no wear. When we were busting nuts yesterday I did notice a couple grousers had new hardware. Don't worry we will catch the bastards

weatherby
Member
Ya--I think you are probable right weatherby. Most of the grousers look pretty good. The bottom wear pads show almost no wear. When we were busting nuts yesterday I did notice a couple grousers had new hardware. Don't worry we will catch the bastards
Ya...........I'll keep my eyes peeled also for.... GROUSER SWITCHERS
Hay.... I got to thin-ken
 ....I wounder ware Mainer was on or about that time period
MNoutdoors RIP
Gone But Not Forgotten
Ya...........I'll keep my eyes peeled also for.... GROUSER SWITCHERS
Hay.... I got to thin-ken....I wounder ware Mainer was on or about that time period

we can check the gps logger implanted under his skin and let you know. but he has been known to wear a aluminum suit from time to time to sheild the transmissions, ( I think he is on to something) he sent me a E-mail yesterday
something about he's been in the sandbox? so we had to run a check a make sure he did not go underground. he is way to young to go underground

dlmorindds
Junior Member
So does anybody have advice on the gas tank--Sand blast first then get the tank cleaned out or the opposite--get the tank cleaned out then sand blast?

Snowtrac Nome
member formerly known as dds
because of stattic don't sand blast water blast withsand water mix or find somebody with a bonded blaster for additional safety always clean and purge before you work on it but never trust the cleaning you can test good start scrubbing rust and next thing you have opened upm a rust cavity housing gas.if you have to blast and clean let a professional do it.So does anybody have advice on the gas tank--Sand blast first then get the tank cleaned out or the opposite--get the tank cleaned out then sand blast?
weatherby
Member
What I did was...first emptied the tank, and then kept spraying water into it then emptying it over and over for about 5 or 6 times, then I sand blasted it. If I had it to do all over again, what I would do is take it to a gas tank repair shop and let them "coat" the inside of the tank with a material that they guarantee will not allow the tank to leak and they also sand blast the exterior to find holes that might be just below the rust in some places, so when you get it back all you need to do is paint it.
After I painted my tank, I accidentally knocked it off my bench and it fell to the floor. So I then put some water in it to see if would leak at the bottom seam of the tank where it had hit the floor, and sure enough "it did" so that's when I had to take it to a gas tank repair shop to have the leak fixed.
That's how I discovered that they would re-line the inside of the tank and guarantee that it will never leak plus blast the exterior and fix any other leaks that may show up. I think it was about $180.00 which I feel was much better than all the mess and time trying to clean the tank out (and then it was not as clean as you would like) then I still had to blast it.


