Similar issue on mine. My shafts were whipped, so they got the complete overhaul / replacement. The short shaft was OK, but because of location I wasn't putting it back without fresh joints. My build sheet had R55 yokes and S55 joints. My invoice shows that 25-3250x joints went back into that short section w/ flush grease fittings. Everything else was updated to 5-153x (1310) connections. (All yokes on the axles and transfer remained stock.) But, like TA stated, they used a lot of different stuff.Sorry, another tidbit today was the drive line shop says the U-joint cross on the Tucker is obsolete, no supply. So does anyone have a source for the Tucker U joints?

-
Please be sure to read the rules and adhere to them. Some banned members have complained that they are not spammers. But they spammed us. Some even tried to redirect our members to other forums. Duh. Be smart. Read the rules and adhere to them and we will all get along just fine. Cheers. :beer: Link to the rules: https://www.forumsforums.com/threads/forum-rules-info.2974/
You are using an out of date browser. It may not display this or other websites correctly.
You should upgrade or use an alternative browser.
You should upgrade or use an alternative browser.
1975 Tucker 1544 - project and trips
- Thread starter YamaDooPolCat
- Start date
Now that I moved the engine ahead 1 inch the drive line guy has all the parts he needs to build a new drive shaft. The 727 Load Flite keeps it's fixed yoke, there is a u-joint that will join to a yoke that he had, the transfer case yoke gets a new yoke that takes available u-joints. Apparently that yoke is what the jet boat people use to drive their pumps. I'll have to wait until the shaft is built to give you the detail and part numbers. I'm just happy there is a solution.

I spent the rest of the day working on the stock blade frame where it goes int oa semi circle to brace the back of the frame. There is a traveller block in a channel that moves as the front housing rotates when making a turn.
That U channel had a hard life and was bulged and ripped.
So I tooh the four point frame off, cleaned it up and cut the bulge out, added another 1/4" x 4" flat bar in side the curve and carved to match the semi-circle. The area where I cut the bulge out I added another 1/4" plate cut to fill the hole. I cut slots in the fill-in piece inorder to weld to the full width carved plate.
 Then welded everything together.
This project is the first time I have used a wire feed, I borrowed the welder from my brother. Santa needs to buy me one of these slick welders.
I tack welded a web of triangles on the legs in an effort to keep the legs from wandering. Tomorrow I will see if it worked or I have to re-drill some holes.


That U channel had a hard life and was bulged and ripped.
So I tooh the four point frame off, cleaned it up and cut the bulge out, added another 1/4" x 4" flat bar in side the curve and carved to match the semi-circle. The area where I cut the bulge out I added another 1/4" plate cut to fill the hole. I cut slots in the fill-in piece inorder to weld to the full width carved plate.
This project is the first time I have used a wire feed, I borrowed the welder from my brother. Santa needs to buy me one of these slick welders.
I tack welded a web of triangles on the legs in an effort to keep the legs from wandering. Tomorrow I will see if it worked or I have to re-drill some holes.
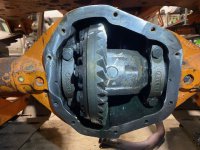
Found some chipped gears in the rear diff, so probably button it back up for now.
Anyone know what diff this is? The tag says 39-8 (so that must be the number of teeth) and 4.88 (ratio).
In the picture there is a number bossed in the web next to the gear housing, and it looks like a 60.
An Eaton E-locker would look nice in the rear diff.


Anyone know what diff this is? The tag says 39-8 (so that must be the number of teeth) and 4.88 (ratio).
In the picture there is a number bossed in the web next to the gear housing, and it looks like a 60.
An Eaton E-locker would look nice in the rear diff.
Food for thought. I was in a Tucker last winter same vintage same blade setup. This cat had the blade off.
The piece that pivots in the half circle channel would bang up and down when running the cat. Was quite loud and annoying. Not sure if his was excess wear or not but seemed like adding some UHMW would have improved the situation and prevent wear.
The piece that pivots in the half circle channel would bang up and down when running the cat. Was quite loud and annoying. Not sure if his was excess wear or not but seemed like adding some UHMW would have improved the situation and prevent wear.
I think you are correct. I'll have a look at what can be done once I have it back together. Retaining the Teflon or UHMW would be the next challenge.
Counter sink screws threaded into steel below.
Kind of like the west plate on my 1443 front roller added if you saw that thread.
Kind of like the west plate on my 1443 front roller added if you saw that thread.
One step froward, two steps back.
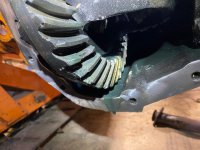
I opened up the front and back diffs to changed oil, the front diff looked good, but the back diff had some chunks out of the crown.
So I pulled the axles and pulled out the crown and carrier to have a look.
The reason for the crown damage was the pinion bearing started spitting out rollers.
You can see in the picture roller bearings stuck between the crown gear and the carrier.
Oh well, parts are available.
Naturally I had to reinstall the crown and carrier and axles in order to lock the pinion nut for the impact gun.
Have to borrow a 1 5/16" in 1/2" drive. Too much slack using 1/2" to 3/4" drive adapter. It just rattles.
Beer break!
![image3[8].jpeg](https://www.forumsforums.com/attachments/image3-8-jpeg.158701/ "image3[8].jpeg")
![image1[9].jpeg](https://www.forumsforums.com/attachments/image1-9-jpeg.158705/ "image1[9].jpeg")
I opened up the front and back diffs to changed oil, the front diff looked good, but the back diff had some chunks out of the crown.
So I pulled the axles and pulled out the crown and carrier to have a look.
The reason for the crown damage was the pinion bearing started spitting out rollers.
You can see in the picture roller bearings stuck between the crown gear and the carrier.
Oh well, parts are available.
Naturally I had to reinstall the crown and carrier and axles in order to lock the pinion nut for the impact gun.
Have to borrow a 1 5/16" in 1/2" drive. Too much slack using 1/2" to 3/4" drive adapter. It just rattles.
Beer break!
Attachments
![image4[6].jpeg](/data/attachments/147/147611-a9c18088f5120e1cb983775882e938d8.jpg?hash=qcGAiPUSDh)
I talked to the fellow building the 727 automatic and we really need some specs on the cam shaft in the industrial 318 for torque band, or the factory stall speed on the torque converter.
The cam listed in that manual was used in all sorts of things. Below is the info listed for an aftermarket 4227879 cam. DO NOT take my info as gospel - do your own investigating. (But I'm guessing this will be spot on.)
Product Attributes
| Exhaust Valve Lift | 0.2666 IN |
| Exhaust Valve Lift | 6.772 MM |
| Intake Valve Lift | 0.2428 IN |
| Intake Valve Lift | 6.167 MM |
| Exhaust Duration at .050 inch Lift | 192 |
| Intake Duration at .050 Inch Lift | 181 |
| Lobe Separation | 109 |
| Cam Type | Hydraulic |
| Exhaust Duration | 192 |
| Exhaust Lift | 0.2666 in (6.772 mm) |
| Exhaust Lobe Center | 108 |
| Footnote Code | (050) Duration at .050 Lobe Lift |
| Intake Duration | 181 |
| Intake Lift | 0.2428 in (6.167 mm) |
| Intake Lobe Center | 110 |
| Lobe Separation | 109 |
| Overlap | 50 |
Thank you all. I took the info to the tranny guy and he seems happy. The torque stall will be 1800 to 2000 rpm.
Now I have started watching YouTube vids of people assembling DANA 60's . Looks dooable, but going to need a safety man to hold stuff when I get to push in the crown and carrier.
Waiting for quotes for new crown and pinion. Freight is always a factor.
Now I have started watching YouTube vids of people assembling DANA 60's . Looks dooable, but going to need a safety man to hold stuff when I get to push in the crown and carrier.
Waiting for quotes for new crown and pinion. Freight is always a factor.
Snowy Rivers
Well-known member
Yes indeed....Not too many "Repair kits" for stuff any more...Used to get a couple copper studs a copper washer and a gasket to fix a starter solenoid......
The 727 TF is a fairly good box......BUTTTTTTTTTTTTTTTTTTTTTT.......After doing a complete "freshenup" with new clutches, seals, bands and bushings.....A TRANSGO -2 shift kit is a must on a TF.....The TF was noted for being mushy shifting.....this is a quick trip to clutch failure
I did a lot of auto transmissions years ago (Had a tranny shop)
Chrysler wanted the shifts to be comfortable.......In doing it this way the shift timing had so much overlap that the clutches/bands just burned up....
There were other issues as well.....but the TRANSGO KIT fixes all the issues........
Always replace the front pump bushing and seal.......
Thrust washers need to be replaced as well...
A good rebuild kit that has all the parts needed is the way to go......Too many outfits out there sell this stuff to just pick one....
New clutches and steels are available in high performance versions....same with the bands...
Get a high capacity oil cooler on that box too.....HEAT KILLS AN AUTO.
A snow cat is like a boat....Very little coasting.....uphill and working all the time......
Reference the converter........The 360 is an externally balanced engine and has a big slab of weight on it to balance the engine (Just like the 454 BBC and the 400 SBC)
The 318 is internally balanced and the converter DOES NOT HAVE THE WEIGHT ON IT...
A 360 converter on a 318 and the thing will shake the doors off.......
CAM SHAFTS
If you use a hydraulic flat tappet cam.....BE SURE TO USE AN OIL THAT HAS ZDDP IN IT....
Todays oils are designed without the ZDDP ADDITIVE to help keep catalytic converters alive for the rquired 100,000 mile warranty........
Use a racing oil with ZDDP....
Using a contemporary oil can lead to cam lobe failure....and that is not a place you want to go......
All current engines use roller cams......This started in the mid 90's with most manuf's.........
I lamented over camshaft stuff on my cat build.......I finally decided to go with a roller cam and lifters..
The synthetic oils are even worse at wiping out a cam.....The sliding action with a flat tappet cam needs the special Zinc/phosphorus compound (ZDDP) to lubricate the cam......
Always having to worry about being able to get the special oil for the old school cam convinced me to go roller.
Not cheap....but a wasted cam makes a real mess that can wipe out the bearings and cost $$$$$$$$$$$$$$$$$$$$$$$$$$$$$$
Good luck on the build......Great fun......
Thanks for that. And the tranny guy is ADAMANT that we have a proper and well set up connection from the carb linkage down to the transmission. Without that setup properly the tranny will die within sight of the parking lot. So if is off to find/design more stuff!
Snowy Rivers
Well-known member
Throttle pressure linkage.
Your tranny guy is spot on.....This is an absolute MUST HAVE ...AND BE ADJUSTED CORRECTLY.
SCARE UP A FACTORY ROD AND HARDWARE.....THEY WORK.....
If you go with an aftermarket carburetor ...Make sure the rod is adjusted so the wide open throttle gets the TP rod to it's max travel when the throttle is wide open.
When using anything but a factory carb...make sure the linkage ratios are correct......
Even if you have to scare up a used junk carb to scavenge the linkage from.
This same issue was common on the GM 700R4 BOX.
People thought the cable was just a kick down like the TH350.....
Nope...throttle pressure............
All the newer stuff is all electronic....The TPS sends a signal to the computer and the pressure is controlled ELECTRONICALLY instead of a cable, rod or a vacuum modulator.
The TPS and other sensors monitor the position of the throttle, the engine loading and then keep the pressure to the various clutches and such where it needs to be.
Yes...Bad Throttle pressure and the clutches will burn up really quick......
Last edited:
I given this limited slip Dana 60 rear diff. Since I’m replacing the new crown and pinion, should I put the limited slip carrier in in place of the open differential?
Think the pros will say no. Too much bite with a track for turning compared to tire contact patch. E or air lockers which are overkill for most adventures.
I given this limited slip Dana 60 rear diff. Since I’m replacing the new crown and pinion, should I put the limited slip carrier in in place of the open differential?
Attachments
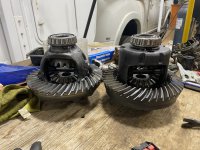

Okay. Limited Slip goes into inventory for now.
Snowy Rivers
Well-known member
I agree on the use of the limited slip.
Having the ability to lock up the diffy to get through a tough spot is great....But depending on the surface conditions....A locker is gonna put more stress on things on a regular basis.....
Having the ability to lock up the diffy to get through a tough spot is great....But depending on the surface conditions....A locker is gonna put more stress on things on a regular basis.....
Been a little slow over Christmas, and didn't help the grandkids brought me a nasty cold and pinkeye.
I noticed the wiper linkage on the drivers side was hanging loose, and had obviously lost the nylon/hyfrax bushing as well.
I swept up and looked everywhere, but obviously not where ever that tiny part had departed to. So....
I had some sheet teflon that has been around a while and decided to experiment with that stuff.
I drilled a hole the same size as the stub shaft it will rotate on in the sheet, then used a large hole punch to punch out a donut. the result was a loose fit in the wiper arm.
I clamped the drill I used for the hole vertical in my vice, slid a washer over the drill to sit on the vice and warmed up (near melt) the donut in place on the arm. Once the donut was ready I slid this down over the drill to rest on the washer, took a second washer on slid that over the drill to rest on top of the teflon, and then slid a deep socket down over that and pressed the warm teflon to expand and lock the donut in place.
Done.
Now lets s
![image4[6].jpeg](https://www.forumsforums.com/attachments/image4-6-jpeg.159338/ "image4[6].jpeg") ee how long this all lasts.
ee how long this all lasts.
I noticed the wiper linkage on the drivers side was hanging loose, and had obviously lost the nylon/hyfrax bushing as well.
I swept up and looked everywhere, but obviously not where ever that tiny part had departed to. So....
I had some sheet teflon that has been around a while and decided to experiment with that stuff.
I drilled a hole the same size as the stub shaft it will rotate on in the sheet, then used a large hole punch to punch out a donut. the result was a loose fit in the wiper arm.
I clamped the drill I used for the hole vertical in my vice, slid a washer over the drill to sit on the vice and warmed up (near melt) the donut in place on the arm. Once the donut was ready I slid this down over the drill to rest on the washer, took a second washer on slid that over the drill to rest on top of the teflon, and then slid a deep socket down over that and pressed the warm teflon to expand and lock the donut in place.
Done.
Now lets s
Attachments
![image1[8].jpeg](/data/attachments/148/148248-2ec2b8327ee77bc95ffcdd46558d024b.jpg?hash=LsK4Mn7ne8)
Here is an old picture from about 1992 of the club Tucker. It was sold a few years later.
I gather it had an inline 6 cylinder and not much power. I don't remember being around this Tucker at all but it was slow and a good workhorse.

I gather it had an inline 6 cylinder and not much power. I don't remember being around this Tucker at all but it was slow and a good workhorse.
I had trouble with my wiper assembly linkages also. All old and worn out. I took one out of a YJ Jeep. I needed to shorten the linkage that goes between the 2 pivots and drilled a different hole in the windshield for the drivers side pivot to make the wiper arm sweep properly. I mounted the YJ motor on the passenger side. I used the stock wiper arms. My wipers were never so smooth only real drawback was I need to fill in the new hole I drilled in the windshield frame. Now I have new parts and parts that are easily source. May be an option for you if your fix doesn’t work out. I could get some pictures if you would like
Okay thank you. I hope my fix lasts.I had trouble with my wiper assembly linkages also. All old and worn out. I took one out of a YJ Jeep. I needed to shorten the linkage that goes between the 2 pivots and drilled a different hole in the windshield for the drivers side pivot to make the wiper arm sweep properly. I mounted the YJ motor on the passenger side. I used the stock wiper arms. My wipers were never so smooth only real drawback was I need to fill in the new hole I drilled in the windshield frame. Now I have new parts and parts that are easily source. May be an option for you if your fix doesn’t work out. I could get some pictures if you would like
Bennyboy1337
Active member
Can you change the cam angle on that LSD? You'll really want to increase the cam angle to make sure you don't need a ton of power to engage the clutch. Typically you want increased cam angles in high tractions scenarios, which I can't think of a more high traction place that grousers in snowI given this limited slip Dana 60 rear diff. Since I’m replacing the new crown and pinion, should I put the limited slip carrier in in place of the open differential?
 You can also adjust the clutch preload, increasing the load will make it so the clutch is easier to engage. You might need to do some experimenting to see what works best.
It's one thing to lock a diff and have wheels slide on a corner, it's an entirely different thing to have a track lock when you don't want it to and put all that strain on your driveline. For these reasons and above I've never been that enthusiastic about LSDs with cats, on an demand locker will never break your drive line unexpectedly, and is always there at a push of a button for those moments you really need it. Tuckers have exceedingly good articulation already, so the scenarios that you should loose traction on either end should be pretty rare, and if you're in a scenario you need a locker then that should probably be a sign of you needing to adjust your driving habits.
Just my 2 cents, maybe someone can chime in who has actual locker experience on tuckers.
I put the LSD on the shelf for now. It makes sense that the strain on the Tucker drive line will increase with the LSD rear end.
I had to come up with a new rear drive shaft as the current one had a damaged cup holder on one end, and the slip joint on the other end had been contacting the u-joint and would no longer slide properly.
Turns out the Ford Ranger drive line had just what I needed, the drive line shop can shorten the drive shaft and it will fit right in. The Ford comes with the 1310 series Spicer u-joints.
Thanks to Blackfoot Tucker I was able to locate a new caliper, and installed it over Christmas holidays.
The old one had ripped boots, probably rotted from oil leaks in that area.
![image4[1].jpeg](https://www.forumsforums.com/attachments/image4-1-jpeg.159372/ "image4[1].jpeg")
![image0[9].jpeg](https://www.forumsforums.com/attachments/image0-9-jpeg.159373/ "image0[9].jpeg")
The old one had ripped boots, probably rotted from oil leaks in that area.
I also liked the idea Blackfoot had for using a backup camera. Santa brought me a nice dual camera unit that I put in the same location Blackfoot and company used. Looks good!
![image1[9].jpeg](https://www.forumsforums.com/attachments/image1-9-jpeg.159374/ "image1[9].jpeg")
Next spot I would take a look is the pivot and tire rods.
Those backers were added under the pivot to frame mount. My guess underneath you will find the frame holes worn out from loose bolts and this was their repair. Pivot bushings probably due as well.
If original tie rods those are probably close to leaving you on the trail. Learned three times on three different machines so far newer and older than yours. New rods and ends pretty simple along with pivot bushings and some frame tube bushings welded in.
How to fix and part numbers are on here let me know if I can be of assistance.
Good catch, I'll dig into that area tomorrow. Needs a clean up anyway.Next spot I would take a look is the pivot and tire rods.
Those backers were added under the pivot to frame mount. My guess underneath you will find the frame holes worn out from loose bolts and this was their repair. Pivot bushings probably due as well.
If original tie rods those are probably close to leaving you on the trail. Learned three times on three different machines so far newer and older than yours. New rods and ends pretty simple along with pivot bushings and some frame tube bushings welded in.
How to fix and part numbers are on here let me know if I can be of assistance.
View attachment 159400
What manufacture did Tucker use for their ball joints?
I'll do a search as well.