• Please be sure to read the rules and adhere to them. Some banned members have complained that they are not spammers. But they spammed us. Some even tried to redirect our members to other forums. Duh. Be smart. Read the rules and adhere to them and we will all get along just fine. Cheers. :beer: Link to the rules: https://www.forumsforums.com/threads/forum-rules-info.2974/

Looking for advice and guidance - cab removal

rockaukum

Active member
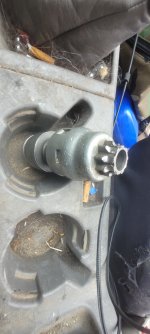
Yep, I just might have to reuse it flipped around. Doesn't look that involved. It is just that I have spoken with a mfgr and just about every auto parts store around me and they can not source the ring gear or the flywheel assembly. So my concern is after going through all this and putting it back together with less than stellar parts may lead me to doing this allover again but having to reconfigure due to the lack of parts.
A thought I had last night was this: All the "books" say this motor has the 132 tooth RG but it is in fact the 136 tooth built for the 9" clutch. I had replaced the starter last winter (22-23) and with the thought that the books say 132 teeth, could the starter be the issue? Thinking the bendix is set up for a ring gear with 132 teeth? Any ideas out there? I did ask at the parts store today and his thought was no, but I'm not certain I believe that.
My next thought is if I can get a 132 tooth flywheel, will it directly bolt up as is? If so, problem solved? I'm guessing a new clutch plate (8") would be order but the rest should function fine....
Today I picked up the gaskets and water pump. I need to get this back together before I forget what goes where and where are all the nuts and bolts? Sucks getting old!
ra
 

BoyToys

Active member
Getting old does indeed suck. Memory quickly fades; where did I put that part, and what was this doohickey for? It's getting to where I take pictures beforehand anymore. 70 years old...not to mention the physical limitations that come with that. Something about not being a spring chicken anymore. At least you've got some muscle/help at hand; not so with me. Was a real challenge to remove/rebuild/install my tracks last fall. They're kinda sorta heavy and just a whimpy WT Imp.
Installed a new windshield the other day, sweating my cojones off at 100+F outside. But it's done. Now where the hell did I put the windshield wiper motor and hardware? Paint will have to wait probably until September, I don't have the luxury of a huge indoor shop.
Sorry off topic for your ring gear issue. There has to be some way to determine the proper tooth pitch of the starter gear relative to the flywheel gear but more than this DIY guy knows about.
 

Cidertom

Chionophile
GOLD Site Supporter
IMHO, 132 vs 136 isn't the issue. The pitch is too close to account for the wear. I'd guess it is just old. If it were 10% (13 teeth) I'd be more wary, but it shouldn't matter where you are. I'd be looking more to: Pinion alignment, is it square, at proper position and not causing the bendix to bind. I'm not familiar with that engine, but some require shims between the starter and the housing for correct engagement. Might research that engine for that issue. It also could be the old starter was worn and the pinion gear wasn't aligned anymore.
 

rockaukum

Active member
BT, Thanks for the chuckle! How true it is... I'm at 65 and doing most of this solo but when the kids (aprox 30 yo's) are around, that helps a lot. My middle son is about to embark on a career as a FireFighter and is moving home for a bit. We are converting the upstairs of the shop to living quarters for him and it is a treat to help him understand construction, electrical and plumbing. Brings back memories of the times gone by....
Cidertom, Good point on the shims. I did not think about the bendix going too far into the ring gear. Definitely a possibility. While at the parts house today, I took the ring gear with me. In an effort to find a solution, we were talking about the worn teeth. They appear to be fresh, no rust of signs of age. When I got this cat, I had problems with the starter. It was going out and at times when the bendix extended it would grind but that was two years ago so I'd think where it hit the gear it would not be shinny, showing some kind of age?
I'll look into the shim issue. I did read about the use of shims but that was in reference to having the flywheel resurfaced, throwing off the tolerances between he gear and the bendix?
Thanks for hanging in there with me on this. It is a bit frustrating at times but when I get out with it, Life Is good!
ra
 

rockaukum

Active member
As a side note, while reading / watching videos and such, I came across one where the guy had a six and he flipped the ring gear. In doing so, he rotated the gear by a third. He said that the six's only hit the ring gear in three spots, each 120* (aprox) from each other. Does this sound accurate to you all? I don't know why, but I tend to agree and two cylinders work in unison with each other(?). I may be wrong but is sounded logical to me.
ra
 

redsqwrl

Bronze Member
GOLD Site Supporter
Im not sure where you are. But i have a quite a few 170 and 200 ford motors. I likely have a flywheel with a good ring.

Manifold as well.

In my experience if you havent run it 20 years with a leak, a fresh gasket usually seals them right up. I tend to find cracks near the center that are hard to see when cold. Your intake is not removable correct?
 

redsqwrl

Bronze Member
GOLD Site Supporter
Count your teeth on the bendix. It is a common situation that someone saved a couple bucks and put an automotive starter in. I have a gehl skid steer. (Ford industrial gas) that had a flaky starter. After about 3 yrs i looked into it. Mark at fondy auto electric figured it out.
 

redsqwrl

Bronze Member
GOLD Site Supporter
And yes, multiple people told me over the years that engines stop in the same spot. Mark your fan and try it. Fwiw changing ring gears is easy. And rewarding. Ive done it on this pos skid steers gehl 4400 is as simple as it gets
 

rockaukum

Active member
redsqwrl,
I have had this cat for two and a half seasons, I get out maybe twice a month with it during season. That said, it had this issue when I got it. So I do not know how long it has been happening. Does not look like there is much room for a surface job but what do I know?
What kind of starter should this have? I'll count the bendix, what am I looking for and or how does one confirm that the bendix count works with the ring gear count? Not sure I'm asking the questions correctly or the correct question so any elaboration on this would be great!
I'm in central CA, foothills to the Sierra.
Thanks!
ra
 

redsqwrl

Bronze Member
GOLD Site Supporter
Im my case. I had an engine that needed a starter gear with 10 teeth. And the listed starter for my application was 9 teeth. The 9 t starter worked, but was never just right. It wore at the flywheel.

In air cooled vw world you will often here of 6v and twelve volt starters. In the case of the flywheels the 12v flywheels have more teeth, thus are bigger.

The photo attached is a case backhoe i helped with in ninilchik 2 weeks ago. I heard the starter, then the owner stated its always like that. I went to homer stumped dean owner of alternator shop for a hot minute, then he stated oh wait, yes right here is what you need. That was another customers desoto starter and he would not sell me the part, but was able to confirm the cw rotation and pitch.
20240709_160127.jpg
 

Attachments

  • 20240709_161347.jpg
    20240709_161347.jpg
    846 KB · Views: 24
Last edited:

redsqwrl

Bronze Member
GOLD Site Supporter
The desoto bendix is 10. The part found in tractor had nine. The wear over 20 yrs is self explanatory
 

rockaukum

Active member
So, what is your thought about this...
I'll place the bendix up against the flywheel gear and snap a picture so (hopefully) we can see how the two mate up. I'm thinking the bendix may be extending too far into the gear and causing the wear but I will look at it more closely to see if that logic fits the situation. I'll try to get a couple photos up tomorrow.
Thanks for hanging in there!
ra
 

rockaukum

Active member
Today I took pictures of the bendix and the flywheel gear to see how they mated up. I think it is fine as far as the teeth meshing up correctly. I turned the bendix while holding the ring gear and to me it looked to line up fine. The lead tooth slid right in without mashing into the opposing tooth.
So, unless I find a replacement ring gear, I'll flip mine. Come Monday, I'll resume the search and as was pointed out to me, the bronco used the 9" clutch and the 136 tooth flywheel gear. Let's hope so.
I visited a machinist friend with the manifold. He agreed that there is not much there to work with. Outside of using a thicker gasket, check eBay.... Fixturing the manifold would be an issue as well, at least for him.
ra
PXL_20240721_200150538.jpgPXL_20240721_200213168.jpgPXL_20240721_200243805.jpg
 

Cidertom

Chionophile
GOLD Site Supporter
when you get it put back together, put a bit of prussian blue on the gears, spin the starter and remove. see what the mating surface looks like.
 

rockaukum

Active member
I'm Back. Been busy with stone work, bathroom and laundry room remodels as well as converting the upstairs of the shop to an apartment...
Things done:
oil pan dents mostly pulled out
found a new ring gear for the flywheel and did the freeze / heat to get the new one on
reassembled the motor and painted it, Ford Blue (of course I used "old Ford Blue")
While the motor was out, I opted to use "KilMat" for the inside of the bay.
Today I had no interest in driving to town for the locator tool used to center the clutch plate and pressure plate so I decided to make one on the lathe. Looks like it will work just fine. Nice and snug fit on both the busing and the clutch plate.
I really want to get this thing back into the cat so I have some room in the shop again. Once that is done, I hope to use the kilmat on the rest of the interior in hopes of dampening some of the noise. Next, off comes the rear bed. The structure has a lot of rusted spots. My thought is to make the bed longer. Not sure how long yet but one benefit to that is it will keep the snow from flying up into the bed and covering all the goods that are there. Any suggestions to the length would be great!
ra

PXL_20240812_001301623.jpgPXL_20240828_185515433.jpgPXL_20240828_190008337.jpgPXL_20240828_191240332.jpg
 
  • Like
Reactions: PJL

BoyToys

Active member
Never heard of Kilmat, but then I haven't researched sound deadening material. I might do something similar to just the doghouse and perhaps tackle the interior of the cab at some point. Right now there's just some sort of carpet glued onto the interior panels and nothing within the doghouse...pretty tacky but I guess serves some minimal function.
That Kilmat appears to be 3" (80mm) thick from my quick search. You'll have to post later on your impressions.
CORRECTION: The stuff comes in 50 or 80 mil, not millimeters. So we're talking 1.3 to maybe 2.0 mm thick...which makes a lot more sense.
 

rockaukum

Active member
The fun continues!
With the motor all buttoned up, I set out today to at least get the motor back into the cat where it belongs. What a long day it was! Ran into several snags being such a tight fit, especially doing this solo. An extra set of hands and eyes is greatly recommended. Spent a lot of time looking for the right nut or bolt. In fact one set that holds the clutch slave (?) cylinder to the mount took a lot of time to find. So much time I gave up and moved on.
While putting the pillow block in for the driveline, I noticed a little pink thing poking out a drain hole in the battery box mounted under the bed. It moved! Mouse time...
I won't describe how I chased him around along the frame rail and such but I think he is now vacated the premises. One good thing came form chasing the mouse around was that I found the "lost" nuts and bolts for the clutch!
Back at it tomorrow....
ra

PXL_20240910_010728766.jpg
 

rockaukum

Active member
Spent some time making all the connections. All went well with he exception of two things.
1. fuel line to the pump and the carb were backwards
2. When I started the motor, I quickly realized that I forgot to hook up the oil pressure sending unit!
clean up the Valdez oil spill and got back to it.
she fired right up and sounded good. It was at high idle, but I could not hear the ticking. Which was the main reason for pulling the motor. I backed it out oof the shop getting ready for the next step, putting the cab back on and dealing with all the wires.
Anyone know where I can get one of these clips?
It is the throttle linkage and I have lost one of them. Currently held in place with zip ties. Pics are a touch blurry...
PXL_20240910_223536902.jpgPXL_20240910_223553632.jpg
 

Cidertom

Chionophile
GOLD Site Supporter
amazon "ball tie rod end" you will need to look through the sizes for one that will work. Probably replace both parts is easiest.
 

rockaukum

Active member
Thanks for the replies!
Big day for me. I set out to put the cab back in its rightful place. I think it went smooth. Not saying there weren't some hiccups along the way, but I got the top on. Now I need to schedule some time to get the wires reconnected. I did find one spring left over.... I did a quick look at the manual as I do not remember where it went. Best I can tell is it belongs on the clutch. Just did not have the energy / motivation to get on the creeper to investigate. The only other issue has to do with the parking brake, Not sure if this is the original cable or not but it pulled through the bracket down at the drum. Have to think about this one for a bit.
ra
Using the tractor to load the cab.

PXL_20240914_163319858.jpgPXL_20240914_165544794.jpg
Used lumber to hold the cab proud of the base so I could put some sealant before setting the cab all the way down. Also helped allow for aligning the bolts.
PXL_20240914_170437615.jpg
Butyl tape. I opted to use this as the prior stuff (weather stripping) had dried out and leaked.
PXL_20240914_170704721.jpgPXL_20240914_172433250.jpg
Happy happy...
PXL_20240914_223212351.jpg
 

mtncrawler

Bronze Member
GOLD Site Supporter
Stainless steel screws and keps nuts for re-hanging the doors. Machine was built using lots of this kind of hardware. Plus stainless adds bling!
 

Attachments

  • IMG_2443.JPG
    IMG_2443.JPG
    2.7 MB · Views: 21
  • IMG_2444.JPG
    IMG_2444.JPG
    2.4 MB · Views: 17
  • IMG_2447.JPG
    IMG_2447.JPG
    2.9 MB · Views: 20
  • IMG_2432.JPG
    IMG_2432.JPG
    2.5 MB · Views: 18
  • Like
Reactions: PJL

rockaukum

Active member
I just removed the bed on the cat. Had to use the plasma cutter to remove all the stainless steel bolts as the nylock's would not let go!
I used a couple stainless hardware on the doors per your suggestion. I think I'll also go with those keps nuts as well. Seems once the nylocks are exposed to the elements, they really do not want to let go!
ra
 

rockaukum

Active member
Question time....
How would you describe the 'C' channel on the outside rails? Mine is 2.5" with 1.5" cross members. I have looked around the web and mainly find heavy steel in this measurement. I am trying to use the same size material in order to keep the weight down. It looks to be about 1/16" thick (16ga maybe?). I plan on using PT plywood for the decking this time. I may do a coat of roll on bed liner to help preserve it. I did a look though the forum and found two posting about deck replacement. I did not find what they used for the deck material. My thought is if I can source the C channel, the channel will hold the plywood in place and then not necessary to bolt it to the frame?
I am going to extend the deck about six inches and won't be able to used the existing C channel.
So, any suggestions on sourcing the channel and how would you describe the stuff? cold rolled?
The other option would be to use square tubing instead of the C Channel but then I'd need to anchor the ply. Not a big deal but I'd rather avoid it if possible.
There may be things I am missing so fire away!
Thanks for any and all suggestions.
ra
PXL_20240922_231103653.jpgPXL_20240922_231112392.jpg
 

rockaukum

Active member
After quite a bit of searching, I think I have found a solution to the 2.5" channel for the side rails on the bed. I found a somewhat local shop that will fabricate the channel for me. It will run about $100. If I could find the channel pre-manufactured, I figure it would cost about half of that but then I'd have to factor in shipping... Probably average out to a break even.
Yesterday, I spent 3.5 hours pulling the tracks off and turning them around as I have been told they are on backwards! What a pain in the back! I opted to do a three grouser overlap joint when I rebuilt them. I have the track jacks but with this type of belt joint, they just do not work! The jacks are designed to span two grousers only. We struggled with the drivers side first and learned some things along the way. I'll try to describe what we ended up doing to maybe help someone else out.
We did one side at at time as I determined I could unbolt the track joint and drive the cat off the track. You just need to ride the brake steer on the side without the track. Worked just fine. We rolled the track up and used the tractor to move it and spin it so it was now in the correct direction. On the first track, we used straps to pull the belts together. Problem was with the straps, they put tension on the grousers and caused them to roll downward. Thus needing more pulling to get the holes to align up. I hope that makes sense.
On the passenger side, we removed the track in the same fashion as it works well.
To reassemble the track, the big difference was I put the first grouser onto one side of the belt only, on the set of holes closest to the other end of the belt. That allowed us to use the jacks to pull the grousers together. Once lined up, we put the third farthest grouser onto both belts. Once that was done, I removed the first grouser as it was only through one side of the belt. after that, we set out to put the two grousers back on through both belts. Much quicker and a bit easier. Now I just need to remember this in case it happens in the field!
Last season, I did blow a track off out in the snow, very hard snow (my mistake completely). It took over five hours to get the one track back on! Lets just hope I do not get impatient while traveling and when making tight turns on hard snow, I do it with a back and forth fashion.
ra
 
  • Like
Reactions: PJL

rockaukum

Active member
Thought I'd share what the metal looked like on the inside once I cut the channel off. L its of corrosion / rust and god know what else.
My first thought was to just replace the channel as the bed will be a bit longer. Once I cut the channel off, I saw how bad the metal looked. Now I will cut off the cross bracing as well. Will this ever end? Waiting to hear back from the shop on the channel. The Forman said he could do it but the price originally suggested was doubled.
ra

PXL_20240926_164719745.jpgPXL_20240926_165328375.jpgPXL_20240926_165321047.jpg
 

rockaukum

Active member
Finally got some things done here so I can play (?). Working on the deck of the cat. It was badly bent up and very rusty under there! I was able to have a shop make the "C" channel for the perimeter and it came out pretty good. Cost $200 for three pieces, ouch! Anyway, after a lot of thought and mocking up things, I came up with what I think will work. I replaced the wing portion of the cross members as the center section did not appear to be in as bad of shape as the outside (wings) portion. Lots of clamps and straps to hold things in place so I could get an idea if it would work or not. I started cutting and grinding, no turning back now!
My thought is to have the deck material float within the C-channel and not have bolts anchoring the decking down. If it does not work out, I'll bolt it down but until then, it will float. I also wanted to make it so I could easily remove the decking without too much hassle so what I am planning is to bolt the back C-channel to the rear cross bar. If I need to replace any portion of the deck, I'll unbolt four bolts, take the back c-channel off and the deck boards should slide out the back. I hope so anyway.
ra
PXL_20241009_001605168.jpgPXL_20241008_205240924.jpgPXL_20241009_194849022.jpgPXL_20241009_204148457.jpgPXL_20241009_194832672.jpgPXL_20241009_235409867.jpgPXL_20241009_235621992.jpgPXL_20241010_000102653.jpg
Here is the deck material! Better get busy on that too!
PXL_20241007_170221665.jpgcedar...
 
  • Like
Reactions: PJL
Top