
-
Please be sure to read the rules and adhere to them. Some banned members have complained that they are not spammers. But they spammed us. Some even tried to redirect our members to other forums. Duh. Be smart. Read the rules and adhere to them and we will all get along just fine. Cheers. :beer: Link to the rules: https://www.forumsforums.com/threads/forum-rules-info.2974/
You are using an out of date browser. It may not display this or other websites correctly.
You should upgrade or use an alternative browser.
You should upgrade or use an alternative browser.
Bombardier SW48 Side Walk Cleaner
- Thread starter ken65
- Start date
pixie
Well-known member
Look carefully at the fittings. Measure them if you can. I think they will be 3/8" Iron Pipe Size but maybe some 1/2" and maybe something else !
Get the right number of caps and plugs to screw into/onto the hoses that go to the plow. Get lots of paper towels and 'oil-sorb' or cat litter.
It will be slightly less messy if you can disconnect the hoses from the machine, cap/plug them and leave them with the plow.
You want to set the plow on the ground or sturdy blocking, shut off the machine and try to get the pressure relaxed in the system by moving the leveres to each function. You will still have a little pressure so let it sit for a while and go slow removing the fittings. Have some pans or half plastic oil bottles to catch the oil. If it's dripping really fast it might still have some pressure so just catch the oil until it slows down. Be careful; hydraulic pressure can cut you and it's nasty.
Oh ! And you might want to color code with tape so the right ones go back together.
Last edited:
acquirermatt
New member
The dash looks the same as mine but mine is bolted in. It is a '69, but the cab has been modified over the years, so who knows what it looked like originally.


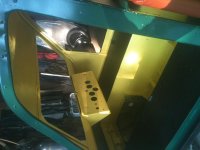
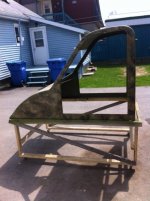
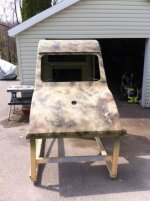
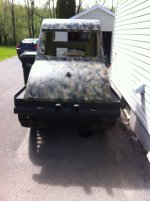
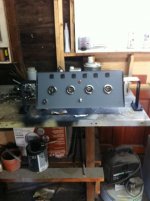
Hey all I just wanted to say were I was with my project been a long winter I took off my cab final and im now redoing my dash with a new dash I re did all wiring including changing alternators Im now looking at installing an electric fan for the radiator. the fan will be coming out of a ford torus. all lights are being changed as well the cab has been repainted my camo job came out fantastic expensive to do but well worth it im having fun and learning comments on the paint job
Attachments

Last edited:
That's going to be an awsome hill climbing hunting rig when its all back together. The grousers on my J5 are half that deep and I rarely spin a track. Those deep grousers can take you places that you probably shouldn't be. Beautiful camo job. You'll have to be carful not to lose it in the woods! Are you hunting for moose, deer or what?
Hi thanks for the comment It should be about 2 weeks before its finished I hunt for deer I dont have moose on my land but plenty of deer
I have this hill to go up and when i go its scares me thinking the machine will roll or flip over going down seem ok but going up scares me.
I have this hill to go up and when i go its scares me thinking the machine will roll or flip over going down seem ok but going up scares me.
rcc
Member
Hi Ken, nice machine you will have loads of fun with this. They are not hard to fix, just patience. I have three J5's that I have (and currently) rebuilt. The parts are available in Toronto also at Inland Tracked Equipment, Bruce Atcheson is the owner he has maybe 20 of these used machines, used parts and new parts. His phone has changed so I will send it to you once i dig it up. Canada is a big place so not sure if this will help. I am north of Toronto.
I have put in electronic ignition works fine, but so do the points. One thing you mentioned was "head bolts look like new" if you can see the head bolts you have a chrysler Industrial 251 flat head not a 300 ford. Also, i have a J5 parts manual, all the parts for the sw48 and J5 are the same, just the tub (body) is narrower and the tracks may have rubber inserts so not to destroy the sidewalks etc.
Let me know if you need any help with anything.
Hi Thanks for replying
I have a 251 Chrysler in my machine getting ready to reinstall a new dashboard that wll not be welded to the cab, this way I can take of cab anytime without having to worry about the wires and dash. I'm looking for a distributor electronic one and a gm alternator. I got my doors at the machine shop to get re done and maybe lighter there to heavy for nothing I find.
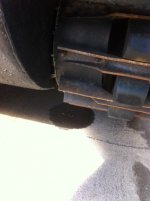
Small problem I notice I'm leaking oil from the left side of the axle were the sprocket is to turn the tracks Ill put up a picture of the leak maybe you can help me with this issue I also wanted to ask how to take the tracks off.
Lots of work fun re doing it frustrating at times.
I re painted the cab again it dint mach the other parts part still looks great will post pictures of new look also
All your input would be greatly appreciated
I have a 251 Chrysler in my machine getting ready to reinstall a new dashboard that wll not be welded to the cab, this way I can take of cab anytime without having to worry about the wires and dash. I'm looking for a distributor electronic one and a gm alternator. I got my doors at the machine shop to get re done and maybe lighter there to heavy for nothing I find.
Small problem I notice I'm leaking oil from the left side of the axle were the sprocket is to turn the tracks Ill put up a picture of the leak maybe you can help me with this issue I also wanted to ask how to take the tracks off.
Lots of work fun re doing it frustrating at times.
I re painted the cab again it dint mach the other parts part still looks great will post pictures of new look also
All your input would be greatly appreciated
rcc
Member
I can walk you through this axle seal problem, there is a number of steps to get to the two seals that are back to back next to the axle bearings, all are located in the axle housing that bolts to the body (tub). look forward to seeing some pics to see how bad the leak is. When you r&r the seals you will most likely need to replace the two axle bearing sets at the same time. I have a break down pic i can send you and the part numbers when you get to that job.
The track will need to be removed from the drive sprocket, first question are the tracks one continuous belt (original equipment) or spliced with overlap aftermarket so to speak?
Were in Canada are you approx location for parts? Also I have a machine shop local to me that makes me new parts at a fraction of the cost for new. You could find a machine shop local to you and compare pricing on what i have had made. I have also remanufactured some parts myself.
rcc
Member
Changing the distributor to electronic is easy, you use your current unit change out only the points set and condenser, new coil and remove the ignition resistor. Cap, rotor etc all remain the same. I will get you the part number for the one I used in my distributor, works great.
The Alternator is standard GM with internal regulator. Big question is what is currently in your machine is it a chrysler OEM pic of it will do. the chrysler to GM will require some wiring work or just put in a rebuilt chrysler one. Big question is the alt not charging?
The Alternator is standard GM with internal regulator. Big question is what is currently in your machine is it a chrysler OEM pic of it will do. the chrysler to GM will require some wiring work or just put in a rebuilt chrysler one. Big question is the alt not charging?
Hi the alternator does have a charge on it theirs a regulator that is connected separately that holds the change. This is why I want to change the thing.
the distributor give me more info on that so I can see if it can be done
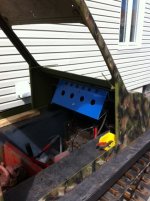
check out some pictures of today had to clean the bucket instal the dash time consuming but well worth it
I had to drill holes in the tub to empty out water I only have one drain plug on it and its in the front were your feet are when siting down in cab
And having trouble posting pictures on the site dont know why
the distributor give me more info on that so I can see if it can be done
check out some pictures of today had to clean the bucket instal the dash time consuming but well worth it
I had to drill holes in the tub to empty out water I only have one drain plug on it and its in the front were your feet are when siting down in cab
And having trouble posting pictures on the site dont know why
Attachments


Snowtrac Nome
member formerly known as dds
I wouldn't mess with the alternator that is one of the older Chrysler small frame alternators one of the most reliable alternators ever made the regulator is a solid state unit and are cheap the one on my dodge is 25 years old now 3 alternators and the same regulator.
rcc
Member
I agree with Don, no need to change the alternator. The GM alt will not help with anything other than give you more things to buy and then rewire. When putting the machine back together make sure you have good clean ground connections for all the electrics to work their best. Also, the GM alt would use the same V belt as the one you have.
Looking at the pic of the alternator is the a top bolt in the upper bracket or is that a wire holding the belt snug?
The electronic distributor has nothing to do with the alternator. I will see if I can get you the info later today when I am up at the garage.
Looking at the pic of the alternator is the a top bolt in the upper bracket or is that a wire holding the belt snug?
The electronic distributor has nothing to do with the alternator. I will see if I can get you the info later today when I am up at the garage.
Ok the distributor is electric the alternator is holding by a bolt the wire was to secure to the bracket its not the original. Yep Im going to keep all and not change anything else on it fix the bracket for the alt . I want to put it back together now and sale it.
How do you take of the tracks off the thing though
How do you take of the tracks off the thing though
MNoutdoors RIP
Gone But Not Forgotten
Ok the distributor is electric the alternator is holding by a bolt the wire was to secure to the bracket its not the original. Yep Im going to keep all and not change anything else on it fix the bracket for the alt . I want to put it back together now and sale it.
How do you take of the tracks off the thing though
If it does not have the overlapped spliced tracks and they are continuious you would take off about six of the track cleats and position at the sprocket area
Release the track tensioner slide the rear wheel forward as far as you can pull the track back and off the rear wheel to the side
rcc
Member
Ken65 where is the "LOVE" .... you need to be a little passionate with these machines you are fixed on the skin (painting) but not the heart and sole... don't worry about the little oil leak unless you are in 2 feet of water, alt ok and working, you do not need electronic ignition the points work just fine. get it out and drive it around and see if you enjoy this type of machine experience! They are just fun and tough! You love them or hate them!
rcc
Member
Ken
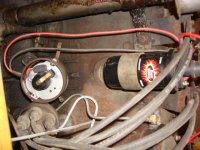
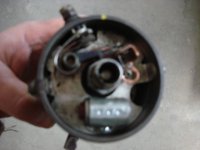
the Distributor module in from www.pertronix.com for Autolite IAY-4004-1 distributor 12V negative ground Part # 1564. The ignition coil is part # 40611 epoxy filled for high vibration. Works get on my machine.
Here is the pic of the module on the J5 using the original distributor, cap and rotor. Pic of the original with old points and condenser and the back of the J5 in the garage ready for work.
First time posting pics so hope it works and i got the correct pics...!
Attachments


That a nice machine my windows will be install in my cab today it was cracked and my doors I have no clue when there going to be back I tried to fix them myself but they were rested and holes in the lower panels
the guy that is doing the electrical has disappeared from the face of the earth
I have been trying to get a hole of him for a week now, He was suppose to finish this weekend that past to re wire the hole thing now im screwed he cut the wires and stuff and now I don't know were to start if I have to do it myself. I can do many things but wiring I have no clue
my windows will be install in my cab today it was cracked and my doors I have no clue when there going to be back I tried to fix them myself but they were rested and holes in the lower panelsthe guy that is doing the electrical has disappeared from the face of the earth
I have been trying to get a hole of him for a week now, He was suppose to finish this weekend that past to re wire the hole thing now im screwed he cut the wires and stuff and now I don't know were to start if I have to do it myself. I can do many things but wiring I have no clue
rcc
Member
The wiring is not hard. If you would like I can email you a wiring diagram for you to follow. As your machine should be mostly factory wiring, you can follow each wire and connect to the dash. The wires are also color coded. If you would like this send me your email in a private message.