• Please be sure to read the rules and adhere to them. Some banned members have complained that they are not spammers. But they spammed us. Some even tried to redirect our members to other forums. Duh. Be smart. Read the rules and adhere to them and we will all get along just fine. Cheers. :beer: Link to the rules: https://www.forumsforums.com/threads/forum-rules-info.2974/

In need of suggestions / help!

rockaukum

Active member
I am trying to order new belts from fall line in Reno. I have spoken with the rep there about getting the replacement belts. side note: ouch! Expensive, but from what I can gather, they are good quality belts.
MY problem is this: The track system is cobbled together. On one side of the cat, the inside two belts are (appear to be) original belts. Both five inches wide with the 8" pitch and four inch pitch. On the two outside belts they have a 10" belt with the two five inch belts mated to each other.
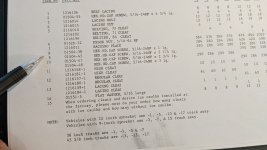
Factory calls for 72 grousers, I got 73.
There are no lacings being used, just overlapped. Actually there are many breaks in the belts which have been mended.
SO... Fall Line can not suggest how to go about measuring for the replacement belts, I even offered to take the machine up there and have them do the take off as I do not want to give wrong info and be on the hook for the $. I think because the belts have been modified, they are concerned what else may be changed which would throw off the measurements(?).
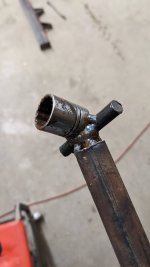
My current thought is to just cut one track off, remove one grouser and re-attach. If I can reinstall the belt, then, in my mind, I can revert back to the original 72 grouser count. If you look at the pictures of the track belt adjustment screws, It looks like I have about two inches remaining inside the sleeve for additional adjustment out OR about five inches shorter. With so little thread contact, I feel it is weak, shortenings the track (if it will fit) should give me a stronger mount.

What are the thought on how I should proceed? I need to figure out how to measure for the belt replacement, but with it being in the state that it is, I am at a loss.
(I plan on using laces)
As always,
Thanks for any and all help
rockaukum
1971 1202B Thiokol
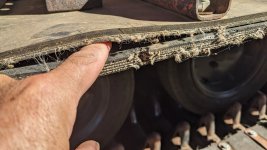
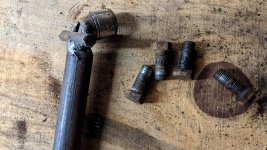
Pic one shows just a tire guide, missing grouser?
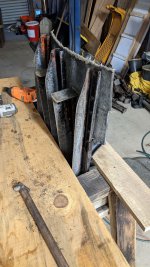
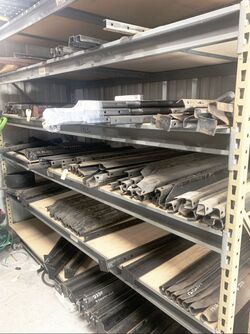
Pic two shows how they mated the five inch belts with the ten inch belt on the outsides only
Pic three shows the two belts mated
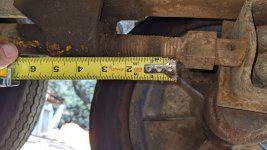
Pic four and five show the track adjustment screws
Pic six shows the inside belts, looks like original five inch belts there
 

Attachments

  • PXL_20221021_220857230.MP.jpg
    PXL_20221021_220857230.MP.jpg
    6.5 MB · Views: 118
  • PXL_20221021_220907207.jpg
    PXL_20221021_220907207.jpg
    1.6 MB · Views: 118
  • PXL_20221021_221007068.NIGHT.jpg
    PXL_20221021_221007068.NIGHT.jpg
    1.3 MB · Views: 124
  • PXL_20221021_221209258.jpg
    PXL_20221021_221209258.jpg
    800.2 KB · Views: 117
  • PXL_20221021_221237757.jpg
    PXL_20221021_221237757.jpg
    1.4 MB · Views: 126
  • PXL_20221021_220641151.jpg
    PXL_20221021_220641151.jpg
    1 MB · Views: 134
If you are going to do the lacing yourself why not order belting to allow for 74 grousers at 4" pitch and then cut it to fit where the lacing will need to be. Screw the adjusters in, put the new tracks on, and go with what looks like the right spot for the lacing. Then tighten em up. It's been my observation that the track belts out in the sun seem to shrink and therefore twist the track causing the machine to pull to the side creating the need for steering corrections. Ski areas de-track their machines for the summer and stand them on end.
 
As a follow up....
As of now I think I am giving up on going with "real" snowcat belting. I'm in the camp that the "Real" belting is just a form of conveyor belting, and priced as such. So far, nothing I have read leads me to think it is special belting only for snowcat use. That said, I have, like many before me, been talking with various belting suppliers (conveyor belting) to find something that meets the requirements. The requirements I am using are the ones posted on this forum by a guy who is no longer active. With that in mind, take a look at the attached spec sheet for a Continental belt and let me know your thoughts as to being a good fit. My cat is purely recreational and not planning on running it hard. Incidentally, I was told that Goodyear is no longer producing belting. Continental purchased Goodyear about six years ago and they are making the belts at the original GY factory. This information was provided in one of the many conversations with various belting providers.
Looking at the spec sheet, my main concern is the overall belt thickness (nominal overall gauge) of .266. Seems kinda thin but the rating is 330/3, and the belt has the same thickness on the top and bottom (1/16") which according to other posts, this is a good thing. Pricing for this belt is at $5.07/ft, plus shipping. This will put it at about half the cost of a supplier of "real" snowcat belting. There is no warranty. One more thing, I see that folks here Use Flexco 550 fasteners on their belts. I was informed by the supplier that this fastener will work but continental recommends using "R2" or "U35A" fasteners.
Looking forward to hearing your thoughts.
ra
 

Attachments

  • PXL_20221102_172438185.jpg
    PXL_20221102_172438185.jpg
    928.3 KB · Views: 112
As a follow up....
As of now I think I am giving up on going with "real" snowcat belting. I'm in the camp that the "Real" belting is just a form of conveyor belting, and priced as such. So far, nothing I have read leads me to think it is special belting only for snowcat use. That said, I have, like many before me, been talking with various belting suppliers (conveyor belting) to find something that meets the requirements. The requirements I am using are the ones posted on this forum by a guy who is no longer active. With that in mind, take a look at the attached spec sheet for a Continental belt and let me know your thoughts as to being a good fit. My cat is purely recreational and not planning on running it hard. Incidentally, I was told that Goodyear is no longer producing belting. Continental purchased Goodyear about six years ago and they are making the belts at the original GY factory. This information was provided in one of the many conversations with various belting providers.
Looking at the spec sheet, my main concern is the overall belt thickness (nominal overall gauge) of .266. Seems kinda thin but the rating is 330/3, and the belt has the same thickness on the top and bottom (1/16") which according to other posts, this is a good thing. Pricing for this belt is at $5.07/ft, plus shipping. This will put it at about half the cost of a supplier of "real" snowcat belting. There is no warranty. One more thing, I see that folks here Use Flexco 550 fasteners on their belts. I was informed by the supplier that this fastener will work but continental recommends using "R2" or "U35A" fasteners.
Looking forward to hearing your thoughts.
ra
Some issues come to mind quickly....

- I don't see any temperature specifications.

- With the belts at greater than 80% tension, the minimum pulley diameter is 18".

- Resistance to cuts and gouges rated only as "fair".
 
Thanks for the feedback. The temp rating is listed at -30 to 150*. I do see the cut issue now, original I fixated on the abrasion resistance as good. I'll follow up with the supplier in regards to tension ratings and pull diameter. That is something I am unclear on how that is factored. Up to 60% is shown at 14". So, do you think a relatively light recreational vehicle with a 200 ci motor will outperform the belts? Thinking (writing) out loud here, wondering if you experienced catters think otherwise?
I'll follow up after hearing from the supplier about the bend radius issue.
Again, Thanks!
 
I'm sorry, I missed the temperature specs on the information sheet.

As background information, for many years Tucker equipped their snowcats with two-ply, 220 PIW belting. A few years ago they stopped selling the two-ply belting, and only offered three-ply, 330 PIW belts. Their prices for replacement belts were not competitive with other sources, and I haven't followed up since.
 
Blackfoot,
Thanks for the insight. I spoke with the rep today. He feels the belt is a good one and said they sell the 600piw to a few resorts in their area and have no complaints with it. I know I am looking at a lighter belt but, no plow, or drag, just me and my skis. I feel I will be okay (I hope!).
Fasteners: Recommended for this belt is the R2 but reading here is seems like a lot of folks use the 550? Any recommendations on which is better and why?
Weather reports is for up to 4' in some areas this next week! Got a foot the other day. I need to get the belts replaced cause I don't want to miss out on the fun!
Thanks.
 
I've never used the R2 system, but a very quick look shows the lacing to be attached to the belts with rivets. The 550 system, which I have used, utilizes small threaded fasteners. It's been awhile, but as I recall the "bolt" has a tab that locks into a slot in the 550 lacing, and the nut is tapered to fit the contour of the lacing.

While it's not a common problem, occasionally the belt lacing breaks and has to be replaced. Drilling out rivets, especially stainless steel ones, can be a pain in the butt, wheres removing the threaded fasteners is comparatively easier.

I would absolutely recommend replacing all the nuts and bolts securing the grousers and backing plates to the belts. When you do the math on the numbers... well there are a bunch of them - and the cost adds up. Definitely worth your time to shop for the bolts. When Scott and I have replaced bolts we use Stover nuts which have a deformed thread to make them resistant to loosening. (They're also called Grade C lock nuts.) I recommend you consider using that style.

While I won't "guarantee" you'll have this issue, it's very likely you'll have some nuts and/or bolts on your existing tracks that will be most uncooperative when you remove them.
 
Blackfoot,
Thanks for the information. I did see the R2's were riveted but I figured if I went with those, I'd use bolts. That said, I have decided to go with the 550's and not use the cable but a bolt.
As far as the nuts and bolts, almost all if them are SS and look darn near new. If I have any issues pulling them, They will be replaced with SS as well. Are the Grade C lock nuts better than the nylock's?
Is there a concern with the 550's working with belts from 1/4" to 5/8"? This belt is just over 1/4" but I do not know if the fastener pinches down to the dimension of the belt. Slop would be bad. I figure it would be just fine as you all have been using these and the belt dimensions are different.
I'm going to order on Monday, four day turnaround then wait....
Perhaps I'll remove the existing tracks and separate the grousers in the mean time.
Thanks for al the information!
ra
 
When it comes to Nylok vs Stover/Grade-C lock nut, I think the Stover type have a greater resistance to loosening than Nyloks do. However, I also think the “book answer” is Stover nuts are not reusable, whereas Nylok ones are, though their holding power is somewhat less after the first use.

On the one hand I’m a big fan of stainless steel fasteners; to the point snowcat buddy Scott might say I have a fetish for them. However, stainless steel fasteners are much more prone to galling than carbon steel fasteners. If you (or a reader) are not familiar, galling is caused by heat and friction, and some refer to it as "cold welding”. You can be loosening or tightening a bolt/nut combination and all of a sudden it gets really tight; to the point it’s either really difficult to continue, or you simply can’t.

Now the fasteners have galled, and your fun has just begun. It may be possible to use longer handled wrenches and/or breaker bars and overpower the frozen fastener, but you very well be in a position where you have to cut them apart. A simple task has now become a significant PITA.

My impression is Nylok nuts are more prone to galling than standard threaded nuts. I would think a Stover/Grade -C lock nut would be even more prone as there is guaranteed to be more friction between the deformed nut and the bolt. But they must work as they are sold. (I personally have no experience with stainless steel Stover nuts.) To reduce the probability of galling, it’s a good idea to use a lubricant on the bolt threads, such as Anti-Seize, and using hand tools rather than power tools will generate less heat during either installation or removal.

Bolts used to secure grousers and backings plates to belting do have a tendency to loosen, and it’s worthwhile to select fasteners accordingly. I think many forum members may nod their heads when I say I’ve seen both bolt heads and nuts tack welded in position so they don’t loosen. That may give the welder a sense of “take-that” to the problem fastener, but that satisfaction will be overcome with a “what was I thinking “ reaction when he/she subsequently tries to remove them.

I thought I’d take some pics of 550 belt lacing and the supplied fasteners to show how the system works, and to illustrate what I said in a previous post..

First pic shows the bolt head side of the belt lacing. Note the formed tab.
IMG_1946.jpeg


Second pic shows a side view of the lacing and you can see the teeth that bite into the belt material when the lacing is secured to the belting.

IMG_1948.jpeg


Third pic shows the head of a bolt with notches to lock into the tab on the lacing.

IMG_1950.jpeg


Fourth pic is a side view of the nut. Note the convex contour of the nut which matches the concave contour of the belt lacing.

IMG_1949.jpeg
 
Excellent comments! One of the first things I did on this cat was to replace the failing deck. I milled some black oak and used some aluminum stock to create the old truck bed look. Then I needed to remove the center ones to do some battery work. Guess what? the SS bolt and nylock's Were impossible (by my standards) two remove and Yes I did have to cut them off. And yes, it is a PITB!
Great tip in the anti-seize, I'm certain to use it.
Yet another question for you all:
I have seen it both ways and would like to know the right way, with any pros and or cons associated with each. When attaching the grousers to the belts, do you all put the bolt down through the grouser or up through the belts with the nut in the grouser? Can't imagine it will matter either way but being new to this game, I'd prefer to do it correctly.
Thanks for sticking with me on this.
Pending the rain (snow up higher) tomorrow, I hope to remove the tracks and start the dismantle process. Then build a template. Thinking about using a somewhat thin plywood and map it out on the cnc so it will be spot on with measurements.
I hope to photo the process and will update here as I go along.
ra
 

Attachments

  • PXL_20220331_003405067.jpg
    PXL_20220331_003405067.jpg
    3.2 MB · Views: 123
  • PXL_20220401_231128082.jpg
    PXL_20220401_231128082.jpg
    2.5 MB · Views: 118
Belts are ordered! Rain is falling and the feet are piling up in the mountains!
Yesterday I started to remove the belts from the machine and then the grousers form the belts. All was going swimmingly until those nice little SS nuts and bolts ran out and I came across all the Old nuts and bolts. Blackfoot Tucker is correct, what a PINTB! I think these are original as is the belting they are securing. I also think they are the "Stover" nuts as they are very difficult to remove and once removed the threads are shot. I ended up making a tool out of a socket I ground down on one side to allow for clearance within the grouser. Then welded a rod onto the socket. Worked good but the small diameter of the rod made it miserable on my hand while using an air impact gun for removal. So, I welded a piece of pipe over the rod. This worked great. I did not have to visually see the nut to ensure proper connection on all of them. Some still presented problems. Next up was cutting the belt into sections about four or five grousers long. I build a jig out of saw horses and pieces of wood to support the grousers in an upright fashion. This made removal much nicer on my knees and back.
Enjoy the photos which show the tool, some fo the effects of those "Stover" nuts, and the jig for holding the grousers.
QUESTIONS:
1. Fall line sent a layout for the holes. They recommend placing one side of the lacing by itself and the mating one should be under the grouser. Thoughts on this? I have ordered the 550's, anyone know if the hole diameter is the same as the grouser mount holes?
2. Is 7/16" the actual hole size for the punch? Is there a certain punch recommended for this? I have read of one guy making one but I think they are relatively inexpensive, so I'll buy one.
NEXT UP:
Design the template to punch the holes. I need to get the punch first so I know the outside diameter, then I can draw up the template to cut.
Thanks again for any and all help!
ra
First two photos: the tool showing how the socket was ground down for clearance.
photo three: shows the tool and the effect the "Stover nut has on them once removed.
photo four: shows the saw horse jig used to support the grousers during removal.
 

Attachments

  • PXL_20221108_004227822.jpg
    PXL_20221108_004227822.jpg
    239.4 KB · Views: 102
  • PXL_20221108_004440498.jpg
    PXL_20221108_004440498.jpg
    1.5 MB · Views: 107
  • PXL_20221108_004213990.MP.jpg
    PXL_20221108_004213990.MP.jpg
    3.4 MB · Views: 104
  • PXL_20221108_004223696.MP.jpg
    PXL_20221108_004223696.MP.jpg
    3.7 MB · Views: 104
Very nice looking machine. VERY!

Second, let me say the photos I posted above are NOT 550 series belt lacing, but rather the lighter duty 375 lacing. All of the snowcats I've bought have had the 375 series lacing, and it's generally held up well.

I'm sorry the process is living up to my description....

The bolts used on both the 375 and 550 series lacing are 1/4" in diameter.

I have not heard of placing one side of the lacing under a grouser. Wouldn't you be adding more holes in a straight line across the belting making it weaker?
 
Most j-cleat tracks use this for buckles. One side under the lacing cleat.
 

Attachments

  • snowcat belt Laces-LMC-5inch-HD.jpg
    snowcat belt Laces-LMC-5inch-HD.jpg
    95.2 KB · Views: 95
  • snowcat belt Laces-LMC-8inch-HD.jpg
    snowcat belt Laces-LMC-8inch-HD.jpg
    97.4 KB · Views: 95
Most j-cleat tracks use this for buckles. One side under the lacing cleat.
Pat,

Those pieces are different than 375 or 550 series belt lacings. Maybe like a proprietary part? Though there's no real scale in the photo, it looks like the diameter of the bolt holes is greater than 1/4". I'm also wondering if the hole spacing lines up with the bolt hole spacing in the grousers?
 
Blackfoot Tucker,
It is my understanding from speaking with the folks at FL, that the lacings do attach on one side under the grouser and the other side mounted directly to the belt. Snowcat services makes his own but I do not know if they mount with the grouser or directly to the belt.

Any suggestions for where to purchase a punch? Not sure of the size yet as I have not measured it.
ra
 
Sure. Flexco, the belt lacing manufacturer, offers punches, too. IIRC, the HP1 makes 1/4" diameter holes, the HP2 makes 5/16 diameter holes and the HP3 makes 3/8" diameter holes. You can find them through many vendors, as well as Amazon and ebay.

The punches have a hex shaped shank are are intended to be used with an impact wrench. It's been a while since I used one, but I do remember thinking "Wow, these work great".
 
I used an flexco rotary punch in an air drill for my rebuild and it worked exceptional. I had a small container of silicone lube to dip it in every so often, Nice clean holes. One warning: the slugs come out hot enough to leave a mark. But that same heat sealed the ends of the cords in the belting. I made a jig that used 2 holes with reference pins than allowed me to drill/ punch 3 sets before moving. Worked very well.
 
Thanks for the tip on using a silicon lube to ease through he belting.
Looking into the nuts and bolts of this and getting ready to order those as well as the punch.
Looking at the manual, it calls for 5/16 x 1" bolts. The nuts they call out are called "eslok nut". So I presume that is similar to the stover nuts. When I measure the holes in both the grouser and the backing plates, they measure 1/2"? To me it seems logical to use 1/2" bolts to avoid the slop or excessive loading on the belt, especially if the bolts get loose. OR do they call a smaller bolt to make it easier to get the bolt through the plate, belt and the grouser? What do you all say / recommend as far as hole size?
Here are a couple photos of what was eluded to earlier (Blackfoot tucker I think) about welding the bolts. Looks like the prior owner jot frustrated and welded these bolts. Looking at the grouser, or more specifically, what is left of the grouser, this one needs replacing!
You may be thinking to measure the bolts taken out and go with that size, but I do not trust what was done by the prior owner(s). Especially when referring tot he track system.
Looking forward to hearing you thoughts not the bolt sizes...
 

Attachments

  • PXL_20221110_183309323.jpg
    PXL_20221110_183309323.jpg
    470.6 KB · Views: 113
  • PXL_20221110_183334328.jpg
    PXL_20221110_183334328.jpg
    724.8 KB · Views: 117
  • PXL_20221110_183355458.jpg
    PXL_20221110_183355458.jpg
    570.8 KB · Views: 115
  • PXL_20221110_214309765.jpg
    PXL_20221110_214309765.jpg
    830.4 KB · Views: 115
  • PXL_20221110_214321374.jpg
    PXL_20221110_214321374.jpg
    1.1 MB · Views: 115
The rubber belted Tuckers use 3/8" bolts to secure the grousers to the belts. The bolts are inserted with the head on the outside and the nut on the inside.

Using 1/2" bolts seems extreme, but if the holes in the grousers are that big, I think you're somewhat forced into going that route. Alternatively, you could make some small bushings to fill the space and use 5/16" bolts.

I'm reasonably sure you can buy new production grousers from Dan Gates at Snowcat Service in SLC, if you need some.

 
Well....
The parts are in, kinda. I finally got the belts, thanks fedx (not really!).
Today I made a jig for drilling the holes. I drew up the pattern for the jig on a piece of 5" x 7' x 1/2" MDF with the four inch spacing with one inch spacing from the edge. I cut the pattern out on a cnc so it should be pretty accurate. The punch I settled on is a high quality piece from Harbor freight (Ha!) $10 for a variety pack so I purchased two of these. I guessI can sharpen it as I go. The holes in the template reflect the OD of the punch bit. Flexco did not have a punch sized at 1/2".
While figuring out where to start the punching, I placed the Flexco 550 hinge on the belt and measured for proper spacing in order to maintain the four inch spacing. I drilled the first two holes with the center at 1 5/8" for the belt to account for the space the hinge takes up. UNFORTUNATELY, with the four inch spacing required, there is not enough room for the Flexco hinge! It will interfere with the grouser and backing plate. I either need to overlap or find the original hinge which mounts under the grouser on one side. I got 25' of belting with the thought of using the hinge, so I hope there is enough material to do an overlap. With that in mind, how many grousers do you folks overlap?
Being Thanksgiving today, I am done for now and hope to start up this weekend.
Fresh Belts have arrived! Boxes of Bolts, Nuts and washers (which are too big), Grousers stacked and ready.
.PXL_20221124_201808769.jpgPXL_20221124_201755662.jpgPXL_20221124_201818633.jpg
Checking the fit of the cutter, hole spacing looks good.
PXL_20221124_204312639.jpgPXL_20221124_210306857.MP.jpg
On the jig, I mounted tow pieces of MDF spaced so the belts will fit snugly in-between. The template will fit over the belt and then drill through with the punch
PXL_20221124_204154144.jpgPXL_20221124_204225269.MP.jpg
Short video of the drilling of the template / jig.
 

Attachments

  • PXL_20221124_200602901.jpg
    PXL_20221124_200602901.jpg
    273.9 KB · Views: 97
I am short on backing plates by about 80! Not having luck finding info on making these as I don't have the extra cash laying around (you married folks might understand). So I se out and started making some. I did not feel good about using just flat stock feeling that it could cause issues at the track foes around the sprocket and front wheel. I ended up buying 1 1/4" square tube as the shop did not have the right size rectangle tube. I cut them down and drilled a couple samples as a trial. Takes a little more that ten minutes to make two. Tomorrow I hope to build a jig or template to speed things up a bit. The sample looks like they will work great. I like the rounded edges to help protect the belts. Let me know if you see something that needs attention before I get too far along.

Also, I'd like to remove the front axle (the one with the tensioner on it). The tracks are off now. Is the process just as simple a jacking up the cat and sliding the axle forward?

The next thing to address as it has been suggested to me before I take this out too many times is to pull the top plate off the OC12 and have a look-see inside. Anyone care to chime in as to the correct procedure. I have searched and searched here and elsewhere and can't seem to find any info. My guess is to remove the lines and then the actuators (?) then the bolts and lift it off. On reinstall, reverse the process and bleed the system much like brake lines on a car.

Enjoy the photos and please.... If you see something I might be doing that is not correct, let me know.
Thanks for this site and those who help us along this journey...
PXL_20221202_003138849.jpgPXL_20221202_003121117.jpg
 
If you have flexible brake hoses you don't have to open the hydraulic lines unless you want to.

Back off the brake rod adjusting nuts (3/4 inch wrench) flush to the end of the threaded rods, (no more or you risk damaging the rod seals with the threaded portion of the brake rod) thus providing slack between the push rod /slave cyl.

You don't have to remove the slave cyls unless the flexible lines are to short, otherwise remove the 1/4 inch screws (7/16 socket) and they will slide up and out. I've never had to do that to get the lid off just for inspection but if you remove them you can inspect them too.

Remove the 18 lid screws (usually 1/2 inch socket) and pop off the lid. There are 4 dowel pins, one in each corner so there is a bit of resistance there but it should pop right off, gasket glue notwithstanding. If you're flex lines are still attached you can rotate the lid counterclockwise and set it on the front of the diff (usually).

When replacing the slave cyls make sure you engage the push rods with the detent (hole/divot) in the center of the slave cyl piston (very important).

Set the brake rod adjusting nuts to make the sticks build pressure about half way back to start. Don't pull the sticks all the way back too hard (bottoming out) while adjusting or bleeding or you may damage the master cyl internals.
Hope this helps.

-Pat
 
Last edited:
Pat, Many thanks go to you for the detailed report on removing the top plate. Great information not only how to remove, but also how not to cause damage to the various parts involved. Once this storm passes, I'll pull the top and hope that I do not see anything out of the ordinary! Again, thank you for the information.
ra
 
Time for an update...
I got the tracks built and ready to instal on the cat. Before I do that, I need to take a closer look at the front axle assemble as it was very difficult to adjust when the old tracks were on it. Also there are 73 grousers on each side and from what I can gather, it should have 72. Also, one of the grousers is broken and I am having difficulty locating one to replace. I may look into building one at a later date.
Pulling the axle off turned out to be a real chore. The driver side was stuck and Thought it should just pull out. I used the tractor to pull on it, but the axle had other plans. I saturated it with PB blaster and continued to work on it. I finally got it to free up and got it off. There is a bunch of gunk in the tube, the male portion appeared to have a bit of rust as well. It was getting dark so I loaded the axle on the tractor and moved it to the shop. While unloading the axle, I noticed the male portion was moving. The welds are cracked. Makes me glad I pulled it!
If anyone has suggestions for protecting the male female union, please let me know. I hope to put it back together Friday. My initial thought was to use some of the anti-seize that was used on the track bolts. However, that product can attach dirt which would be counter productive. I can't imagine I am the first to experience this, so Please chime in with suggestion.
I have attached various pictures of the axle and the sleeve as well as some photos of the track rebuild, tools used ect.
Looking forward to hearing your suggestions
Thanks for checking on this build and for any suggestions.
ra
Tracks!PXL_20221213_010951016.jpgPre install setup of the hardwarePXL_20221214_190634520.jpg
Tools used for track buildPXL_20221211_205910293.jpg
Axle photosPXL_20221215_010009896.jpgPXL_20221215_010020201.jpgPXL_20221215_010035411.jpgPXL_20221215_010053719.jpg
Right tool for the job?PXL_20221215_010803470.jpg
Cracked weld!PXL_20221215_010615350.jpg
 
More progress...In the light of day I see that the previous owner(s) knew about this problem as there was extra weld along the seam. I got the old weld off, some of it just pealed away with a cold chisel. As it was removed, you could see what appeared to me that they did not clean the metal as the metal showed rust. not sure but just an observation.
I cleaned it up, and was taking measurements to ensure everything would square up. Then it dawned on me that maybe I should place the axle back into position and them weld it in place. So that is what I did.
Next I pulled the axle back out and set to the task of cleaning out the frame tube. It had a lot of dirt, rust particles and whatnot. I welded up a little tool to help clean out the tubing. After some heavy scraping, the tube looks much better.
With the axle back in the shop, I used a flapper disk to clean up the male tube which as you can see has a bit of rust as well.
It appears that at some time in the past, the cat hit something hard! Take a look at the bolted on bracket and you can see how bent it is. This was on the passenger side which I believe caused the axle to bind putting pressure onto the drivers side making it difficult to adjust. Thinking the hit knocked the tubes out of alignment.
All speculation but it seems logical to me.
Today will be the big day to get the axle back in and hopefully the tracks back on!
Doing a bit of reading, I have decided to use anti-seize as the lubricant on the alxe sleeve and mating tube. I was thinking of using grease for this, but gonna go with the anti. It has additives such as graphite (I think) which should be beneficial in the long run. I do not see a way to keep water dirt ect. for getting in there.
Take a look at the the pictures. One had a screwdriver locating what I think is a seal for the torsion part of the axle. It has pulled away and I'd like to know if this is repalacable. Please, if you know, let me know and hopefully this will help others too!
Thanks for following along and any replies with assistance or advice. I appreciate the help.
ra
Is this a seal or retainer or...PXL_20221215_212908805.jpg
Old fix?PXL_20221215_201549929.jpg
new welds, I feel confident with the weld but it doesn't look that prettyPXL_20221215_232152434.jpg
Tool used to clean the tubingPXL_20221215_234813792.jpg
Crap in the tubePXL_20221215_233857761.jpg
Old weld cleaned up PXL_20221215_210551060.jpg
 
Time to wrap this up! Yesterday I finally got the tracks on with one grouser to spare! The cat had 73 when I got it and I think I figured out why. Noted above.
I did the overlap and carried the overlap to three grousers.
I had to drill out one of the starter(?) grousers to 1/2" as they were 3/8 (I think). The belt was drilled to 1/2" so It was best to just drill it out to match the holes in the belt. I ended up using a bit that was for Glass and or hard stone like marble, slate ect... The bit worked out great! Nice and easy.
Today I took the fuel tank off to clean it out. Oh man! there was no less than a gallon and a half of water in there as well as sludge. I'm glad that is done.
UP next is:
Fix the wipers
Figure out which air cleaner will work with the ford 200 industrial motor
Replace the oil in the Dif and the motor.
Then it is time to get out on the snow!
Enjoy the photos and If you have suggestions on wiper motors or air cleaner, please advise...
Thanks for the help,
rockaukum
PXL_20221224_000230993.jpg
I made the some of the backing plates
PXL_20221224_000302083.MP.jpg
New belts!
PXL_20221224_000313980.jpg
Water, sledge, and fuel. Just a sample of what was removed. Along with slag from welding up the aluminum tank.PXL_20221223_191445750.jpg
 
No clue if yours are the same...

Scott and I have been working on TUG's (1984 DMC 1450) right side wiper motor's park function. That wiper motor is an American Bosch model WWF.

I don't know if yours is similar, or not, but be aware there are numerous varieties of that model number (different voltages and different shaft lengths, etc). If you start by Googling "American Bosch WWF wiper motor" you can find lots of information.

Good Luck!

I have no idea if this interests you, or if you want to go down the potential Rabbit hole, but it's food for thought....

Several years ago there was an excellent thread by forum member cloudcap about upgrading the wiper system on a Thiokol Imp to pantograph wipers:


For whatever reason, it seems the wiper system on snowcats get short shrift from the manufacturers. Cloudcap's upgrade was the inspiration for Scott and I to redesign and improve the factory's crappy wiper system on both Thundercat and Putri-Zilla. In our case once we ( really Scott) figured out the geometry of the system, the actual modifications were easy-peasy.
 
Top