• Please be sure to read the rules and adhere to them. Some banned members have complained that they are not spammers. But they spammed us. Some even tried to redirect our members to other forums. Duh. Be smart. Read the rules and adhere to them and we will all get along just fine. Cheers. :beer: Link to the rules: https://www.forumsforums.com/threads/forum-rules-info.2974/

Building another bedroom.

NorthernRedneck

Well-known member
GOLD Site Supporter
So we are just nearing completion of a (what turned out to be) year long kitchen reno and I thought life was good. Basement was completely finished just before we moved in. Whole upstairs has been updated. Wrong!

We have 5 kids. Our house was originally a 4 bed 3.5 bath 2400sq.ft built in 2002. In this economy, we don't anticipate anyone leaving any time soon. Two of them are adults being 19 and 21. We have 2 bedrooms on the main floor and originally only 2 downstairs with a huge l shaped recroom and a bathroom. When we first moved in back in 2019, we built a wall in the recroom creating a 9x11 bedroom for our oldest son. That left our 3 boys each with their own rooms and our daughters sharing.

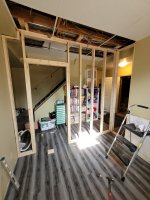
We have a 9x8 area at the bottom of the basement stairs where I will be putting up a wall and door to make a 6th bedroom so we can separate the girls. It won't have a closet but will be big enough for our youngest daughter. She's never in her room now.
This is just phase one of the operation. 🤣
20240316_123201.jpg20240316_123226.jpg
 

NorthernRedneck

Well-known member
GOLD Site Supporter
Phase 2 of the operation will be removing the carpet and painting the girls current bedroom. (Ignore the mess. They're teen girls both with diagnosed adhd and other things. 😆 keeping it spotless is a losing battle)

This room is 13x16 and should make a comfortable little apartment like room for our oldest.

I plan on installing laminate flooring in this bedroom.

No pictures of phase 3 room. Our oldest son will be moving out of this room into the bigger one and our daughter will move into it after a fresh coat of paint. I plan on starting this week sometime after getting materials.

20240316_124241.jpg20240316_124246.jpg
 

Melensdad

Jerk in a Hawaiian Shirt & SNOWCAT Moderator
Staff member
GOLD Site Supporter
Looks like a good project for privacy and separation, which are usually good things! The big window is a bonus in that lower level room too, nothing worse that a dark room.
 

NorthernRedneck

Well-known member
GOLD Site Supporter
So the nice thing about where the bedroom is located is that it's right at the entrance to the basement from the attached garage. I was able to lay down the wall in the garage and cut everything to size easily as it's a smaller area where the room is going. I started this morning laying out the wall and cutting everything to size.

20240318_092238.jpg20240318_092447.jpg
 

NorthernRedneck

Well-known member
GOLD Site Supporter
Measure twice cut once? I missed factoring in the aid ducts in the ceiling and had to modify the end of the wall. Also came to the conclusion that it wasn't going up in one piece so I split it above the doorway then spliced it together. I anchored it to the wall and ceiling with 3" screws.


20240318_104421.jpg
20240318_122217.jpg
 

NorthernRedneck

Well-known member
GOLD Site Supporter
I still need to secure it at the top but the wall is in place. My in laws are coming up for Easter and he's a retired electrician so guess who is going to run a switch plug and ceiling light in the room?

20240318_145836.jpg
 

Attachments

  • 20240318_150053.jpg
    20240318_150053.jpg
    1.8 MB · Views: 2

NorthernRedneck

Well-known member
GOLD Site Supporter
Nothing exciting to report but I have been working on it in between running "dad's taxi service" and other things.

If you will notice at the top of the wall, the dropped ceiling support rail is directly over the wall. I picked up some L channel edge trim from home depot and removed the cross pieces. You will also notice there are three 2x4 support pieces that I screwed to the bottom of the floor joists. I had to remove the metal ceiling support to be able to tie the wall into those supports to secure it.
20240318_150053.jpg

Here's how I tied into the supports so it's secured in 3 places at the top. And of course double screwed about every 16" on the vertical pieces to tie into the existing wall.
20240320_150319.jpg

I was off by an inch in my initial measuring apparently so I picked up a 1x4 8ft to use as filler for the drywall to screw to. Because the wall is 9ft and home depot only sold 8ft sections, I just cut the 8 ft piece in 2 to make sure there wasn't a gap at the top. It's all being covered in drywall afterwards. But, it's secure. It's as square as I can get it considering the original walls aren't.

20240320_155839.jpg


20240320_155903.jpg
 

NorthernRedneck

Well-known member
GOLD Site Supporter
My second oldest son and I got to work hanging the drywall this morning on the inside of the room. The outside will get done later once the electrical is installed.

20240322_110449.jpg
 

NorthernRedneck

Well-known member
GOLD Site Supporter
By 3pm, I had the wall taped mudded and the door installed. I'm hoping to have it ready for primer tomorrow afternoon. Now it's the waiting game. But today was a good day as far as progress.

20240322_144959.jpg
 

NorthernRedneck

Well-known member
GOLD Site Supporter
We have lights! My father in law is a retired electrician. They are down for easter. He wired up two plugs a switch and a light fixture in the bedroom. What took the longest was expending the wiring to relocate the original ceiling fixture.

20240330_155827.jpg20240330_155845.jpg
 

m1west

Well-known member
GOLD Site Supporter
Looks good, the only critique I have is maybe it would have been a good idea to pull up the flooring where you put the wall then re installed it after the wall was installed and fit around the wall. Changing out the floor at some future date may get a little difficult in that area.
 

bczoom

Super Moderator
Staff member
GOLD Site Supporter
Looks good, the only critique I have is maybe it would have been a good idea to pull up the flooring where you put the wall then re installed it after the wall was installed and fit around the wall. Changing out the floor at some future date may get a little difficult in that area.
Looks like he has good vinyl flooring so it should last his lifetime. ;)
Won't be hard to cut that flooring out with an oscillating tool. They're $25-100 depending on brand and will easily cut the flooring right against the wall.
 

NorthernRedneck

Well-known member
GOLD Site Supporter
I have no intention of ever lifting up that flooring. We kinda had the opposite thoughts on that leaving the floor intact underneath the wall should we ever decide to remove the wall in the future once kids are all moved out.
 

FrancSevin

Proudly Deplorable
GOLD Site Supporter
I have no intention of ever lifting up that flooring. We kinda had the opposite thoughts on that leaving the floor intact underneath the wall should we ever decide to remove the wall in the future once kids are all moved out.
Presuming the base floor is concrete, leaving the vinyl floor as a moisture barrier to the wood framing, is a current good practice. In some jurisdictions, it is required.
 
Last edited:

NorthernRedneck

Well-known member
GOLD Site Supporter
There it is! It's not perfect by any means but not bad for a crippled up rookie drywaller/ carpenter. I tried to blend the existing suspended ceiling into the wall which left a slight gap at the top of the wall in one spot. Oh well. I may just pick up a piece of edge trim to hide that. The room is ready inside for her to move into. Just in time as we ordered her a loft bed which is supposed to be coming in today. Now I can move on to the hallway and getting that drywall up, mudded and painted. The kids are getting excited about moving rooms. Everyone is happy.

20240402_130249.jpg20240402_130310.jpg20240402_130339.jpg

here's the bed we ordered for her.

Screenshot_20240402_132041_Amazon Shopping.jpg
 

NorthernRedneck

Well-known member
GOLD Site Supporter
I worked with my oldest son yesterday and got the outside of the bedroom drywalled and mudded. We also assembled the loft bed and she was able ro sleep in the new room last night. I picked up a nice wardrobe on sale yesterday but that still needs assembly.

20240404_155212.jpg20240404_155153.jpg
 

NorthernRedneck

Well-known member
GOLD Site Supporter
The outside still looks the same as I'm still only on the second coat of mud. Didn't get much done on the wall this weekend. However, I did spend about half the day Saturday assembling a wardrobe closet for the room. My daughter is all moved in now and is quite happy.

20240406_212748.jpg

Here's a better picture of the wardrobe I built.
20240406_212758.jpg
 

NorthernRedneck

Well-known member
GOLD Site Supporter
I put down my carpenters tools this week as I have a few things going on. I did have a few hours this afternoon and tackled our water system.

There was a water softener system installed but our water is already very soft. It has bypass valves to divert the water directly to a second filter. Friends of ours have hard water coming from their well so we decided to delete the system completely and sell it to them. Which meant I had to make 2 trips to home depot for fittings then another to the nearby village that has a hardware store for more fittings. I decided to use sharkbite fittings to reconnect everything. I also picked up a proper bracket to hold the water filter as the previous owners had a piece of 1/2 " plywood supporting the filter with only 2 lag bolts holding it.

20240408_212840.jpg20240410_214406.jpg
 

NorthernRedneck

Well-known member
GOLD Site Supporter
I was finally able to get back at it today and got a third coat of mud on as well as installing side rails, the ceiling panels, and hall light fixture.

20240416_143922.jpg
 

NorthernRedneck

Well-known member
GOLD Site Supporter
I was finally able to put in a couple hours of work on the wall downstairs. I installed the trim around the door and along the floor. I have some trim pieces for the ceiling as well but those are finished white and going up after primer and paint.

20240420_111827.jpg20240420_111905.jpg20240420_112653.jpg
 
Top