In a previous post in the Snowzilla thread I talked about water intrusion getting into the door frames on Tuckers through the holes in the rivets and then freezing. I included photos of one such frame section that Scott and I cut out and replaced - as the frozen water had distorted and split that tube. That square tube is 3/4” x 3/4” and has a wall thickness of 1/16”. Here’s that photo.

I purchased a used Tucker earlier this fall and the main frame has several frame sections that have damage from water intrusion and subsequent freezing. Just like the door frame photo, in some of the locations the force was strong enough to split the tube. The main Tucker truss frame tuses 2” x 2” square tubing, and depending on location, has a wall thickness of either 1/8” or 3/16”. That is some serious power to split that tube!
I’m guessing that over 99% of the readers of this forum who are considering purchasing a snowcat are looking for a used one. In the vast majority of the cases, that usually involves a long-distance acquisition. It may mean a long drive to look at the machine, or in some cases it’s a sight-unseen purchase from 1,000s of miles away. If you’re considering a Tucker, I’d suggest you look at these pictures and then think about what would you do if you were considering a machine that had this issue, or had bought one and you discovered the damage when it showed up.
We’ve got other snowcat projects to do before we tackle this. However until then, potential Tucker purchasers should look at these photos, and consider the possible ramifications for their own situation. I've not seen this before, and I think it’s highly unusual, but it’s something to consider. The Latin phrase is appropriate: “Praemonitus, praemunitus”: forewarned is forearmed. (Don’t be fooled; I was a C student in Latin... and had to look that up.)
This is at the left rear of the machine, just above the rear fifth-wheel plate.

These two vertical members attach to the bottom of the cab’s rear wall frame.

Left front, just in front of the left front door.

The same tube photographed from the back side.

This is at the right rear of the cab. You can see the weatherstripping on the lower rear corner of the right rear door to the right of the photo. To the left of center that’s the bed’s frame. If you look through the hole you can see the crack on the other side. It’s cracked completely through. Talking with Jeff Godard at Tucker, he theorized this machines frame was subject to significant flexing over time, which weakened the frame to the point it broke.

The materials involved in repairing this are not expensive. However, the amount of labor required to correctly repair these pieces is substantial, and the skill level necessary is substantial as well. Is this something you could handle personally, or with a buddy, or is it something you’d need to take to a professional? If the latter and done correctly, I’d guess the cost could easily be in the thousands; as-in multiple. You could probably try and straighten the distortion and vee out the cracks with a grinder. Then weld the cracks, use the grinder to clean up the welds, a little paint... and it looks a whole lot better. But if water got inside the tube to do that damage, how long was/is it in the tube, and how badly rusted on the inside is the tube? Put differently, you know the tube has suffered damage, but you can’t see the inside of the tube, or otherwise verify its structural integrity. So yes, it’s a ton more work, but the right way to fix this is to cut out the damaged tube sections and weld in new ones.
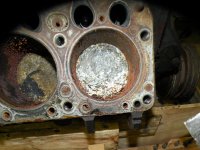
Mostly to satisfy his curiosity, Scott drilled a hole in two of the damaged tubes to see if there was still water inside. Here’s a photo of one side (the other was virtually identical). Yup…water and rust flowed out the hole.

We’ve discussed our strategy to repair the damaged frame. To get sufficient access, the bed has to come off. What’s frustrating and annoying about this is the way Tucker builds the machines, complicates this - needlessly in our opinion. If you look at a pickup truck or a box truck, etc you’ll see the bed, or box, is attached to the truck’s frame with bolts. You want to remove it; you unbolt it and lift it off. Tucker however welds the bed frame to the machine’s truss frame, then they install the expanded metal floor and weld that in place. When two pieces are welded together and you want to separate them, you have to cut them apart. Depending on the specific circumstances, that often means if you try and save both pieces - you end up damaging both. So it can be a better plan to essentially sacrifice one part to save the other. We’re going to cut the frame behind the cab on both sides and in the back to remove the bed. Then we have to cut the expanded metal to gain access to the welds on top of the frame. Then those welds have to be cut and once we have everything separated we’ll have to go back and repair the damage. Several hours wasted because Tucker couldn’t have simply bolted the bed to the frame. (Note: we faced this before with Thundercat. We fabricated a completely new (and larger) bed and we welded tabs with holes in them on the bed’s frame and the Tucker frame for six 1/2”-20 Grade 8 bolts. That’s more than adequate strength to hold the bed to the frame.)
Unfortunately the damage is not confined to the truss frame members. On a four door Tucker, there’s a center structural member and roof support that's between the two doors on each side. Essentially from front to back you have the front door’s rear door post, the center structural member and the the rear door’s front door post. These three pieces of steel tube are welded together and there’s an outer sheet metal skin that wraps around the three and is skip welded to the two door posts.
Here are some pics of this damage. This is the right side.

And the left side.

In this case to gain access, the roof has to come off. Not particularly difficult, just a whole bunch of rivets to drill out. As I mentioned earlier, we have a bunch of other snowcat projects ahead of this. When we get around to it, I’ll resurrect this thread and show how we did it.
I purchased a used Tucker earlier this fall and the main frame has several frame sections that have damage from water intrusion and subsequent freezing. Just like the door frame photo, in some of the locations the force was strong enough to split the tube. The main Tucker truss frame tuses 2” x 2” square tubing, and depending on location, has a wall thickness of either 1/8” or 3/16”. That is some serious power to split that tube!
I’m guessing that over 99% of the readers of this forum who are considering purchasing a snowcat are looking for a used one. In the vast majority of the cases, that usually involves a long-distance acquisition. It may mean a long drive to look at the machine, or in some cases it’s a sight-unseen purchase from 1,000s of miles away. If you’re considering a Tucker, I’d suggest you look at these pictures and then think about what would you do if you were considering a machine that had this issue, or had bought one and you discovered the damage when it showed up.
We’ve got other snowcat projects to do before we tackle this. However until then, potential Tucker purchasers should look at these photos, and consider the possible ramifications for their own situation. I've not seen this before, and I think it’s highly unusual, but it’s something to consider. The Latin phrase is appropriate: “Praemonitus, praemunitus”: forewarned is forearmed. (Don’t be fooled; I was a C student in Latin... and had to look that up.)
This is at the left rear of the machine, just above the rear fifth-wheel plate.
These two vertical members attach to the bottom of the cab’s rear wall frame.
Left front, just in front of the left front door.
The same tube photographed from the back side.
This is at the right rear of the cab. You can see the weatherstripping on the lower rear corner of the right rear door to the right of the photo. To the left of center that’s the bed’s frame. If you look through the hole you can see the crack on the other side. It’s cracked completely through. Talking with Jeff Godard at Tucker, he theorized this machines frame was subject to significant flexing over time, which weakened the frame to the point it broke.
The materials involved in repairing this are not expensive. However, the amount of labor required to correctly repair these pieces is substantial, and the skill level necessary is substantial as well. Is this something you could handle personally, or with a buddy, or is it something you’d need to take to a professional? If the latter and done correctly, I’d guess the cost could easily be in the thousands; as-in multiple. You could probably try and straighten the distortion and vee out the cracks with a grinder. Then weld the cracks, use the grinder to clean up the welds, a little paint... and it looks a whole lot better. But if water got inside the tube to do that damage, how long was/is it in the tube, and how badly rusted on the inside is the tube? Put differently, you know the tube has suffered damage, but you can’t see the inside of the tube, or otherwise verify its structural integrity. So yes, it’s a ton more work, but the right way to fix this is to cut out the damaged tube sections and weld in new ones.
Mostly to satisfy his curiosity, Scott drilled a hole in two of the damaged tubes to see if there was still water inside. Here’s a photo of one side (the other was virtually identical). Yup…water and rust flowed out the hole.
We’ve discussed our strategy to repair the damaged frame. To get sufficient access, the bed has to come off. What’s frustrating and annoying about this is the way Tucker builds the machines, complicates this - needlessly in our opinion. If you look at a pickup truck or a box truck, etc you’ll see the bed, or box, is attached to the truck’s frame with bolts. You want to remove it; you unbolt it and lift it off. Tucker however welds the bed frame to the machine’s truss frame, then they install the expanded metal floor and weld that in place. When two pieces are welded together and you want to separate them, you have to cut them apart. Depending on the specific circumstances, that often means if you try and save both pieces - you end up damaging both. So it can be a better plan to essentially sacrifice one part to save the other. We’re going to cut the frame behind the cab on both sides and in the back to remove the bed. Then we have to cut the expanded metal to gain access to the welds on top of the frame. Then those welds have to be cut and once we have everything separated we’ll have to go back and repair the damage. Several hours wasted because Tucker couldn’t have simply bolted the bed to the frame. (Note: we faced this before with Thundercat. We fabricated a completely new (and larger) bed and we welded tabs with holes in them on the bed’s frame and the Tucker frame for six 1/2”-20 Grade 8 bolts. That’s more than adequate strength to hold the bed to the frame.)
Unfortunately the damage is not confined to the truss frame members. On a four door Tucker, there’s a center structural member and roof support that's between the two doors on each side. Essentially from front to back you have the front door’s rear door post, the center structural member and the the rear door’s front door post. These three pieces of steel tube are welded together and there’s an outer sheet metal skin that wraps around the three and is skip welded to the two door posts.
Here are some pics of this damage. This is the right side.
And the left side.
In this case to gain access, the roof has to come off. Not particularly difficult, just a whole bunch of rivets to drill out. As I mentioned earlier, we have a bunch of other snowcat projects ahead of this. When we get around to it, I’ll resurrect this thread and show how we did it.