• Please be sure to read the rules and adhere to them. Some banned members have complained that they are not spammers. But they spammed us. Some even tried to redirect our members to other forums. Duh. Be smart. Read the rules and adhere to them and we will all get along just fine. Cheers. :beer: Link to the rules: https://www.forumsforums.com/threads/forum-rules-info.2974/

Tranny woes on 1404 Imp

BoyToys

Active member
New to me and my first snowcat, drug it home yesterday and today managed to get it off the stock tilt trailer with no issue other than finding the right gears.
With the rear diff in first (I think), and the tranny in 1st per the diagram (lower left)...and she goes backwards. Shift to reverse (upper left, straight up from 1st on the diagram) and she goes forward. 2nd and 3rd also go only in reverse so right now I'm stuck with just one forward gear in the tranny.
Now to figure out how to access the linkage and transmission.
Comments/advice, something wrong going on here. Do I not have the rear diff in a forward gear, but in reverse instead? Would that cause the cat to go in reverse in tranny gears 1, 2, and 3...and to go forward in reverse gear. Huge learning curve ahead.
 
go shift your rear diff by hand into a range of your choice. report back
Was my first thought that shifter linkages were worn or out of adjustment. Inspected both front and back linkages...no appreciable wear or slop and front adjustment is as it should be. Transaxle lever itself has full range of motion though I didn't try manually shifting gears back there.
The clues are that in transaxle gears 1, 2, 3, and 4 the cat will move only in reverse. Only when reverse is selected do I get forward motion. And, with differential/transaxle in reverse, if I put the engine transmission in reverse as well - the cat moves forward! Everything is basically working backwards.
KEY POINT: The diff. was worked on by somebody that may have screwed up.....
Thus I'm following the input from another member (see my post on C-4 shift linkage) that perhaps the differential carrier was put in backwards when it was serviced with new ring and pinion years ago and not driven since (work done by an auto shop mechanic, not a shop specializing in differentials). If the ring gear is therefore on the right side instead of the left, the rear axles will turn in the wrong direction. Simple fix [ :-( ] to pull out the carrier and turn it around 180°.
My next move will be to pull off the diff. cover and take a look at carrier positioning. That will tell me if or not that's the issue. And while I'm I there...new relined brake bands would be in order.
 
Last edited:
  • Like
Reactions: PJL
If the rear moves as it should in all ranges. I agree you are flipping your chunck. It is not a bad job.diff can stay in machine
 
Thanks for your input. I can get the diff. to move the cat in all 4 forward gears and the reverse gear...but as I described it moves in the wrong direction.
I'll be pulling off the tracks once new ones arrive, which I would have to do anyway in order to pull the axles and axle housings off the differential to prepare for removing the innards (the carrier). Then flip it around, check and adjust pinion/ring clearances, get the brake bands relined, then stuff it all back together.
Running out of time though as this will be an outside project. My shop is too small to accommodate this thing. Hoping the weather holds long enough.
 
I’m elbows deep in my oc-4 right now. As you face forward looking at differential, the ring gear will be on the right half of the diff. As stated, it’s a pretty easy swap. 4 bolts I think on bearing caps on each side. You will have to re-mesh and check R and P, and make note of the shims. I would replace the seals on the diff bearings while you’re in there. You will have to start by removing outer axle tubes and axles, etc. It’s pretty simple. I’m replacing all seals and one axle in mine currently as well as new steering bands.
IMG_9607.jpeg
IMG_9558.jpeg
IMG_9559.jpeg
 
Thanks for the tips...I'll take all the advice I can get!
Looks like I'll need to drop my diff about a foot in order to gain unobstructed access to the inspection plate. Seems I've read that the front pillow block has to be just loosened, and the rear one removed completely in order to lower the diff. This, with jacking up the cat itself. Sound about right?

Currently in the process of getting new belts, so I'll probably wait until they arrive before splitting the old belts...which I would have to do anyway in order to remove the axles and tubes. Then removing 560 almost 50 year old nuts and bolts from the grouzers...will probably have to skinny-wheel them off. PITA!

To your point, I should replace the bearing seals while in there, and certainly the brake shoes if they need it. I know where to get the shoes relined, but where to get the bearing seals?

Would be nice to get this all done while the weather lasts but realistically she may not see snow until next season. No indoor shop to house this beast so it's all weather permitting.
 
totally unrelated to this specific project, but have done a (sigh) more than I care to recall . . . dealing with bearings and seals . . . .
when you are that deep into it, replace all of them - bearings and seals.

nothing will more painfully pierce you . . . than wrapping it all up, , , and next week finding oil spots . . .

well . . . except hearing a bearing growl, , , that you suspected anyway . . .
 
I did mine right where idaho imp did his. on the trailer.

the belts are task in themselves

seals will have a number on them, if not the bearing house you go to will be able to figure them out off the old ones
 
totally unrelated to this specific project, but have done a (sigh) more than I care to recall . . . dealing with bearings and seals . . . .
when you are that deep into it, replace all of them - bearings and seals.

nothing will more painfully pierce you . . . than wrapping it all up, , , and next week finding oil spots . . .

well . . . except hearing a bearing growl, , , that you suspected anyway . . .
It's the old axiom "while I'm in there"...
I have a boat-load of work ahead of me but in the end all worth it.
 
I did mine right where idaho imp did his. on the trailer.

the belts are task in themselves

seals will have a number on them, if not the bearing house you go to will be able to figure them out off the old ones
Well first I have to find a bearing house. Such things don't exist in small town USA but there's always our good friend Google or Napa. The belts: probably my worse nightmare.

Working on these while on the trailer...ugh. I needed a couple stout shots of whiskey before I drove mine off the stock self-unloading trailer. Thinking "this will go well, or this is the end". A newbe's introduction and many more to come.
 
All of my seals had numbers but the outermost at the sprocket flange. Nancy at Spryte Improvement has everything you need in stock. I did have to order new bands, not just liners, as one v tab was broken off and one on the other band had been welded previously. I did buy a center gasket kit from John at Oliver Crawlers. My outer spacers to axle tube don’t have gaskets but I will make them out of thicker gasket paper. I also plan to use aneroebic sealer on the 5/8 bolts holding axle tubes to center case. Using the Thiokol trailer to work off of is a game changer. It’s the perfect height and I support the rear with axle stands. I have a safety chain to keep the cat from rolling backwards.
 
i make belts if you are worried about drilling. BFT has a nice write up of his efforts making templates for his koolaid cruiser
 
I’m elbows deep in my oc-4 right now. As you face forward looking at differential, the ring gear will be on the right half of the diff. As stated, it’s a pretty easy swap. 4 bolts I think on bearing caps on each side. You will have to re-mesh and check R and P, and make note of the shims. I would replace the seals on the diff bearings while you’re in there. You will have to start by removing outer axle tubes and axles, etc. It’s pretty simple. I’m replacing all seals and one axle in mine currently as well as new steering bands. View attachment 168754View attachment 168755View attachment 168756
Thought you might enjoy this. Take a look at how my ring gear is on the left side. Oops...for whoever put it together last. At least now I have a clear path for correction.
IMG_2362.JPG
 
  • Like
Reactions: PJL
All done and stuffed back into the Imp. Sprockets now turn in the proper direction. Got my gaskets and seals from Oliver Crawlers. Just finished putting the last track on today. Need to adjust the brakes and fill her up with oil and we're off for a test run.
Good timing since it started snowing this afternoon.
Don't adjust the brakes any tighter then you need to steer, if you get them to tight they will be fighting each other putting drag on the differential ,and it also leads to scoring the brake drums. usually if the sticks come back to almost touching the seat when steering ,your good ! Don
 
Adjustment is pretty straight forward, especially after being inside the diff and understanding the lay of things. But here's an issue that I noticed on the couple minutes of drive time before I shut her down for rebuilding. Left turning was minimal compared to right, and left lever in the cockpit would move only a couple inches whereas the right lever would move almost to the seat as it should.
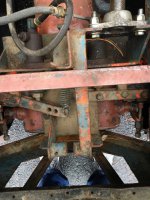
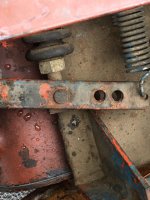
Closer inspection at the linkage on top of the diff. shows that the left linkage is stopping at a steel mounting bracket for something like maybe a winch (see pictures), limiting the motion to less than an inch before contacting that verticle steel piece. Can't get full motion or brake action unless tightening up the adjustment nut to where the brakes are almost constantly in contact with the drum.
Seems I'll be breaking out the plasma cutter to remove what's in the way, cut a notch for clearance.
 

Attachments

  • IMG_2408.jpg
    IMG_2408.jpg
    118.2 KB · Views: 32
  • IMG_2407.JPG
    IMG_2407.JPG
    71.4 KB · Views: 36
Last edited:
Top