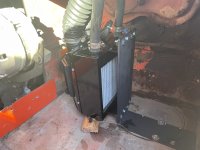
The heater in my 1076 Thiakol IMP was the original one and it was LOUD, and the hose to the defrost tube was thrashed. So I replaced it with a heater from JEGS. See Photo. You can see in the photo that there are two outlets for heat with two black hoses attached. This meant that I had to find a way to combine these two hoses into one larger hose to get the heat from both into the defrost tube that is roughly 3in in diameter.
So I took a Tuna can (empty of course, lol) and cut two holes in it, top and sides, to allow these two hoses to become one bigger one. After inserting the black hoses into the can, I then used caulk for wood stoves (to withstand the heat) to seal all around both inside the can and outside the can.
Then once this was all set and cured, I attached the can to a 3 inch dryer duct (aluminum and ribbed just like coming from your home clothes dryer) with aluminum heat tape and then regular heat tape over this and attached hose clamps to the tapes at the can and around the dryer duct and before doing this I had applied more of the wood stove caulk. So it is all tight and firm.
Then I ran the dryer duct up to the intake tube for the defrost heat and the 3 inch duct slipped right in for about 2 inches which should hold nicely.
I had modified the heater tubes so they exited top and up as you can see in the photo. The nice thing about this heater is you can remove 8 screws and rotate the fan and electronic housing so the outlets are where you want them.
I welded up a bracket to fix to the floor. The piece of wood you see is just there to support the heavy part as I attached it to the floor. In hindsight, I should have welded a triangle for additional stiffness to the upright as the heater has some weight and will wiggle rather than be stiff as the cat drives since the metal flexes just a tad. I will cut a piece of wood to place under the heater weight for support and fix the wood to the floor.
I also ran wires from the dashboard to the two speed heater through the openings medial to the headlights by running a piece of bailing wire through from the inside and taping the connecting wires to the bailing wire, lubricating them, and pulling through which worked nicely. Installed the two speed heater switch, hooked it all up and it works great. QUIET and a LOT of heat so the cabin will be warm and the defroster should, well, defrost.
Can't wait for winter!!

