I figured it out as follows:
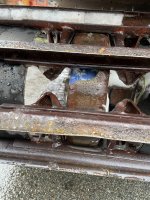
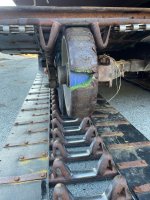
There was no option but to do the deed with the hinge on the idler wheel. The bolt that holds this together enter from the outside edges, not the inside. This means that the inner belt hinge connecting bolt (I will call it the Pin) cannot be removed in any other position than the front wheel or the rear sprocket as the frame prohibits removal due to lack of room and if removed over the front idler wheel, there is no way to insert the pin in any other way due to interference from the idler wheel itself. Thus, no option but removal and replacement over the idler wheel.
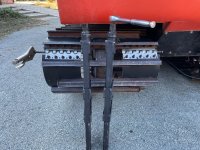
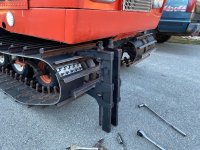
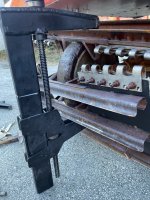
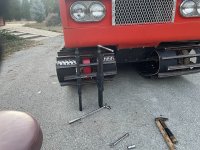
I purchased two track jacks from SnowCat Service. Not cheap but they are massive and very well built. Two is way better than one. In the method shown in the photos, it only took about an hr to do this and it was really quite simple.
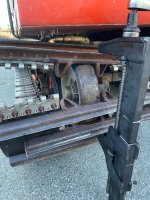
In short, the jacks were placed on the grouser just above the hinge and on the second one below the hinge. They were tightened until I saw the hinge move which indicated a degree of looseness. The nuts were taken off and the pins removed, first with a hammer and rod to tap so the top of the pin was exposed sufficiently to put a vise grip loosely in place and then this was tapped to remove the pin. First one side then the other.
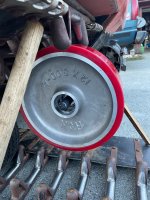
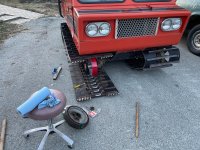
Once the pins were removed the lower part of the track was laid on the ground and the upper part was elevated with sticks to allow access for wheel removal. The grease fitting on the old wheel was pumped with grease until the outer cap released and was removed. The nut was exposed, the cotter pin removed and the nut was removed with only finger pressure, the flat washer and the bearing was removed and then the wheel slid off easily.
The new wheel and inner bearing were greased and placed on the spindle, the new outer bearing was greased and placed on the spindle with the flat washer to follow. Then the nut was placed and tightened until the wheel and bearings were against the stop on the spindle and then the nut was reversed part of a turn so it did not fit tightly against the washer and the cotter pin was placed to hold the castle nut in place. Then I put grease in the outer cup and tapped it into place.
The track jacks were positioned as before and tightened until the hinge parts were adapted properly and the pins placed, nuts tightened and the job was done.
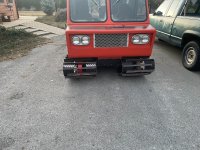
This also tightened the track nicely as the original idler wheels are old and worn. I did measure the old and new from the inside center to the outer edge and they are equal except for the wear on the old ones.
I am going to do the other side today. Actually this was very easy to do.
Maybe this will help others if they need to do this on their cat.
Attachments
-
 IMG_1929.jpeg2.7 MB · Views: 26
 -
 IMG_1930.jpeg3.2 MB · Views: 21
 -
 IMG_1932.jpeg3.2 MB · Views: 19
 -
 IMG_1933.jpeg2.5 MB · Views: 18
 -
 IMG_1934.jpeg2.6 MB · Views: 17
 -
 IMG_1935.jpeg2.2 MB · Views: 18
 -
 IMG_1942.jpeg2.2 MB · Views: 21
 -
 IMG_1943.jpeg3.8 MB · Views: 17
 -
 IMG_1944.jpeg3.6 MB · Views: 17
 -
 IMG_1945.jpeg3.5 MB · Views: 23
 -
 IMG_1446.jpeg2.6 MB · Views: 21
