• Please be sure to read the rules and adhere to them. Some banned members have complained that they are not spammers. But they spammed us. Some even tried to redirect our members to other forums. Duh. Be smart. Read the rules and adhere to them and we will all get along just fine. Cheers. :beer: Link to the rules: https://www.forumsforums.com/threads/forum-rules-info.2974/

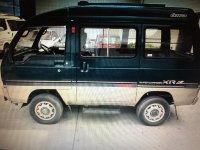
Mitsubishi mini cab van, Mattracks installation

m1west

Well-known member
GOLD Site Supporter
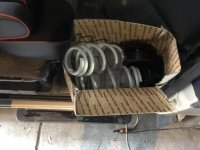
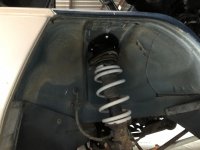
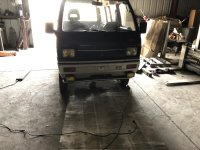
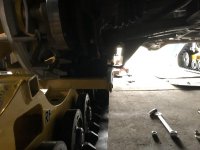
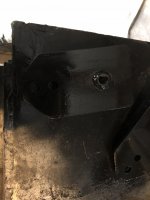
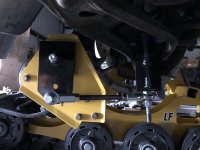
Ok , its time to start the Mattracks installation on the mini mini van. This morning I washed it off and took it to the shop. Pulled the front wheels off and was able to get one side on the front lift kit installed. It was much easier than the Suzuki. After jacking it up and removing the front tires.

1- Remove the 3 nuts holding the top of the strut in place on the body.
2- Remove the bottom bolt where the strut attaches the spindle and push down and pull out at the same time, this gives access to the top of the strut outside the fender well.
3- compress the spring and remove the center nut on the top strut mount. remove the the nut then the mounting plate ( be careful there are washers and spacers to drop and loose ) remove the spring.
4- the new spring is then installed, it went in easily with minimal compression of the spring.
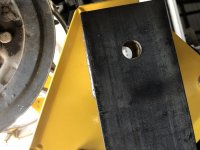
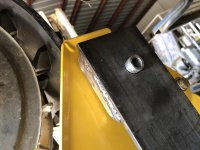
5- After installing the top mount back on the strut add the new 3" spacer to the top and orient the plate as shown in the picture, The slot in the top is how you correct the castor and camber after adding the spacer, then reinstall the bottom bolt that holds the strut to the spindle.
One side took about an hour. Next I will do the other side and then move to the rear.
 

Attachments

  • IMG_1201.jpg
    IMG_1201.jpg
    94.9 KB · Views: 460
  • IMG_1196.jpg
    IMG_1196.jpg
    79.8 KB · Views: 440
  • IMG_1199.jpg
    IMG_1199.jpg
    62.1 KB · Views: 437
Ok , its time to start the Mattracks installation on the mini mini van. This morning I washed it off and took it to the shop. Pulled the front wheels off and was able to get one side on the front lift kit installed. It was much easier than the Suzuki. After jacking it up and removing the front tires.

1- Remove the 3 nuts holding the top of the strut in place on the body.
2- Remove the bottom bolt where the strut attaches the spindle and push down and pull out at the same time, this gives access to the top of the strut outside the fender well.
3- compress the spring and remove the center nut on the top strut mount. remove the the nut then the mounting plate ( be careful there are washers and spacers to drop and loose ) remove the spring.
4- the new spring is then installed, it went in easily with minimal compression of the spring.
5- After installing the top mount back on the strut add the new 3" spacer to the top and orient the plate as shown in the picture, The slot in the top is how you correct the castor and camber after adding the spacer, then reinstall the bottom bolt that holds the strut to the spindle.
One side took about an hour. Next I will do the other side and then move to the rear.

Dibs on the first ride!
 
Today I got the lift kit finished and now the front is done. I started looking at what I am going to do in the rear. After measuring and pondering, I ordered a set of air shocks, that is the easiest option to raise it up a couple inches and wont sag when loaded with stuff.
 

Attachments

  • IMG_1208.jpg
    IMG_1208.jpg
    102 KB · Views: 419
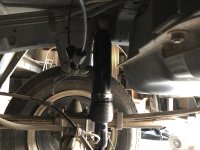
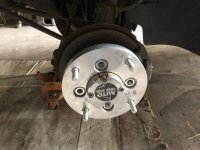
Today I finished the lift kit on the van, the air shocks I ordered showed up yesterday. Learning from the Suzuki build you can save a lot of money resourcing you're own parts. The air shocks are a set of universal air shocks from eBay $78.00.The air shocks for the Suzuki were bought from a Mini truck parts dealer for over $200.00. The stud is smaller than the hole in the shocks so it is easily fixed with a piece of 1/2" poly tube as a spacer. Looks like I paid over $100.00 for .50 cents worth of poly tube the last time around. They worked out great 70# of air brought the rear 1/2" higher than the front. I have to modify the front 2 wheel spacers by opening up the hole that fits over the locking hub to 81mm, the rear is OK. I will get that done tomorrow. After the adapters are installed it will be time to bolt on the tracks and fabricate the anti rotation brackets. After the tracks are installed it will go another 8" higher. When I went to the cabin I looked at the burned Suzuki and determined that I can use a lot of the parts from it on the van. I plant to go there again soon so I will either remove the parts there or if enough time load it on the trailer and bring t home.
 

Attachments

  • IMG_1240.jpg
    IMG_1240.jpg
    81.6 KB · Views: 373
  • IMG_1241.jpg
    IMG_1241.jpg
    194 KB · Views: 390
  • IMG_1239.jpg
    IMG_1239.jpg
    94.6 KB · Views: 376
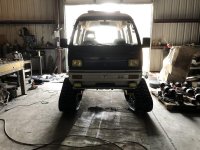
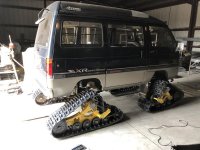
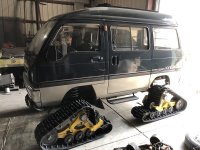
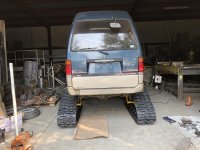
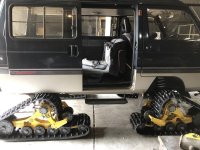
Hi all, today I got the wheel adapters and the tracks on the van. I had to enlarge the center hole that clears the locking hub to 81mm to get them installed, the rear had no issues. Next I had to drill the stud holes in the tracks to 31/64 to fit the studs on the adapters, that didn't bother me as larger studs are stronger. I found that the Mattracks drive flange is not machined for a tapered lug nut. I used flange nuts, and the flange fits snugly in the counter bore so I feel good about it. When I do final assembly I will use blue locktite on everything ( too many stories involving the nuts falling off ). The ground clearance at the bumpers is 24" and 14" on the diff center section. There is only 24" of clearance between the tracks, thats a lot more track under it than the Camso tracks on the Suzuki plus the Matts are an inch wider and have more aggressive lugs on the tracks. The side doors even open, I was a little worried about that. Next is the final task of fabricating the anti rotation assemblies.
 

Attachments

  • IMG_1242.jpg
    IMG_1242.jpg
    79.1 KB · Views: 396
  • IMG_1244.jpg
    IMG_1244.jpg
    117.5 KB · Views: 401
  • IMG_1243.jpg
    IMG_1243.jpg
    102.1 KB · Views: 418
  • IMG_1245.jpg
    IMG_1245.jpg
    108.6 KB · Views: 413
  • IMG_1246.jpg
    IMG_1246.jpg
    100.5 KB · Views: 397
  • IMG_1247.jpg
    IMG_1247.jpg
    106.9 KB · Views: 401
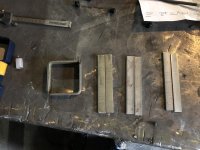
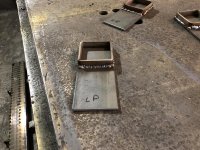
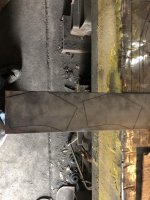
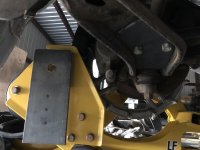
Today, I started fabricating the attachment brackets for the anti rotation. First I tacked together a frame made from 3/16" x 3/4" flat bar for a trial fit as seen in the picture. Then I made the rest of the frames and welded them together.
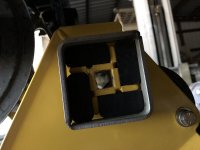
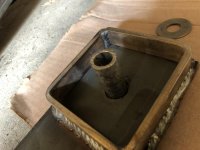
Then welded 4" x 1/4" x 8" on one end so I had plenty of material to work with. In the picture of the frame around the rubber dampeners the flat bars the dampenets sit on for a square hole in the middle. The arms with the frames welded to them get a hole on center with a piece of pipe welded in that fits into the square hole, then a bolt from the back of the plate on the track gets a bolt with a big washer that goes through the backing plate through the pipe and a nut on the outside that holds the whole assembly together and allows it to pivot with the dampeners. ( if you can't understand my explanation you will have to wait until I finish. I am going to the cabin this weekend and will rob all the pivot parts from the Suzuki that may be used on the van. The front has to attach to a bracket that is on center of the lower ball joint so it won't bind while turning. The rear I can either go to the leaf spring mount towards the front or to the rear shock mount on the rear end. I need to think about it for a while now.
 

Attachments

  • IMG_1251.jpg
    IMG_1251.jpg
    52.5 KB · Views: 365
  • IMG_1252.jpg
    IMG_1252.jpg
    90.3 KB · Views: 361
  • IMG_1255.jpg
    IMG_1255.jpg
    140.2 KB · Views: 361
  • IMG_1256.jpg
    IMG_1256.jpg
    93.9 KB · Views: 364
  • IMG_1257.jpg
    IMG_1257.jpg
    90.1 KB · Views: 364
wow that thing is looking good those tracks are definitely bigger. turning that mini into a beast! we have pretty good defensible space around our place never enough tho.... and with forest service closing the forest makes it interesting....
 
wow that thing is looking good those tracks are definitely bigger. turning that mini into a beast! we have pretty good defensible space around our place never enough tho.... and with forest service closing the forest makes it interesting....

Thanks, it should even better than the Suzuki in the snow, and I was happy with that. Do you have to pass through BLM land to get to yours? At you're elevation there should be less trees to burn ( hopefully ) Have you been up there in the winter? That is really my favorite time to go to the cabin. Its takes more time to get there and more work hauling the van or snowcat but to me its worth every minute. I am headed there tomorrow to finish hooking up the solar panels, secure the gates and some clean up.
 
No BLM land just forest service land. and yes my wife and i snowmobile up there every winter. definitely one of the best times to be up there! we are still in the tree line, we are proactive about tree clearing.
 
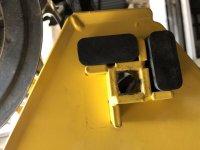
Today I was able to get back on the van, after study of the arrangements made by Mattracks and some thinking I have come up with what I think will be a pretty simple design. The hardest part is making the attachment to the Mattracks with the rubber dampener arrangement, its over engineered and complicated when it didn't have to be. A solid attachment and a threaded rod with a spring and nuts for adjustment like Camso tracks work good and is much easier to fabricate. The way the system works is 4 rubber pucks are captured on the flat bars and the outer ring welded to the 4" flat bar, then a tube is welded in the 4" flat bar that passes through the square and protrudes slightly out of the round hole in the backing plate. Then a bolt with a washer passes through the baking plate and the tube with a nut that holds it all together and lets it articulate slightly without binding. I plan to make a link bar assembly with Hyme joints to the axels.
 

Attachments

  • IMG_1308.jpg
    IMG_1308.jpg
    58.7 KB · Views: 313
  • IMG_1304.jpg
    IMG_1304.jpg
    91.5 KB · Views: 312
  • IMG_1305.jpg
    IMG_1305.jpg
    93.8 KB · Views: 304
  • IMG_1307.jpg
    IMG_1307.jpg
    81.3 KB · Views: 318
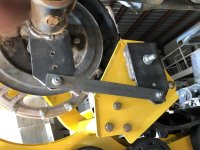
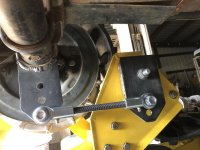
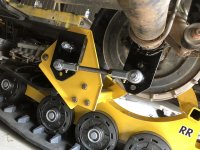
Today I finalized the design for the rear. The rear mount is welded to one of the U bolts holding the rear Axel, the link bar is just for mock up. I plan to use heavy duty Hyme joints with a threaded rod for the link bar, that way I will have fine tune adjustment and tolerate any mis alignment without binding. I jacked it up and tilted the tracks and it seems to work, when I laid it out on paper it seems to work because the tracks are tilting from the center of the axle and the link bar is off center so it binds and stops it from turning, controlling the tilt. The front will be a little different as it will attach to the front A-arms on center the lower ball joint.
 

Attachments

  • IMG_1321.jpg
    IMG_1321.jpg
    97.9 KB · Views: 306
What is the thickness, width and length of the stabilizer flat?

The bracket welded to the U bolt on the rear end is 1/4"X3"
The flat bar that is bolted to the track is 3-1/2"X1/4"
The collar that fits around the rubber pucks is 3/16"X3/4"
The link between the brackets is 3/16"X1" but it is just for mock up. The real link will be made from 1/2" Hyme joints with a 1/2" threaded rod, it will give me some fine tune and will be very strong.
 
The Hyme joints and threaded rod showed up over the weekend. This will be the final design for the rear track attachments. The Hyme joint arrangement will give me 1/2" in or out for a total of 1" adjustment plus the extra holes should allow me to fine tune the rotation. I have to weld in the center tube where the bracket bolts to the track, add some jam nuts on the threaded rod and paint the assembly then 1 rear assembly is done and the others side is nearly there also. I started working on the front brackets while waiting on the Hyme joints. Another week or 2 and we will be testing the rig out.
 

Attachments

  • IMG_1329.jpg
    IMG_1329.jpg
    89.8 KB · Views: 267
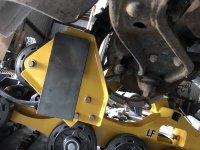
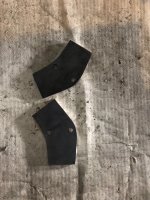
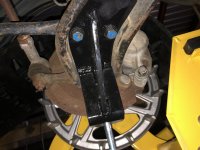
Today I started making the brackets for the front, they bolt to the A-arm stabilizer bolts. There will be a bent angle welded to the part that is now bolted to the A-arm that will be centered under the lower ball joint so you can turn without binding. Also made the rest of the links, turned out to be the same length as the rear 8-1/2". Back on it tomorrow.
 

Attachments

  • IMG_1332.jpg
    IMG_1332.jpg
    199.6 KB · Views: 248
  • IMG_1333.jpg
    IMG_1333.jpg
    251.4 KB · Views: 242
  • IMG_1334.jpg
    IMG_1334.jpg
    69 KB · Views: 244
Today I nearly finished, the rear end is completely finished. All parts are made just waiting for the paint to dry on the last 2 parts. Tomorrow morning I will bolt them on and start testing.
 

Attachments

  • IMG_1335.jpg
    IMG_1335.jpg
    109.5 KB · Views: 240
  • IMG_1338.jpg
    IMG_1338.jpg
    92.9 KB · Views: 248
  • IMG_1339.jpg
    IMG_1339.jpg
    68 KB · Views: 245
  • IMG_1337.jpg
    IMG_1337.jpg
    133.1 KB · Views: 250
Is your rear brackets welded to the axle or just to the UBolt?
 
Today the fat lady is singing. I finished the front brackets and did some testing, I drove it around the property up and down hills and some pretty steep ditches testing the anti rotation. The tracks never rubbed the body, everything seems to be working out with the original set up. After running it hard nothing broke or bent. I will continue to play with it around here and now cleaning it up. Next I will change the oil and tune it up. after it warms up the idle is set a little low at 500 rpm I will re set it at 800 rpm, after that its time to put it on the trailer and wait for snow. The van is going to be great for the winter cabin trips, at 1500# easy to tow so I don't have to store it up there that saves $110.00 a month. The room on the inside is great, plenty of room for the wife, dog and everything else. I still have the winch from the Suzuki but the remote and controls burned up.I plan to fabricate new bumpers with receivers so I can plug in a winch or tow something. I saw another set of used Camso tracks on an equipment auction, if they can be had cheap maybe there will be another Suzuki in the future. Having a truck up there that can handle the terrain was very helpful. A dump bed would be nice.
 

Attachments

  • IMG_1340.jpg
    IMG_1340.jpg
    79.3 KB · Views: 391
  • IMG_1341.MOV
    IMG_1341.MOV
    1.7 MB · Views: 408
Hi all, today I put a set of seat covers, front and rear to keep the dog from ruining them. When I went to start it after sitting 3 weeks or so the battery was low. So I made a trip to NAPA and picked up a garden tractor battery the same size with 230 CCA. After installing it, now it cranks over way faster than it ever did. We don't need any dead batteries off grid. Then I did some more testing around the property getting use to what gear to be using in different situations. There is one more thing I need to check, I want to pull the timing cover off and inspect the belt even if I don't change it this season.
 
Did some more testing around here. Either the Mattracks have less parasitic drag than the Camso tracks or the supercharged engine in the van makes a lot more power than the Suzuki. I drove it to my buddies house up the road today and it is much more zippy than the Suzuki and was able to pull 3rd gear up the hill. The Suzuki would not. The mountain got some snow this weekend, just a few inches but its a start.
 
Mattracks claims to have super low rolling resistance; hopefully that justifies the price! Lol
 
Mattracks claims to have super low rolling resistance; hopefully that justifies the price! Lol

They really weren't that bad at $4100.00, I really wanted the MAXI's but could not justify almost double the price at $7100.00 for a little longer track and 2 more bogie wheels on each side. If they were 25% more I would have bought them. I have a 2' gap between the front and rear tracks, the MAXI's would have nearly closed the gap so it would have been completely tracked under the van. There is 3-4 days of snow reported to come around Thanksgiving up on the mountain, hopefully I can go up there.
 
that is SO cool! i love it. i built a similar type of thing out of a pt cruiser that was pretty fun in the snow. I am curious as to how easy (or not) it is to steer. the mattrax seem to be engineered quite well but i wonder if they have the same steering issues that mine has.
will be looking forward to a report on how it performs.
great looking vehicle.
Thanks, I've been busy with work and we haven't got much snow but next week looks promising, testing around the property it turns easily even on grass. The turning radius is about 15-20 feet. I will be loading it on the trailer soon and would like to make a trip right after the first of the year. I will take pictures and short video clips of the trip.
 
Top