• Please be sure to read the rules and adhere to them. Some banned members have complained that they are not spammers. But they spammed us. Some even tried to redirect our members to other forums. Duh. Be smart. Read the rules and adhere to them and we will all get along just fine. Cheers. :beer: Link to the rules: https://www.forumsforums.com/threads/forum-rules-info.2974/

Looking for advice and guidance - cab removal

rockaukum

Active member
I did a look through and found an old thread and found one that the guy removed the cab on his 1202. I am looking for more specific guidance on the process. His reason for the cab remove is the same as mine.
History: The motor has either an exhaust leak or most likely a valve issue. Tapping noise, so I figured to freshen up the motor while the sun is out and the snow is melting away!
I have 1202B (with the back seat), ford industrial motor and want to pull it so I figure the easiest(?) way is to remove the cab.
Any advice on the procedure, bolt locations etc would be great! While I am at it, I will be extending the bed area as the existing one is a bit tweaked.
Thanks in advance for any insight!
ra
 

PJL

Well-known member

Some pics in this thread. The upper part of the cab comes off. It wasn't too hard. This one has roll bar which had been welded to the cab.
 

rockaukum

Active member
Thanks!,
As I had said, I did a search and came up with nothing, I guess I need to learn to read "between the lines" when a specific search yields no results. Anyway, I gave a quick look. I had been looking underneath the whole cab for a solution, I did not even think about separating the cab. I will take a look soon but that looks promising.
As for the Clutch, I figured it was a mechanical clutch. Always learning here and I greatly appreciate the help and suggestions.
I hope to get started on this in the near future as there are other "priorities" that seem to get in the way.
ra
 

PJL

Well-known member
The lower part of the cab is basically part of the frame. It doesn't come apart. The crew cab version has I think 9 bolts and an electrical connector to disconnect.
 

rockaukum

Active member
PJL: Thanks, I went out and took a look at the cat. Correct, the cab is in two pieces. Removal looks pretty straight forward with the exception of lifting the top portion off. I'll need to recruit some folks for that.
The roll bar (square tubing) on mine is actually bolted to the floor as well as the upper portion of the cab. Should separate without issue.
Thanks again for the information as this already has saved me a lot of frustration!
I'll try to take photos and post once I get the "other" stuff done.
ra
 

BoyToys

Active member
PJL: Thanks, I went out and took a look at the cat. Correct, the cab is in two pieces. Removal looks pretty straight forward with the exception of lifting the top portion off. I'll need to recruit some folks for that.
The roll bar (square tubing) on mine is actually bolted to the floor as well as the upper portion of the cab. Should separate without issue.
Thanks again for the information as this already has saved me a lot of frustration!
I'll try to take photos and post once I get the "other" stuff done.
ra
I for one would love to see photos of your process and any tips you've learned along the way. Should I ever have to pull my cab to get full access to the engine....just mundane fun stuff like that.
 

rockaukum

Active member
Once I get around to it, I will post some progress photos here on this thread. As I get into it and you have any specific things to see, let me know and I'll try to get it to you.
ra
 

BoyToys

Active member
Once I get around to it, I will post some progress photos here on this thread. As I get into it and you have any specific things to see, let me know and I'll try to get it to you.
ra
Something like a three part docuseries like streaming on Netflix :)
Things like bolt attachment locations, required electrical disconnections, stuff like that. From drawings it looks like there are three sections: the cab and doors as a unit (all aluminum), the windshield frame (steel), and the nose cowl (steel). Seems the easiest would be to unbolt at the top of the windshield frame and just remove the cab.
When you get around to it, any descriptions you could offer would be good for the collective wisdom of this group.
 

rockaukum

Active member
I had a break in the to-do list. Finished building a Pergola by the pool so I had a day off to play Snowcat Mechanic, Ha!
Anyway here are some photos of the limited progress. As for the wiring, yeah, it is a mess! I ended up cutting some and undoing others where possible as it was hot and I got lazy. I am thinking of putting in a wiring terminal (?) upon reinstall. That said, I think it is ready for lift-off. Just mulling over different ideas. One nice thing about this cat is the full doors, one not so nice thing is the doors hang lower that the top portion of the body. My current thought is to use the car lift but worried about the integrity of the doors as I would lift from there in order to get the cab high enough to drive the cat out from underneath.
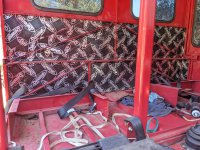
Removed the backseat. Three nuts / bolts. One on each side and one in the middle.
PXL_20240611_212520159.jpg
This is the drivers side from door opening looking at front wall next to the instrument panel on the R.
PXL_20240611_220607393.jpg
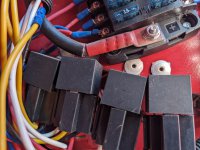
Broke a couple of the big fuses / relays trying to unplug them.
PXL_20240611_221203447.jpg
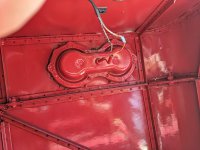
Front Drinkers side showing the two nut / bolt location as well as the broken light wire. Perhaps that is why the light did not work?PXL_20240611_212537214.jpg
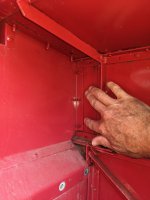
On the cowl there are five bolts on each side but the front was riveted to the cab so the bolts had to be removed.PXL_20240622_181929269.jpgPXL_20240622_181937042.jpg
As stated earlier, this has full size doors so it is riveted on both the top and bottom portions of the cab. Out come the lower rivets.PXL_20240622_180758967.jpg
I used a putty knife to separate the two halves. There is some double sided adhesive in there and it holds really well. I imagine it doubles as a water sealant. It looks like the stuff that is used on camper shell windows. Go ahead, ask how I know....PXL_20240622_181012687.jpg
With the conversion to the full size doors, I found one spot that has been welded. The welded structure is for the full size doors but it appears whomever got a little carried away and welded the top to the bottom half in that area. Nothing a cutoff wheel can't solve. Noted by the screwdriver pointing, R side of photo.
PXL_20240622_181316988.jpg
Well that is is for a while. Got a room to finish out amongst other things.
Please let me know if you have any ideas or suggestions.
ra
 

Attachments

  • PXL_20240621_211058631.jpg
    PXL_20240621_211058631.jpg
    2.5 MB · Views: 34
  • PXL_20240621_211739958.jpg
    PXL_20240621_211739958.jpg
    2.4 MB · Views: 31
  • PXL_20240621_215450531.jpg
    PXL_20240621_215450531.jpg
    2.1 MB · Views: 34
  • PXL_20240622_180802905.jpg
    PXL_20240622_180802905.jpg
    4.5 MB · Views: 31
  • PXL_20240621_210911706.jpg
    PXL_20240621_210911706.jpg
    2.6 MB · Views: 37

BoyToys

Active member
Thanks for sharing your misery. Though different than my 1404 Imp, it's helpful. Looks like you at least have some updated fuse and relay blocks. All mine is ancient 47 year old OEM. I spent hours tracing dead wires...none of the switches were labeled and I had multiple lights and things mounted all over the place, none of which worked - either blown fuses, fubar switches, shorted connections, burned out bulbs, poor rusted grounds, etc. Freaking rats nest of wiring. All fixed now, just part of the deal.
On the topic of rivets: I swear my Imp is obstructed solely of rivets. Rivet rivet rivet, I sound like a frog. And I'm here to tell you, the process of sanding down 3 layers of old paint to prep for the new, those damn rivets are a female dog.
 

mtncrawler

Bronze Member
GOLD Site Supporter
Couple ideas. The rivets holding the cowl to the upper cab look like extra long pop rivets. Why not knock them off and replace them later and leave the cowl bolted in place so it doesn't get banged up. With your doors, consider removing the rest of the hinge rivets so you can remove the doors completely. I put mine back on with stainless screws and keps nuts instead of rivets looks real good. When the doors are off, you and two buddies can easily lift the the cab off.
 

rockaukum

Active member
I like the idea. Especially considering that the young strong guy that was gonna help lift it off got hurt and is only "half" available. Can you elaborate on the screw set up you speak of? Perhaps a photo or two would be nice. Taking the doors off may also push me into doing split front doors, a-la jeep style. Only on a few trip with this cat have I had the need for the door to be closed. So it would be nice to split the door and have the top portion removable. ah, but I am getting sidetracked. I got to focus on the motor issue first.
Thanks for the input guys!
ra
 

rockaukum

Active member
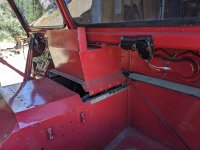
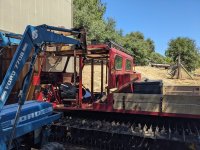
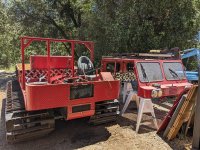
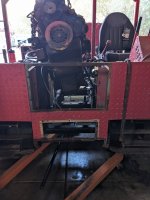
Getting to visit the cat randomly. Got the top off by using the tractor and forks on the front.
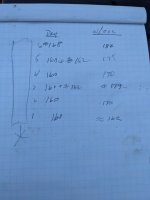
I also did a compression test on the motor, see pic for values. I did a dry test then put a bit of oil in the cylinder and repeated the test. They seem to be okay to me but I really do not know what the parameters should be. Any input would be great. (Ford 200)
I thought it might have a valve issue but with the cab off, I think I can isolate the sound a bit better. My current thought is that it may be an exhaust issue. Still, think I will send the head out to be gone through...
ra
Compression readings
PXL_20240708_222650456.jpg

Lifted the cab a bit and then inspected further for any additional items to be removed, like the heater hoses.
PXL_20240701_225056926.jpg
lifted the cab with the tractor

PXL_20240702_180844616.jpg
All separated.

PXL_20240702_192143780.jpg
 

Cidertom

Chionophile
GOLD Site Supporter
In my opinion, the fact that everyone was that close , within a few percent, you don't have a valve issue. it's your machine, but if it were me, I wouldn't touch the heads unless something changed. If you decide to do it, get ALL of the gaskets, valve retainers etc. on hand before you do.

The above statement is the personal opinion of the writer and makes no warranty as to the accuracy or validity of the statement.
 
  • Like
Reactions: PJL

rockaukum

Active member
Didertom,
I am kinda leaning towards leaving the head alone. Primarily due to the numbers from the compression test.
Also because once I put the plugs back in, I ran the motor and listened and looked all around. I did the "stick" stethoscope all around the motor and the sound was what I consider normal. Then I ran my hand along / between the intake / exhaust manifold. Bingo! Lots of air purging out towards the last cylinder.
The motor still comes out in order to replace the oil pan. Then I'll check the head and manifold for any warpage. Other than that, gasket changes and oil pan.
ra
 

redsqwrl

Bronze Member
GOLD Site Supporter
In my opinion, the fact that everyone was that close , within a few percent, you don't have a valve issue. it's your machine, but if it were me, I wouldn't touch the heads unless something changed. If you decide to do it, get ALL of the gaskets, valve retainers etc. on hand before you do.

The above statement is the personal opinion of the writer and makes no warranty as to the accuracy or validity of the statement.
I would argue cyl one has a worn or ever so slightly bent pushrod, fulcrum or rocker arm.

Oil raised all the cylinders except #1. I would wager dollar to donuts your adjuster on #1 needs about 1/16th of a turn. On the intake valve.

The above statement is the personal experience of the writer and makes no warranty as to the accuracy or validity of the statement. Other than it worked for me multiple times.
 

rockaukum

Active member
Good point. I still have the loaner compression check tool so To rule out operator error, I'll repeat the dry and wet test on them to verify the accuracy. It is hot here and when I get out there, I am a bit tired so mistakes and or lack of patience may have influenced the results. Either way, it will confirm the prior results.
The main thing right now is the exhaust leak at the back, and replacing the oil pan.
Thanks folks,
ra
 

BoyToys

Active member
I would argue cyl one has a worn or ever so slightly bent pushrod, fulcrum or rocker arm.

Oil raised all the cylinders except #1. I would wager dollar to donuts your adjuster on #1 needs about 1/16th of a turn. On the intake valve.

The above statement is the personal experience of the writer and makes no warranty as to the accuracy or validity of the statement. Other than it worked for me multiple times.
I love your legal disclaimer!

I adjusted the valves on my Imp a few months ago, just because...and as part of the plan to replace the valve cover gaskets for a small oil leak pooling around the distributor. Several valves were pretty loose, but now rectified. But still have the small oil leak; my brain tells me most likely a bad head gasket OR distributor shaft o'ring. I will just live with it because popping off the head means pulling off the cab most likely.
These machines are just a kick in pants in sensitive areas.
 

rockaukum

Active member
I went ahead and did a compression test again yesterday. The results are in the photo. My guess is that I did not get much oil in #1 for the wet test or did not have the hose completely in causing a little blow-by? Other than that, they look good to me.
I also included a video that shows the air leaking. I grabbed a piece of the insulation that separates the cab portions and moved it from front to the back of the engine. At the end of the video, you can see how the leak bounces the insulation , cylinder six.
raPXL_20240713_230433432.jpg
 

rockaukum

Active member
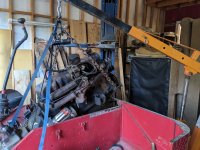
The motor is out!
Please review the pictures and let me know your thoughts on these items...
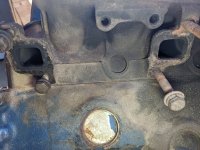
1. Looking at the head side of the exhaust system, I believe the black staining (carbon buildup) showed the leak, agreed? Numbers 5 &6.
PXL_20240717_221958802.jpg
This is all the gasket material that was left upon removal. Nothing there on cylinders 5 & 6.
PXL_20240717_221846478.jpg
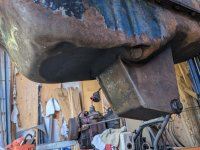
Here is the oil pan. As you can see, it is banged up pretty good. So much so that the dip stick did not seat properly. Also note that it appears to me this has been welded an possibly that whole bottom section was added? I'm looking to replace the pan, your thoughts on whether or not I would need the extra volume of oil?
PXL_20240717_233318556.jpg
Here is the exhaust manifold. Any suggestion for a home remedy to get a better mating surface? My first thought is sandpaper on a flat surface and work the manifold back and forth to reduct the pitting. Suggestions?
PXL_20240717_233255840.jpg
The flywheel also has issues. A number of the teeth have been damaged. Trying to find a replacement but it seems most auto stores have the ring only....
PXL_20240716_215808880.jpg
Just some photos of the motor removal. Done by myself so I did not stop much to snap photos....
PXL_20240716_014734965.jpgPXL_20240716_014746174.jpgPXL_20240716_020009890.jpg
 

Cidertom

Chionophile
GOLD Site Supporter
re: Oil pan. Many cats have the enlarged sump. With the grades you can climb and descend, the standard oil pan can leave the pickup tube high and dry. The pickup tube is probably extended to near the bottom of the enlarged sump. yes keep it.
 

rockaukum

Active member
Thanks for the insights! I have not pulled the pan off to see where the pick tube sits. Any recommendation on sourcing a replacement pan? Seems the local part houses have standard pans. I may just take it off, clean it up, and pound it out a bit for clearance on the dip stick.
ra
 

DAVENET

Bronze Member
GOLD Site Supporter
At least the flywheel ring is available for it. A lot of those you would need to tap it off, flip it, heat it and reseat it. That could still be possible, but it looks like the starter worked on that one side for a while.
 

rockaukum

Active member
Yep, It is toasted. I checked the bender on the starter and it is fine. As it should be because it was replaced when I fried the old one with a shorted out cable. I do not feel accomplished enough to do the reheat and reseat process, so I'll have to source that job out. What type of shop does that? I'd guess a machine shop but don't know.
ra
 

BoyToys

Active member
At least the flywheel ring is available for it. A lot of those you would need to tap it off, flip it, heat it and reseat it. That could still be possible, but it looks like the starter worked on that one side for a while.
My 2 cents: replace it with new. I've never done one but imagine if you heat it up in your wife's oven it should expand enough to easily be pressed onto the flywheel. If not take it to a shop and have them do it
 
Last edited:

BoyToys

Active member
Lapping enough off the exhaust manifold via your proposed method may not cut deep enough to get past all the pitting, but certainly won't hurt. As long as the surface is smooth and level, a new gasket should seal fine even with the pitting I would think.
Another MacGiver approach would be to fill the pits with JB Weld, then lap it flush and level. I think JB can handle the exhaust manifold temperatures but you may want to Google it or look for other like suitable materials.
Or, find an accomplished cast iron welder to build it back up. Then a machinist to mill it flat.
Or (there's always another or) find a used one in a junkyard.
 

Cidertom

Chionophile
GOLD Site Supporter
Thanks for the insights! I have not pulled the pan off to see where the pick tube sits. Any recommendation on sourcing a replacement pan? Seems the local part houses have standard pans. I may just take it off, clean it up, and pound it out a bit for clearance on the dip stick.
ra
These are all "shop made". If you feel comfortable with your fab skills, then get a standard pan and build your own. Otherwise just remove enough of the dent to clear. The watchout is distorting the sealing surface.

Re: manifold, take to an automotive machinist and get their opinion if they can get you a seating surface while leaving enough metal.

Re: ring, take it to the same machinist as manifold
 

rockaukum

Active member
Okay, I took the pan off and used the press and an assortment of odd pieces to push out a portion of the pan to provide clearance. It did deform the mating surface a bit but I think I go that sorted.
As for the flywheel ring gear.... No longer available! I even contacted "Pioneer" who manufactures this part and they tell me they are not producing it anymore. I contacted Summit racing as well, no longer available. So he searched for the complete flywheel. Only available in 132 tooth! Mine is 136. Looking like I'll have to flip the current ring gear and reattach it with the fresh teeth side facing the starter. I have already removed the ring gear thinking I would use it to match up with a new one.
If anyone has suggestions on where to source this, I'd appreciate it. I'd rather go new opposed to the wrecker.
ra
 

DAVENET

Bronze Member
GOLD Site Supporter
If reusing, just clean up both surfaces - DON'T sand it or remove material cleaning it. It obviously needs to remain a tight fit. Just remove any burs that would hinder a clean reassembly. If the inner (soon to be outer) part of the ring isn't a little beveled, you could always round the square edge a little to ease your mind about getting it back on. Put the flywheel on the deck with a bag of ice on it. Put the ring in your oven at 350 for 45 minutes. Grab it with oven mitts, walk it outside and place onto flywheel. Make sure it's seated. Waalaa. The slide on should be easy. Working kind of quick is the key.
 
Last edited:
Top