• Please be sure to read the rules and adhere to them. Some banned members have complained that they are not spammers. But they spammed us. Some even tried to redirect our members to other forums. Duh. Be smart. Read the rules and adhere to them and we will all get along just fine. Cheers. :beer: Link to the rules: https://www.forumsforums.com/threads/forum-rules-info.2974/

Installing Hardwood Floor?

Melensdad

Jerk in a Hawaiian Shirt & SNOWCAT Moderator
Staff member
I know Dargo just installed a hardwood floor in his bedroom but he didn't post a step-by-step installation thread. I'm considering installing some wood flooring in our dining room, probably after the holiday season is over (so maybe spring '07).

I'm curious about installing 3/4" thick hardwood floor. Do you rip up the baseboards and reinstall them over the floor? What about the door frames? Do you cut the door frames and slide the floor under the frames? Any advice?

She had her heart set on Bamboo, but then saw Brazilian Koa, also called Tigerwood or Goncalo Alves.
Tigerwood%20room.jpg


She wants wide planks (5" or 5.5" width). Is there any advantage to wide over narrow planks? It seems like the wide planks would be easier for me to install, but unfortunately cost more than narrow planks.

Do the home centers rent the flooring hammers? If not, where do I rent one of those? BTW, Tigerwood is substantially harder than Oak, are their air powered/air assist flooring hammers that can be rented? On the hardness scales, Tigerwood is 170% as hard as red oak (2160 on the Janka scale vs. 1260 for red oak). Any advice on installing this stuff would be greatly appreciated.

Tigerwood.gif


husko3s38v_650x650.jpg


B_Skurka said:
I'm curious about installing 3/4" thick hardwood floor. Do you rip up the baseboards and reinstall them over the floor? What about the door frames? Do you cut the door frames and slide the floor under the frames? Any advice?

Do the home centers rent the flooring hammers? If not, where do I rent one of those?

Bob,

I'm going to be watching this one because I'm in the same boat.. Some thinsgs I have found out so far..

Yes, pull the baseboards..
Cut the door jams..
Tool rental places rent the hammers..

I have seen many home improvement show regarding it, and it seems to be pretty easy as long as you allow the flooring to aclimate to your house and allow for expansion when installing it against the walls.. An underlayment is necessary and you should go against the floor joists as I have been told..

Good luck and please post pictures...
 
HGM said:
Bob,

I'm going to be watching this one because I'm in the same boat.
Well as my plans are not to do this for roughly 6 months, I suggest you go first so I can view your photos of your install. :D

HGM said:
as long as you allow the flooring to aclimate to your house and allow for expansion when installing it against the walls.
Everything I see tells me the flooring should be in the house for about 2 weeks, removed from the packaging, and stacked in the room prior to install.

I've put down some Pergo engineered/laminate flooring, you have to allow for expansion with that too, but it is not nailed down, and when I installed that flooring the rooms did not have baseboards until after the flooring was installed. This will all be new to me.

As an aside, I would like to inset some stone into the wood flooring. Ideally, the stone insets will be 10" by 10" and will consist of a mosaic of green slate, or something similar. Currently the lovely Mrs_B is not sold on the idea of setting stone mosaic into a wood floor, but I think I can talk and talk and talk until she finally gives in :blahblah:
 
We will be installing allot of random width hickory flooring in the our new house. (Doing it ourselves.)

I will start a page on my website specifically for this part of the project. I estimate we will begin in the next 3-4 weeks.
 
I've done it. It wasn't the most fun job.

Remove the trim. Leave a gap around the edges for expansion. There are flooring staplers and flooring nailers. The T-Nailers are supposedly better but harder to find from the rental places.

I ended up renting a stapler and it worked fine but I was just doing Oak. Some of these harder exotics may require something with more bang but I'm not sure - just a guess.

Get the wood into your house early and open the boxes to see what you have. They don't always come in perfectly straight long lengths. I got my stuff from Lumber Liquidators and the boxes were essentially an assortment of sizes. There were some curvy pieces that were virtually unusable unless you had a really short end piece then you could cut them down. So remember to buy more wood than you will need as you will end up with lots of extra pieces. I ended up with an extra box.

You can correct some slight curves by hitting the nailer extra hard and it will seat the wood. and straighten it.

Stock up on your favorite pain killers. Your back will be sore the next day.

Any other questions?
 
If that first picture is the Tigerwood, that is some beautiful looking wood. However, I wouldn't justify it on hardness alone: As far as I know (barring serious extremes on the scale - like balsa), the durability of the finish will be more significant to life than hardness.

That said, don't take my advice: I was sweating bad enough refinishing the old floor in a lousy closet. :o

Good Luck! :thumb:
 
Rereading, looks like you were more concerned about the hardness affecting installation than longevity. No advice there. :pat:
 
Dont skip on the leaving it in the room to climatise, and leave the expansion gap around the edge that the suggest. For my flooring it was about 14mm, which I thought was a bit large.

By the time the flooring had expanded to the point where the skirting boards had broken off, and the flooring was lifting in the middle I believed that you needed the expansion gap.

Follow the instructions exactly to the word, and you will be fine :D
 
Can't help with the installation but just wanted to apologize on the behalf of everyone that attended the party at your house for destroying your existing dining room floor...
 
bczoom said:
Can't help with the installation but just wanted to apologize on the behalf of everyone that attended the party at your house for destroying your existing dining room floor...
NO PROBLEMS, that carpet was installed when we built the house. By the time you guys got to the house the carpet was already 11.5 years old and due for a change.
Spiffy said:
If that first picture is the Tigerwood, that is some beautiful looking wood. However, I wouldn't justify it on hardness alone: As far as I know (barring serious extremes on the scale - like balsa), the durability of the finish will be more significant to life than hardness.
There seems to be a pretty big spread on the price of this product. I'm finding the wide plank (5" size) running from about $7 to about $10 per square foot. The higher priced product seems to typically (but not always so reading the warrenty carefully is important) have a 25 year residential & a 5 year commercial wear warrenty. The lower priced products typically have shorter residential warrenties, or no commercial warrenty. Also the more expensive brands seem to be made without formaldehyde and often have water based glues.
PBinWA said:
Get the wood into your house early and open the boxes to see what you have. They don't always come in perfectly straight long lengths. I got my stuff from Lumber Liquidators and the boxes were essentially an assortment of sizes. There were some curvy pieces that were virtually unusable unless you had a really short end piece then you could cut them down. So remember to buy more wood than you will need as you will end up with lots of extra pieces. I ended up with an extra box.
WOW that is an eyeopener. I have put down the engineered flooring, every piece is perfect. I expected the same from hardwood. Do you remember which brand you used? I know that Lumber Liquidators did not carry the brand we are leaning towards. So I wonder if the brands used may make some difference?
Mith said:
By the time the flooring had expanded to the point where the skirting boards had broken off, and the flooring was lifting in the middle I believed that you needed the expansion gap.
I've heard some horror stories about that. The same is true for the engineered floors, got to make room for an expansion gap around the room. The bigger the room the bigger the gap. In this case I'm only doing a small room, the dining room of our house. 13' by 17'. I figure if I follow the instructions I should e OK. I've also been warned to place the wood into the room 2 weeks prior to the start of the project to allow the moisture content to stabilize. Also to strip the carpet in the room 1 week prior to the flooring installation to allow the SUB-floor moisture content to stabilize too.
Av8r3400 said:
We will be installing allot of random width hickory flooring in the our new house. (Doing it ourselves.)

I will start a page on my website specifically for this part of the project. I estimate we will begin in the next 3-4 weeks.
It would be a big help to everyone if you would add posts to this thread, which provide LINKS back to your personal page so it is easy to follow your progress. Maybe even link some of the photos too.
 
bczoom said:
Can't help with the installation but just wanted to apologize on the behalf of everyone that attended the party at your house for destroying your existing dining room floor...

:yum: :yum: :yum:
 
WOW that is an eyeopener. I have put down the engineered flooring, every piece is perfect. I expected the same from hardwood. Do you remember which brand you used? I know that Lumber Liquidators did not carry the brand we are leaning towards. So I wonder if the brands used may make some difference?

It was the Lumber Liquidator own brand of their best grade pre-finished Oak. One other person I talked to about it said the same thing happened for him and he seemed to think this was normal. Dargo used some fancy name brand stuff (can't remember the name right now) so it will be interesting to see what he has to say. If you are getting the wood from a local importer or re-seller then you should ask them about this.
 
PBinWA said:
It was the Lumber Liquidator own brand of their best grade pre-finished Oak. One other person I talked to about it said the same thing happened for him and he seemed to think this was normal. Dargo used some fancy name brand stuff (can't remember the name right now) so it will be interesting to see what he has to say. If you are getting the wood from a local importer or re-seller then you should ask them about this.
I'm looking at a couple of different national brands, and looking to buy from a local supplier (unless the internet sources offer a MAJOR price break on the identical product). The brand I like the best (so far) is Scandian, no commercial warrenty, but the wood comes in regular lengths as opposed to random, has an excellent residential warrenty.

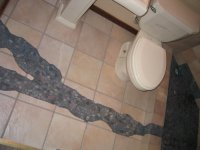
By the way, I am really curious about doing a "mixed medium" installation with wood and stone. Below is a photo of a small bathroom I did that mixed cut stone and ceramic tile. Using a tile saw, and breaking a lot of pieces in the process, I cut a "river" as I installed the floor. The layout was drawn on the floor and the pieces were cut and intalled the pieces one at a time to match the drawing I made on the floor. Doing the 2 colored grout required a lot of trial and error becasue the blue grout tended to bleed into the sand-colored grout. I'd like to do something similar with stone and wood. The pattern in the dining room would not be a 'river' but would probably be inset squares or some other rectilinear design.
 

Attachments

  • 1tile.jpg
    1tile.jpg
    82.6 KB · Views: 44
That looks pretty cool Bob. You have way more free time than I do. I'm still in the "just get it done" stage of life!

With a wood floor you could probably clamp all the pieces together and then draw a pattern and cut it out when everything is disassembled. Just remember to mark all the pieces so you don't forget the order.
 
Thinking about the stone inset: How will you manage the expansion/contraction issues? With wood the floor, it will expand and contract with the seasons. I think this could present issues with stone unless you use some form of highly elastic grout/silicone which may not look all that great.
 
PBinWA said:
Thinking about the stone inset: How will you manage the expansion/contraction issues? With wood the floor, it will expand and contract with the seasons. I think this could present issues with stone unless you use some form of highly elastic grout/silicone which may not look all that great.
There are a couple things. First there is a grout designed to be used outside in freezing/thawing enviornments, I plan to use that because it is designed for expansion/contraction.

Second, if I understand it correctly, most of the expansion of a wood floor is in the WIDTH not the length. The stone insets would be placed along the short walls, so would work with the width by breaking up the width into many small sections, so each section would expand/contract very minimally.

Now if I am wrong on the way the boards expand, then :confused2:
 
B_Skurka said:
There are a couple things. First there is a grout designed to be used outside in freezing/thawing enviornments, I plan to use that because it is designed for expansion/contraction.

Second, if I understand it correctly, most of the expansion of a wood floor is in the WIDTH not the length. The stone insets would be placed along the short walls, so would work with the width by breaking up the width into many small sections, so each section would expand/contract very minimally.

Now if I am wrong on the way the boards expand, then :confused2:

Have you seen this done elsewhere? I've never heard of it before but I haven't been looking for it either.

I can see the harder surface acting as a wedge and causing splitting over time. Grout that is used for exterior tile may not be giving enough for wood contact. Just some stuff that comes to mind - I'm no expert.
 
I've seen wood pieces set into tile and stone floors and used as accents. It is not commonly done which is why I am starting my planning and research so far in advance. But the wood pieces I've seen inset into stone floors were always fairly small, no longer than 12" long.

But I've never seen stone set into a wooded floor. My logic for using the exterior type grout is that it is designed to expand and contract with changes in the season, temperature, etc and still not crack. I had not given any thought to silicone. I may play with that and do some tests. It strikes me that I could use flexible silicone and then press some dry grout onto the surface??? It would look like grout but it would only have grout on the surface. I don't know how it would wear, so I'll have to test some of it and see what I can come up with.

I think it also makes sense for me to go visit the tile stores and ask for some help. Someone who is a professional must have some ideas? Although I have often talked with professionals about my ideas only to have them look at me like I am a total idiot. Maybe I am?


EDIT: Apparently I am not an idiot. I've been doing searches for several days on the interent, today I finally found one that is relavant to what I am trying to do. In fact this is pretty damn close to what I want to try:


[FONT=Verdana, Arial, Helvetica, sans-serif]URL: http://www.diynet.com/diy/fc_carpets_rugs/article/0,2037,DIY_13811_2275466,00.html[/FONT]
 
That article looks like a great find!

So they say you should use Latex Caulk. Seems safe enough and it would be easy to remove and re-apply if needed.

I'm not a fan of the wearability or durability of latex caulks but they are easy to work with.

The "professionals" will always be wary of difficult projects as they often require a lot of callbacks and are hard to estimate.
 
Latex caulk actually makes a lot of sence in this case. It doesn't maintain the glossy appearance of silicone, it is going to be about as water resistant as the wood floor it abuts, and it have flex enough to compress and expand with the wood floor. I would suspect it would have to be replaced every few years, but that is not too much maintainence to be concerned about.

Now I have to get serious with the pattern design. And then selling the design concept to the lovely Mrs. B.
 
Top