• Please be sure to read the rules and adhere to them. Some banned members have complained that they are not spammers. But they spammed us. Some even tried to redirect our members to other forums. Duh. Be smart. Read the rules and adhere to them and we will all get along just fine. Cheers. :beer: Link to the rules: https://www.forumsforums.com/threads/forum-rules-info.2974/

Homemade 3pt Fork Lift + subsoiler, etc

Melensdad

Jerk in a Hawaiian Shirt & SNOWCAT Moderator
Staff member
I've posted some photos of this project before, but never showed the back side of this thing so I figured I would post a new thread about it (mostly because I couldn't find my old thread).

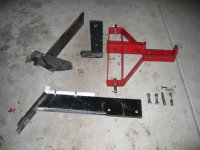
I purchased a Howse Sub-Soiler/Middlebuster/trailer hitch combo unit a while back because I wanted to bury some wire. The Howse combo unit is a modular unit and includes a very sturdy "A" frame, plus it includes 3 blades that can be bolted into place. One blade is the subsoiler, one is the middle buster, the third 'blade' is actually a trailer hitch.

The first thing I did was throw away the 2 bolts that hold the blades into place! Using large wrenches it took about 10 minutes to replace a blade. The bolts were the same diameter as top link pins. Using pins, takes less than 1 minute to swap blades.

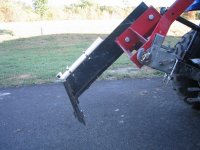
The second thing I did was drilling 2 holes, 5/8" in diameter in the trailing edge of the subsoiler. I then used 2 cheap muffler clamps to hold on an even cheaper plastic pipe with a 90-degree bend. That gave me a sub-soiler and cable layer! The total added cost was about $6 total for the 2 top link pins, 2 muffler clamps and the plastic pipe.

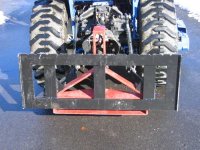
I quickly realized that you could turn the "A" frame backwards and that presented a flat side facing away from the tractor . . . and possibilities.

The first two photos show the combo unit and the cable laying modifications :tiphat:
 

Attachments

  • 1subsoil-combo1.jpg
    1subsoil-combo1.jpg
    47 KB · Views: 112
  • 1subsoil1.jpg
    1subsoil1.jpg
    67.4 KB · Views: 109
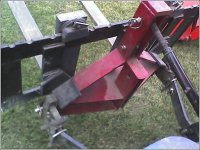
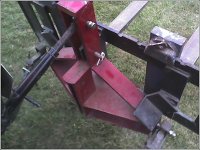
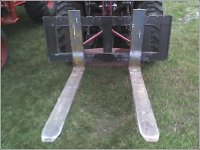
Here is the forklift portion.

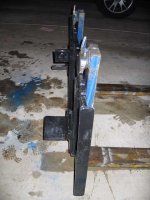
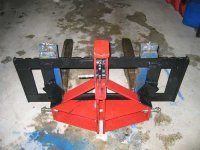
I used to old forklift forks. The back plate was an old backplate that was modified with only 3 simple pieces of angle iron welded to the back. But it would have been easy enough to build this from from simple flat stock. The back plate modifications include 2 pieces of angle iron that were welded to transfer the weight from the forks onto the Howse "A" frame. The backplate simple sits down on top of the original Howse "A" frame.

The third piece of angle iron is a critical piece. It is vertically mounted and has a hole drilled into it that lines up with a hole in the "A" frame. A simple top link pin is used to lock the back plate to the "A" frame.
 

Attachments

  • 1fl rear left.jpg
    1fl rear left.jpg
    98.8 KB · Views: 102
  • 1fl rear right.jpg
    1fl rear right.jpg
    96.6 KB · Views: 94
  • 1fl.jpg
    1fl.jpg
    82.7 KB · Views: 91
And more . . .
 

Attachments

  • 1fl-side.jpg
    1fl-side.jpg
    59.2 KB · Views: 92
  • 1fl-back.jpg
    1fl-back.jpg
    40.1 KB · Views: 87
  • 1.jpg
    1.jpg
    58.3 KB · Views: 88
Nice looking job Bob. I picked up my forks a few weeks ago while I was in Michigan. I forgot to ask the Uncle to stash away a carriage for the forks before he retired. Maybe someone who works on fork trucks here in Ohio (ummm Tom you out there?) can hook me up with a used one?
 
Its amazing what can be cobbled together out of 'salvaged' parts that are unusable in the commercial world.

I should point out that these photos show a manual top link with the fork lift attachement. It works MUCH MUCH better with a hydraulic top link.
 
B_Skurka said:
I should point out that these photos show a manual top link with the fork lift attachement. It works MUCH MUCH better with a hydraulic top link.

I'm sure it does. I love my top link.
Actually these forks were salvage. They were worn too thin on the "heel" of the fork. Caused from both the chain stretching and allowing the forks to drag the ground.
 
Hmmm...I could use the cable layer next weekend. Can you drop it off in Hammond, and I'll pick it up on Sunday at the MIL's? :D
 
DaveNay said:
Hmmm...I could use the cable layer next weekend. Can you drop it off in Hammond, and I'll pick it up on Sunday at the MIL's? :D
Actually I probably can. :tiphat:

I have a crew using my tractors to help landscape the front entrance to the neighborhood I live in, they should be done tomorrow or Thursday, I could load it in the back of my Touareg and take it up there, I will probably be in Highland sometime before the end of the week, Highland borders Hammond. Let me know if you need it.
 
B_Skurka said:
Actually I probably can. :tiphat:

I have a crew using my tractors to help landscape the front entrance to the neighborhood I live in, they should be done tomorrow or Thursday, I could load it in the back of my Touareg and take it up there, I will probably be in Highland sometime before the end of the week, Highland borders Hammond. Let me know if you need it.

I was kidding....I need to bury about 50 feet of 2/2/2/4, and I don't think yours would handle it. :eek:
 
Well I don't know what 2/2/2/4 is but I'm guessing it is pretty stout?

You could easily put a muffler pipe on the back with a wider radius curve, the cost to modify it would probably cost $3.00! The muffler clamps are already there!

The other way to pull cable with a sub-soiler is to attach the cable directly to the lower hole that is drilled on the lower trailing edge and actually pull the wire. Pipe can be buried that way too.

The offer is still open. Let me know by Thursday morning. I know I will be in Highland tomorrow afternoon/early evening but I don't know if the landscapers will be done before I leave. I will probably be back up there either Thursday or Friday afternoon.
 
I don't see why you couldn't use the subsoiler. I swapped out my normal 3/4" elbow for a 4 or 6" (don't remember which but I think 6) elbow and buried a 3/4" water line to the wife's flower garden. Had to go to the 6" because the water line wouldn't bend any sharper than that. I got it down probably 6" or so with that setup. That big 6" elbow didn't want to go down in the ground. Worked OK until Monday night when we were setting poles for the fence that she wanted and I knicked the edge of the water line with the auger - but at least I missed the electric line.:yum:
 
Top