• Please be sure to read the rules and adhere to them. Some banned members have complained that they are not spammers. But they spammed us. Some even tried to redirect our members to other forums. Duh. Be smart. Read the rules and adhere to them and we will all get along just fine. Cheers. :beer: Link to the rules: https://www.forumsforums.com/threads/forum-rules-info.2974/

Counter tops

BadAttitude

New member
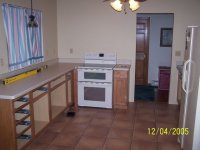
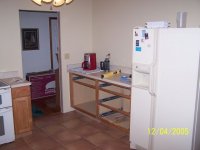
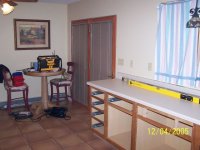
Installing a 10' counter in my kitchen remod and looking for some advice for scribing to fit. Anyone have experience doing this?
 
None! But the lovely Mrs_B is getting new countertops installed in our kitchen tomorrow. I was amazed by the technology they used to determine the scribe line. I figured they would make a cardboard template or something? NO CHANCE.

This guy went to his van and pulled out several electronics cases and set them up on our floor. Out of the cases came a digital camera, a tripod to mount it on, and a dozen or so clamps that adjusted to our counter top. Each clamp thing held a card. The clamp thing adjusted so that the card was directly in line, but directly above, the surface of the edge of the cabinet face below the counter top. There must have been a dozen of those clamp things/cards that he set up around the kitchen, each was at a measured distance from the next one. Then along the walls he places some special tape. The special tape was placed roughly in between each of the clamp/card things on the wall. On both the tape and the cards was a black & white image that looked sort of like the old time TV circular "test patterns."

The camera was then used to take digital photos of the kitchen from several different angles making sure to get all the walls, corners, etc.

I asked what it was all for, he said the camera images will be uploaded into a computer program and the computers will calculate the distance between the face of the cabinet and the wall based on the "test pattern" image size differential in the digital photos. That was then used to control the computer that made the scribe cuts along the back wall edge of the stone counter top.


Sorry, but that is the only answer I can give :tiphat:

I'm guessing you wanted an easy answer?
 
Set it in position and put a carpenter pencil against the wall resting on the counter top and go down the wall following the contours of the wall marking the top. Then you can belt sand it if not to bad.

Dur
 
Durwood said:
Set it in position and put a carpenter pencil against the wall resting on the counter top and go down the wall following the contours of the wall marking the top. Then you can belt sand it if not to bad.

Dur

That would be easier for a do-it-yourselfer!

But if you do it the way my installer is doing it you can buy a whole bunch of new toys! :whistle: I mean tools.
 
B_Skurka said:
That would be easier for a do-it-yourselfer!

But if you do it the way my installer is doing it you can buy a whole bunch of new toys! :whistle: I mean tools.


Yep, until you get their bill taking hours for what is a 20-30 minute job start to finish. I'm curious on how they cut the counter top once they had it measured? :4_11_9:

Dur
 
It is my understanding that the top will come in pre-cut to fit my wall. The slab is cut on some sort of a computer controlled saw at the plant before they deliver it. That is why it is so critical to get the measurements so accurate.
 
That's sounds like quite the technoligy Bob...but it wouldn't work for me. My CT is already made. The problem I have is how or what is the best way to conmpensate for a wave in the wall. Close to 3/16" from hi to lo over a 2-3' distance. The walls are already finished and painted and somehow this error was missed...don't ask:(

I did scribe the line OK and have 1 1/4" backsplash to play with. But if I scribe this to fit the wave, I think it will look like crap. I imagine I could do some mud work to level it out, but was hoping there was another option.

Durwood... sighting down the 10' length, I think the wave will be obvious since the backsplash will only be an inch thick. Any suggestions?
 
B_Skurka said:
It is my understanding that the top will come in pre-cut to fit my wall. The slab is cut on some sort of a computer controlled saw at the plant before they deliver it. That is why it is so critical to get the measurements so accurate.

I'm curious...would they precut to fit a wavy wall, or require the wall be fairly flat?
 
As I understand it, the stone is too hard to accurately cut on site (they now do this for marble, quartz, and granite tops, not sure about Corian and other softer tops). The digital camera imaging system they use to measure the wave in the wall is apparently so accurate that the pieces simply slide into place with a nearly perfect fit. At least that is what they claim.

The interesting thing is that I also went to a big box store for a bid on the project and they used a manual measuring method and they charged substantially more money for the same top ($4000 more is substantial in my book). The big box store also required me to remove my counter top before they would measure for the new top. The lead time for the new top is 3 to 4 weeks. So I would have had to remove and reinstall and then remove again my top for them to come in and measure and then install the new top.
 
BadAttitude said:
That's sounds like quite the technoligy Bob...but it wouldn't work for me. My CT is already made. The problem I have is how or what is the best way to conmpensate for a wave in the wall. Close to 3/16" from hi to lo over a 2-3' distance. The walls are already finished and painted and somehow this error was missed...don't ask:(

I did scribe the line OK and have 1 1/4" backsplash to play with. But if I scribe this to fit the wave, I think it will look like crap. I imagine I could do some mud work to level it out, but was hoping there was another option.

Durwood... sighting down the 10' length, I think the wave will be obvious since the backsplash will only be an inch thick. Any suggestions?

You might split the difference if it isn't to bad and let a bead of silicone help fill the gap a little (just not to much). It's tough sometimes to match up existing stuff and sometimes all you can do is split the difference so it isn't one extreme either way.

Dur
 
Durwood said:
You might split the difference if it isn't to bad and let a bead of silicone help fill the gap a little (just not to much). It's tough sometimes to match up existing stuff and sometimes all you can do is split the difference so it isn't one extreme either way.

Dur
I thought of using caulk, but I'm not sure if I can do it neatly. Biggest problem would be laying too much caulk and then trying to finger it smooth...BTDT and what a mess I made:eek: Thanks for the tip on splitting the difference. At least I haven't belt sanded the CT yet.

I'll have to practice a little with the caulk before I try it. Maybe I can do better than I think I can.

Thanks
 
One other thing is once you get everything set on the countertop it may not be that noticable. If it is take your M-I-Ls picture and hang it there and nobody will ever look that way. :coolshade

Dur
 
Durwood said:
One other thing is once you get everything set on the countertop it may not be that noticable. If it is take your M-I-Ls picture and hang it there and nobody will ever look that way. :coolshade

Dur
LMAO!!
 
BadAttitude said:
I thought of using caulk, but I'm not sure if I can do it neatly. Biggest problem would be laying too much caulk and then trying to finger it smooth...BTDT and what a mess I made:eek: Thanks for the tip on splitting the difference. At least I haven't belt sanded the CT yet.

I'll have to practice a little with the caulk before I try it. Maybe I can do better than I think I can.

Thanks

Use silicone and try a spoon to lay it down. Put a bead down then use a wet spoon to lay it down. Just try a small amount first that you could wipe off easy. You can do it just don't use a bigger amount of silicone than needed.

Dur
 
One last thing. You don't have to split it exactly down the middle. I myself would try to keep the silicone small as i could when splitting it.

Dur
 
Kubota King said:
The installers used cardboard when they installed our granite counter tops. They fit perfect.

I presume you mean they came out and made a cardboard template, they went back and cut the scribe line to fit the wall in the shop, and then delievered and just fitted it into place? If so, that is essentially what my installers are doing, only they are using a high tech method.

I gather that "BA" is installing laminate or some other material that can be shaped on site. I gather that would explain the different processes used.
 
BA; Durwood has given some good advice. The only thing I could offer is to split the difference, 3/32" scribe with the pencil, and sand away. That's a pretty thick backsplash at 1" thick. Most are 3/4". If in fact yours is 3/4, you can bend it ever so slightly to cover the space between wall and top. Then finish it off with caulk from the same brand laminate. They come in matching colors. When I put a backsplash up, I'll break out the old hot melt glue gun. Put my adhesive on, then dab some hotmelt in spots. Just enough to hold it in place while the adhesive sets up. Is this going to be in a spot that you'll be sighting down all the time? or is it where someone needs laser alignment tools to pick it out?:tiphat::beer:
 
John
If I understand what you said about bending, that would have been the perfect answer. However the CT already has the backsplash attached. Damn...I wish it wasn't!! Probably damage something if I tried to remove it. Interesting you say the norm is 3/4" for a backsplash. The guy I got the cabinets from also made the CT. He told me the industry standard is 1". The extra 1/4 is for scribing. BTW...yes Bob, it is laminate. Spent the real money on cabinets and flooring. Someday I'd like Corian, but for now this will have to work.

Is this going to be in a spot that you'll be sighting down all the time? or is it where someone needs laser alignment tools to pick it out?

Now that you mention it, the problem area is right below and to the right of the window. Once the window is trimmed out, you'd probably never notice it. :pat: Here I'm driving myself nuts worrying about it. I only have one chance to make this fit and I don't want to blow it. Once I start sanding, I can't put any back. As for the laser...yep, that's me LOL if you only knew what I strive for:boobies: :D

Here's a peak at where I'm at. I gutted this room right down to studs and subfloor. As you can see, I still have quite a bit work in front of me. The upper cabs with crown molding will be a real test of my skills. But I'm pretty confident in my abilities. This will be my first attempt at doing a kitchen remodel and so far I'm pleased. Once the CT and sink are in place, then Mrs BA will be REAL happy. She'll be able to cook Christmas dinner, which she's had her doubts about being able to do.
 

Attachments

  • kitchen1.jpg
    kitchen1.jpg
    46.2 KB · Views: 16
  • kitchen2.jpg
    kitchen2.jpg
    40.7 KB · Views: 16
  • kitchen3.jpg
    kitchen3.jpg
    50.2 KB · Views: 16
  • kitchen4.jpg
    kitchen4.jpg
    55 KB · Views: 16
Durwood said:
One last thing. You don't have to split it exactly down the middle. I myself would try to keep the silicone small as i could when splitting it.

Dur
Are you saying just caulk the gap or run a small bead the full length? I would think the full length would look better.
 
B_Skurka said:
I presume you mean they came out and made a cardboard template, they went back and cut the scribe line to fit the wall in the shop, and then delievered and just fitted it into place? If so, that is essentially what my installers are doing, only they are using a high tech method.

I gather that "BA" is installing laminate or some other material that can be shaped on site. I gather that would explain the different processes used.

Yes, that is what they did.
 
BadAttitude said:
Are you saying just caulk the gap or run a small bead the full length? I would think the full length would look better.

Run the bead the full length. I meant instead of taking the whole 3/16 out of the backsplash take only half or a little less out than that and make the difference up with silicone. I see you have the window so that will help break up the view of just siteing down the top.(as you mentioned) Like i said before once you get everything on the countertop then i doubt you will notice it anyway. Nice job on the kitchen btw, it looks good.

EDIT= I've done worse than that before and they turned out good.

Dur
 
Durwood said:
Run the bead the full length. I meant instead of taking the whole 3/16 out of the backsplash take only half or a little less out than that and make the difference up with silicone. I see you have the window so that will help break up the view of just siteing down the top.(as you mentioned) Like i said before once you get everything on the countertop then i doubt you will notice it anyway. Nice job on the kitchen btw, it looks good.

EDIT= I've done worse than that before and they turned out good.

Dur
Thanx...your making me feel that much more confident. :tiphat:

Still a little gunshy with using the caulk for finish detail work...and it seems everytime I get near the stuff, I end up wearing most of it too :D

I never did try using a wet spoon to smooth it. I'll give it a try, maybe that's the answer I'm looking for.
 
BadAttitude said:
Thanx...your making me feel that much more confident. :tiphat:

Still a little gunshy with using the caulk for finish detail work...and it seems everytime I get near the stuff, I end up wearing most of it too :D

I never did try using a wet spoon to smooth it. I'll give it a try, maybe that's the answer I'm looking for.

Different spoons have different shapes and sizes. You might have a few different ones on hand to see which one works best.

Dur
 
Top