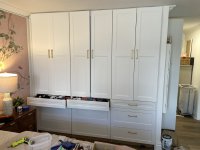
Melen had an 8' wide by 8' tall closet in her bedroom with mirror glass doors in her condo. It had 1 shelf at 7' off the ground. Another shelf at roughly 6' off the ground with a hangar bar under that. She wanted something more functional. I mean it was great if she owned enough long dresses to fill an entire closet, but not sure even a queen needs that many dresses.
Solution is 3 kitchen "drawer base" units, ordered from Home Depot. They match her kitchen and dining room. So not the home depot 'stock' budget cabinets, but only a modest 'special order' upgrade without getting into the really expensive stuff. 6 doors, ordered from IKEA, in the same finish and a nearly perfect match in design, top off the new closet space to turn it into a 'built in' drawer & cabinet unit.
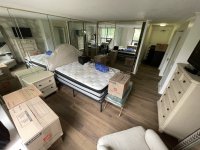
Original view of the closet (Photo was taken "move in day" approx 9 months ago)... The Mirror Wall is gone. Lots of others things have changed, but that big mirror closet remained in place until yesterday.
I had help. My friend Ricardo came over, I thought he was coming alone, but he brought a handyman that I had previously hired, which turned out to be a pretty good decision. NONE of the work was hard, but we are working in a high rise condo unit in Chicago and there are limited hours we can work, limited access to an elevator, limited blah blah blah
I had most of the materials upstairs and all the base drawer units moved myself.
Before they got there, I removed the shelves and hanging rod in the closet. Together we carried out the big mirror doors WITHOUT breaking them. The 3 of us set in the drawer units.
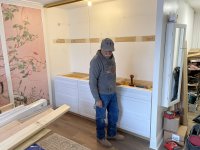
A salvaged piece of plywood that was in my garage served as the top of the drawer units, obviously cut to fit into the space.
Original lower shelf unit was reinstalled at 7' off the ground, 1' higher than its original location. The support serve as base for the hanging rod for clothing.
2 x 4 frame built around the perimeter of the face, but set back 3/4" so the finish board fit flush with the face of the lower base units.

Perimeter frame built. A couple vertical 2x4s installed in line with the joints of base units. A double end piece was needed on the far wall to account for a couple extra inches of offset.

Face trim wood nailed over the 2x4 frame.
Look close at the top right corner and you will see a notch. That is for the hinge. We were at the mercy of IKEA on the placement of the hinges, the doors came with the hinge mounts pre-drilled out. So we had to make notches for each of the 6 doors in the frame. I didn't bring my jig saw, which would have made for an easy cut, but Ricardo had has sawzall in his truck so we adapted. Notching the spaces for the hinges was NOT something I had anticipated. Ricardo, who normally comes up with crazy good ideas said we needed to use different hinges . . . which would have made Melen eternally angry with me . . . I vetoed the hinge change and decided we should eat a late lunch and figure it out later. That is when I came up with the idea to notch out the frame.

We were running out of time, so we decided to delay install of some trim pieces and do the caulking of the seams later. Decided we better try the doors. Couldn't have asked for a better fit, but each door needed to be custom installed, used washers and needed longer screws. Fortunately there is an ACE Hardware 2 blocks away, so I walked over a couple times for supplies. Yes, 1 door was hung upside down!?! Do you think she will notice??? And no, they are not blue; that is a protective film that peels off.
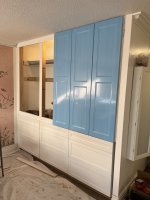
Back this morning. But working alone today.
All doors are installed. Correctly oriented. Trim boards installed on the ends. Caulked the seams with paintable caulk all the way around.
Inside, no photo, but all the holes in the walls from screws were patched. It is all ready for primer and paint. But that is Melen's job. I am not a painter. A couple door hinges need to be adjusted, and the drawer and door pulls need to be installed, but those will not arrive until Friday, so all that will probably happen sometime next week.
She also needs a kick plate installed, I forgot that.

While I was there I also ran a bead of caulk around the crown moulding in her guest room, her office and her bedroom. The private spaces are now ready for paint. All the public rooms, hallways, etc were finished months ago, but the 2 bedrooms and the office were lower priority simply because I was injured, then sick, then surgery, and we had some holidays and I'm also kind of lazy. But the painting is SUPPOSED TO HAPPEN this weekend. As I am NOT the painter, I will gladly show up AFTER the painting in done and admire it.
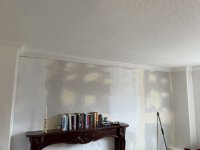
Solution is 3 kitchen "drawer base" units, ordered from Home Depot. They match her kitchen and dining room. So not the home depot 'stock' budget cabinets, but only a modest 'special order' upgrade without getting into the really expensive stuff. 6 doors, ordered from IKEA, in the same finish and a nearly perfect match in design, top off the new closet space to turn it into a 'built in' drawer & cabinet unit.
Original view of the closet (Photo was taken "move in day" approx 9 months ago)... The Mirror Wall is gone. Lots of others things have changed, but that big mirror closet remained in place until yesterday.

I had help. My friend Ricardo came over, I thought he was coming alone, but he brought a handyman that I had previously hired, which turned out to be a pretty good decision. NONE of the work was hard, but we are working in a high rise condo unit in Chicago and there are limited hours we can work, limited access to an elevator, limited blah blah blah
I had most of the materials upstairs and all the base drawer units moved myself.
Before they got there, I removed the shelves and hanging rod in the closet. Together we carried out the big mirror doors WITHOUT breaking them. The 3 of us set in the drawer units.

A salvaged piece of plywood that was in my garage served as the top of the drawer units, obviously cut to fit into the space.
Original lower shelf unit was reinstalled at 7' off the ground, 1' higher than its original location. The support serve as base for the hanging rod for clothing.
2 x 4 frame built around the perimeter of the face, but set back 3/4" so the finish board fit flush with the face of the lower base units.

Perimeter frame built. A couple vertical 2x4s installed in line with the joints of base units. A double end piece was needed on the far wall to account for a couple extra inches of offset.

Face trim wood nailed over the 2x4 frame.
Look close at the top right corner and you will see a notch. That is for the hinge. We were at the mercy of IKEA on the placement of the hinges, the doors came with the hinge mounts pre-drilled out. So we had to make notches for each of the 6 doors in the frame. I didn't bring my jig saw, which would have made for an easy cut, but Ricardo had has sawzall in his truck so we adapted. Notching the spaces for the hinges was NOT something I had anticipated. Ricardo, who normally comes up with crazy good ideas said we needed to use different hinges . . . which would have made Melen eternally angry with me . . . I vetoed the hinge change and decided we should eat a late lunch and figure it out later. That is when I came up with the idea to notch out the frame.

We were running out of time, so we decided to delay install of some trim pieces and do the caulking of the seams later. Decided we better try the doors. Couldn't have asked for a better fit, but each door needed to be custom installed, used washers and needed longer screws. Fortunately there is an ACE Hardware 2 blocks away, so I walked over a couple times for supplies. Yes, 1 door was hung upside down!?! Do you think she will notice??? And no, they are not blue; that is a protective film that peels off.

Back this morning. But working alone today.
All doors are installed. Correctly oriented. Trim boards installed on the ends. Caulked the seams with paintable caulk all the way around.
Inside, no photo, but all the holes in the walls from screws were patched. It is all ready for primer and paint. But that is Melen's job. I am not a painter. A couple door hinges need to be adjusted, and the drawer and door pulls need to be installed, but those will not arrive until Friday, so all that will probably happen sometime next week.
She also needs a kick plate installed, I forgot that.


While I was there I also ran a bead of caulk around the crown moulding in her guest room, her office and her bedroom. The private spaces are now ready for paint. All the public rooms, hallways, etc were finished months ago, but the 2 bedrooms and the office were lower priority simply because I was injured, then sick, then surgery, and we had some holidays and I'm also kind of lazy. But the painting is SUPPOSED TO HAPPEN this weekend. As I am NOT the painter, I will gladly show up AFTER the painting in done and admire it.

Last edited:

