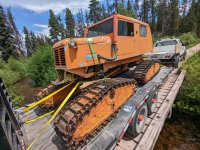
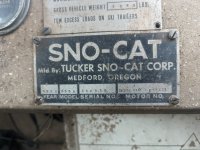
1962 443A Tucker - V8 Poly Hot rod!

Bennyboy1337

Active member
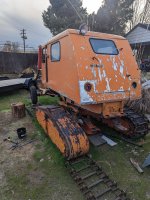
I've been lurking on these forums for 9 years and obsessively searching Craigslist and Marketplace for a smaller sized project cat for cabin access and backcountry skiing. Last week I saw a posting for a "Tucker sno cat" on my Marketplace feed with zero description or other details for $6k in Montana. I thought this was maybe a scam but after inspecting the seller profile and reverse image searching the photos I determined it looked promising. I messaged the seller and quickly realized this was the real deal, and offered to drive up cash in hand ASAP with the few details I had.

The Tucker spent 15 years at a mountain ranch ferrying around equipment and guests, before then I don't really know of it's origins. It has sat for the last several years because the rear pontoons which are fiberglass were starting to wear, and the owner had the correct conclusions to stop driving to prevent further damage.

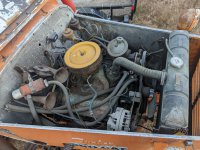
One really surprising fact after getting the cat home was I discovered someone had swapped the motor to a V8 at some point in the past, this is a A318 Poly V8 to be precise, a really iconic mopar hunk of iron. It pumps out twice as much power as the Chrysler V6 flatheads tucker installed originally, so I'm sure this increased power probably hastened up the pontoon wear to some degree. This motor is so huge they had to move the battery from the engine bay to front of the cat, someone I certainly want to fix in the future. A lithium or advanced AGM with a smaller footprint may do the trick.

My list of repairs/refurbishing in order of importance

-Pontoon/track repair (yeah I know what I'm getting myself into)
(the front two are steel rear are fiberglass, adjusting, inspecting bearings, repacking, painting)
-General fluids replacement and drivetrain inspection
(the CVs were recently replaced with modern shafts which is really nice)
-Power overhaul/heater
(need to fix battery situation and run all new electrical)
-Roof/trim/windows
(need to reinforce the frame for the roof to support a cargo rack and seal all major water entry locations in the process)
-Undercarriage cleanup and sealing
(rust cleanup and prevention, undercoating spray, few light duty braces need replacing)
-Interior
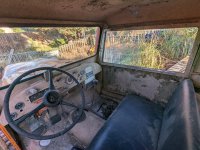
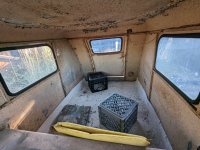
(Bench seats install and returning the rear floor to the original drop design, carpet interior)
-Exterior/paint/new skin
(I'd like to make some new engine housing panels, then either repaint the shell or do something fun, maybe strip to bare aluminum and mirror polish)

I hope to have the pontoons and tracks up to snuff in time for this season, but we'll see how that goes :D Look for some updates to come after I finished the bathroom remodels I promised my wife before I touch even a bolt on the tucker :D
 

Attachments

  • PXL_20220628_183738697.jpg
    PXL_20220628_183738697.jpg
    4.7 MB · Views: 247
  • PXL_20220630_134440057.jpg
    PXL_20220630_134440057.jpg
    4.2 MB · Views: 223
  • PXL_20220630_134444432.jpg
    PXL_20220630_134444432.jpg
    3.6 MB · Views: 206
  • PXL_20220705_031022249.jpg
    PXL_20220705_031022249.jpg
    2.2 MB · Views: 198
  • PXL_20220705_031027206.jpg
    PXL_20220705_031027206.jpg
    3.4 MB · Views: 200
  • PXL_20220705_031040113.jpg
    PXL_20220705_031040113.jpg
    2.5 MB · Views: 200
  • PXL_20220705_031134267.jpg
    PXL_20220705_031134267.jpg
    2.3 MB · Views: 195
  • PXL_20220705_031229323.jpg
    PXL_20220705_031229323.jpg
    4.1 MB · Views: 207
  • PXL_20220705_031247768.jpg
    PXL_20220705_031247768.jpg
    3.7 MB · Views: 215
  • PXL_20220705_031310509.jpg
    PXL_20220705_031310509.jpg
    2.7 MB · Views: 247
welcome aboard, this is the place to find lots of information on the struggles that lie ahead. looks like you got a nice piece of snow cat history, enjoy the rig. it gets pretty slow here in summer but there is a lot of knowledge here.
 
welcome aboard, this is the place to find lots of information on the struggles that lie ahead. looks like you got a nice piece of snow cat history, enjoy the rig. it gets pretty slow here in summer but there is a lot of knowledge here.
Thanks! I've already read every single post and comment about pontoon/track maintenance on this forum to prepare myself for the journey ahead :D Also I've become acquainted with Pontoon Princess over DMs. Through conversations with her I've found out my cat was sold to the Southern Pacific Railroad Sacramento office, which means my cat more than likely serviced the line over Donner pass!
I've ordered several rail history books about that line and have contacted several SP rail historic societies to see if a photo of my cat working exists in an archive somewhere. Because of this I'm thinking about putting an old Southern Pacific logos on doors and a vintage beacon light up top (the roof has holes up top that look like they were used for such a light).

I've debated about what I'm going to do cosmetic wise with the cat, and I think I've settled on keeping the original patina, plus the above mentioned additions as a memento to her working history. The pontoons and lots of the bottom components will need rust treatment and seal, I'm going to try and avoid fresh coats of paint unless it's necessary or not that visible. I am going to have some fun with the interior however, and do some sort of diamond vinyl backing (the factory splatter stuff if falling off everywhere), and have my friend sew up some cowhide bench seats (front back).

In the musclecar world they have a word that describes the look I'm going for "Ratty" :D

1658952000517.png
1658952030291.png
1658952418004.png
 
Last edited:
It's been a very long time since I posted anything, life well.... gets in the way of things. Glad GMoose invited me up to the Joseph Jamboree this year, had an absolute blast getting to meet the extended Tucker/Track family, even though our Tucker wasn't ready for her maiden appearance.

My Tucker has been sitting for 8 months outside now unceremoniously like it had been for the last three years in a ranch in Montana. It really pained me to see her there every day not getting any love, but her time is now! Well.... to be honest, I need to do some seriously property upgrades that include grading a bunch of dirt, installing carport to work and house the Tucker indefinitely, and getting a shipping container installed first. Before any of this can happen the cat has got to move! Considering the motor is currently not running and I don't want to risk any damage to the tracks which need some serious TLC, it's time to transform this Tucker from 256 wheeled mode to 4 wheel mode? (I haven't actually counted how many rollers there are but I think 250 is a good guestimate).

PXL_20230416_222823827.jpg
PXL_20230416_232903983.jpg

Definitely learned a few things with removing the first track and pontoon, took me about an hour to get the first one off, got that down to about 15 minutes by the fourth one. Pretty confident I could do a field removal if necessary, I will have to think about what type of jack I take with me on the trail.
PXL_20230417_002730964.jpg
PXL_20230418_000317573.jpg
I have a halftrack now!

PXL_20230416_232910822.jpg

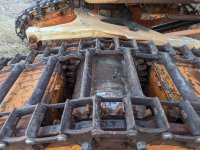
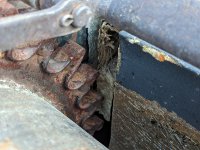
First steel pontoon analysis, I swear it looks like they purposely cut the top sections out, anyone know why they would of done that? I shook out at least 10lbs of rocks and dirt, I'm sure I will pull lots more out when I cut them open.
PXL_20230416_233049763.jpg
Bottom is in pretty good shape, I'm going experiment with maybe installing a sheet of molded HDPE on the bottom for improved drag coefficient, more to come on that.
PXL_20230417_002236142.jpg
Metal pontoon #2, these slots were clearly cut out. Why on earth would someone open up the pontoon for snow, dirt, rocks to accumulate? I have no idea.....
PXL_20230417_002245317.jpg
PXL_20230417_002249258.jpg
#2pontoon is the worst shape of all four, this one is going to need a lot of love.
PXL_20230417_002955427.jpg
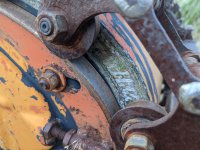
Here was a surprise find, only a matter of time before this sprocket would of completely sheered off.
PXL_20230418_015319518.jpg
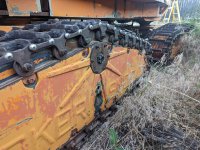
So front two pontoons are steel, the rear are fiberglass which are substantially lighter (I can tell why Tucker moved to them). I think I will move these to the front considering I have a V8 motor so I can use all the weight savings up front that I can get. The pans are in fair condition, the front of the two pontoons will obviously need some serious repair.
PXL_20230418_021125196.jpg
Can anyone tell me why the rear axle standoffs have a ~3/4 spacer attached to them?
PXL_20230418_020843792.jpg
Half tempted to get the motor running just so I can take her for a spin down the block :D I'll end up pulling her out on our street while I do all the skidloader work in our backyard, then it will be time to jack her up under a shelter and the real work begins!

Few things I learned...
  • I have 3 different types of of axle shaft bolt styles (some studs, some bolt/thread).
  • I have 3 different types of pontoons (Steel with welded inner rails, steel with all removable rails, and fiberglass) some certainly mixed matched axles and pontoons in the past.
  • Steel weights significantly more than fiberglass, anyone have spare two fiber for sale? :D
  • Cotter pins cotter pins.... I have a feeling I'm going to get very acquainted with them in the future, did I mention my track has about 30 DIY pins made from nails? :D
  • I need a bigger wrench for the axle castle nuts, my giant ass cresent wrench opened just big enough barely to work.
Well.... onto rebuilding my fence gates, retaining wall, grading the property, spreading road mix, running 240v power under the ground, then installing a carport! Then the real fun will begin :)
 

Attachments

  • PXL_20230418_004254916.jpg
    PXL_20230418_004254916.jpg
    4.6 MB · Views: 87
As far as why the torched holes in the pontoons, Tuckers have a problem with the drive drums freezing in place when parked after use. Flexible steel hose connected to the exhaust pipe was used to melt out the snow/ice that was packed in the drive cavity, Slots were opened up with a torch below the drive drum bearing to allow hot exhaust gases to get in better, In your case it looks like some idiot thought the problem could be solved by removing pontoon metal in the area where the drive drum teeth would freeze tight,
 
As far as why the torched holes in the pontoons, Tuckers have a problem with the drive drums freezing in place when parked after use. Flexible steel hose connected to the exhaust pipe was used to melt out the snow/ice that was packed in the drive cavity, Slots were opened up with a torch below the drive drum bearing to allow hot exhaust gases to get in better, In your case it looks like some idiot thought the problem could be solved by removing pontoon metal in the area where the drive drum teeth would freeze tight,
Post 4 picture ten is why it was torched.

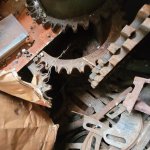
the pitch is critically off on the stretch or wore grouser link combo, Previous owner created tall teeth to treat the symptom which chased the problem to clearance of the sprocket , Which then created the access of debris.

Welcome young tucker ite. Baptism by fire is uncomfortable I suppose, but you stated it well on the learning curve. Great job.
 
As far as why the torched holes in the pontoons, Tuckers have a problem with the drive drums freezing in place when parked after use. Flexible steel hose connected to the exhaust pipe was used to melt out the snow/ice that was packed in the drive cavity, Slots were opened up with a torch below the drive drum bearing to allow hot exhaust gases to get in better, In your case it looks like some idiot thought the problem could be solved by removing pontoon metal in the area where the drive drum teeth would freeze tight,
ughhhh.... seems like an even more idiotic move considering my cat has a dual exhaust and they could have defrosted the sprockets in half the time with two hoses. But I guess that would have been too much work for them?

Post 4 picture ten is why it was torched.

the pitch is critically off on the stretch or wore grouser link combo, Previous owner created tall teeth to treat the symptom which chased the problem to clearance of the sprocket , Which then created the access of debris.

Welcome young tucker ite. Baptism by fire is uncomfortable I suppose, but you stated it well on the learning curve. Great job.
You say "created" tall teeth, but the sprocket looks factory as far as I can tell, did Tucker have different teeth height sprockets and it looks like previous owner put two of the taller ones up front?

Tracks are loose obviously after years of neglect, tighteners on the pontoons are pretty much maxed, I think this can mostly be addressed by tensioning the tracks properly at the links, I don't think I'm going to bother building/buying all new pins which is were most of the slop presumably is coming from? I'm seen photos of worn pins on other threads and if you multiply this by 80x then that can equal a inch or two of extra play. Downside to doing this is you no longer have a perfect factory tooth to track pattern and I guess that could increase wear in the long run? I think this can be mitigated by staying on top of tensioning, seems like if an owner gets sloppy about tightening links you get a runaway scenario like this. I'm debating having new sprockets water jet cut and assembled to get back to factory size and ditching the old ones all together.

Catholics should just pick up refurbishing pontoons for Ash Wednesday, if they really want to atone for their sins and suffer for their Lord, I think Tuckers would have a thing or two to teach them :ROFLMAO:
 
The East Coast Preserve specializes in this surgery and has the largest rehabilitated pontoon population successfully released into the wild!

Internet tracking devices have found them thriving with their pontoon pods after being released to the snow habitats of MA NH ME VT.

Grouser Reduction Surgery SOP

1. Remove tracks.
2. Loosen adjustable nose and smash in.
3. Remove one complete grouser and associated links/pins/rollers/bearings.
4. Reinstall track to evaluate slack take up measurements.
5. Imperially remove, add, straighten, bend any and all available half/full links to maximize smiles per mile and work with what you got!
 
Lots of joy left in this old girl.....
The snowmobile club I belonged to years ago had a pontoon type Tucker..

I got recruited several times to help rebuild the pontoons.....

Your desire to restore the machine to it's former glory is cool....THE RAT CAT IDEA IS SWEET.

The work to care for the pontoon type drive was certainly why Tucker went to the bogie wheel frames and rubber tracks.....

Enjoy the toy.....
 
Last edited:
1. Remove tracks.
2. Loosen adjustable nose and smash in.
3. Remove one complete grouser and associated links/pins/rollers/bearings.
4. Reinstall track to evaluate slack take up measurements.
5. Imperially remove, add, straighten, bend any and all available half/full links to maximize smiles per mile and work with what you got!

Tucker should have stamped these instructions into every pontoon from the factory, I feel like the pontoon population would be more abundant and healthy if they were treated them this way for 70 years.

Conversely..... I just realized I'm probably going to solve my own problem of needing a spare grouser or two with this :D
 
Please consider not removing a grouser. you are very accurate with your understanding of pitch and the effect every 8th grouser has to the Sprocket. those tall sprockets are created by others. you can see at the root the OEM tabbed sockets. Tucker actually sold a replacement weld in socket. bend your links and hold the course, the evil joys in the 30 club are not worth the eternity in ........ I give a whoot what you do but the wear is sped up by not building up the nose cones with a bit of flat stock to make the path around the pontoon a bit longer......
 
Please consider not removing a grouser. you are very accurate with your understanding of pitch and the effect every 8th grouser has to the Sprocket. those tall sprockets are created by others. you can see at the root the OEM tabbed sockets. Tucker actually sold a replacement weld in socket. bend your links and hold the course, the evil joys in the 30 club are not worth the eternity in ........ I give a whoot what you do but the wear is sped up by not building up the nose cones with a bit of flat stock to make the path around the pontoon a bit longer......

This is accurate on the two steel pontoons he has since they only have one adjustment point at the rear. The fiberglass toons have dual adjusters - if they are already maxed out, the easiest solution is to bottom them out on the pontoon and drop a grouser. (Or swap in a half link depending on wear). As long as the rollers on the grouser are seating correctly in the valleys of the sprocket the machine doesn't care if there are 31 or 21 grousers.
 
This is accurate on the two steel pontoons he has since they only have one adjustment point at the rear. The fiberglass toons have dual adjusters - if they are already maxed out, the easiest solution is to bottom them out on the pontoon and drop a grouser. (Or swap in a half link depending on wear). As long as the rollers on the grouser are seating correctly in the valleys of the sprocket the machine doesn't care if there are 31 or 21 grousers.
Developed length of the chain is indeed in-material, but spacing between the elements need to match. the sprockets do care and live a very short life if they are not matching, My learning curve was steep. I ran a tracked machine with One grouser 1/8" to long center to center,( due to a misinstalled splice) destroyed a $800 pair of sprockets in 50 hrs. Put .375 pitch chain on a .404 chainsaw and report back. take out all the cutters or rakers you would like. .039 is giant gap to make up on the sprocket, this brilliant technique ( club 30 ) is .125 8-)

Do as you please as tucker parts are available at napa 8-)
 
I will find the box i created a few years ago, I found a cam roller for a paint line conveyor system that was close in dimensions to a tucker roller, then put it in a napa box as a joke some random april fools day, Piles of people fell for it. If I remember correct the sku beeped up as a flux capacitor at oreillys auto stores....
 
Ahhh, I see your thought process now.
I was tucker hunting this weekend and had to school up a snow cat enthusiast about their New tucker sprockets. I will find my phone and add the photos shortly. there is a photo of an ok sprocket and then four repaired sprockets that were built up and then ground down yielding a pleasant look.

the grouser pitch or pitch on the grouser is usually close enough as the cast puts up a more noble fight, but the links are quick to say phuck it and they are the problem causers. there-fore bending the links is brilliant to a point.
 
Few minor updates. I bought a cool little Japanese tractor a month ago to help grade our property, but also finding it's super useful for moving those giant awkward pontoons around. It's small enough it can fit everywhere in our backyard but also sidewalks, I can envision myself plowing the whole neighborhood in the winter already :)

AIL4fc96zaAMScl0VUADMxeSgXq3SQA_KBg6sIXj3OSR7pXkbIbhFD0AqGLdDBP9J2uEMXtw6OKTzB5OBUBlNBmNoMKqVykAKrSbwwxq2UgBxbjOjNKndex83Y2Qsbisdm2ssZsojAJHxEOrcCgZjFMilBKcP1IZ9nUqgcoCJ-1RQoTzMeZEAhMSACmonJmKJg3uYMFJ9nupSJTDaJNFwMGiZRdWxUmm226YruT4KYzcbbiit4PFNybdoJEKjcgBt2WWy_nE9KjQWQogMX2L6WTO5fYxFaFc1kghGLlusy_tmENAgnhZdqV1MsrdOp_f-V27CrI7zwgZ0JwCPwx_I5nGASbAdmPBnGtaaiQe57Htv_QwDkV9HH-7USKFyoybiNY5sm2R9nG2_a4byghvY4aHYQ8e9nsHGGW-2q5EHZJ_E1le7ej07YWlXeIjPlSlwGvBA0idBTPPXvw56jAnyUzEdNDSrcw5HvYXysgP9D7MWBefKUQyS-JXXTcWDAp1gD3t4oAub_exVj4wV5eQi48qdg1FNgYE1iW5ERCXZ_z6XKfQxL3BEGdHolwfq2q9Xv6cwEzbfSEyjYKubAqDin6_FlcdlNuQ_SNCO_NGdiu5_aj_A6CSMgsxcRVQxK4w1aIoynDs_tTBYvX_10kREX4Gl7HLFu38HGhX9XB9f_7jPINN3z_j7BEBjcCWXQUl3rx2G4k85qs4-8PC8uTUlsTAXwRW7tIr1t6z8BSuR0xb3JHNq7OxK9Ez9EevQdku9n1MNclDxtWSGGoqbvsdIcE9G60cetXhIbbbJw6ciH-BSONzjxbxHZdQPCeHOJccL9WbdGIdTeO8guhiw2NX6CxqiYGkKQPLHfLFLdnzTdzs6m_3EwdjESlJ6BoICafGwkCLFD6qLfSuTV5EZtcDt3DJpLZ6DTc=w2648-h1994-s-no

AIL4fc8NysJvUPn_XDb1X7ck3uOFx5E_TgDwyFHIP94gFZA5Xa3N69gEkco29zctNzedPFUCVM5UZo6eJg_0BZs7CNEEnV3xviedUvoNHrI0gxt2nv7Cyf4kzrGut-b3SGXt45RmWPIgQ35LHJzP3JMR0q5UQIgIpD13Tf1xYdenuPX8J8DATlM_rwmQ0_25kRoVMcBTmZmU1zw8GDuVLMDHReR4ltkfSv-pjAMcNFDiVTRL0_vxdLFqPxkVd85X9BLHIiHP9nmY_YLXZxTQO1RDhcca5wnORFLjiKVjv6JQLQY53w2TqR6loERIPtG87yFYdlaLzuj4gZTJuxpLaYYG2svTlYCZHFCLx2AictYQocEdlJojIKc4_WtFVTBoRsqh0jiq23b7dl6b-J19qwqvkNoQMCRmePG-cmcrA6l0b0bjPI7YGm57R7sKcDwGdC2YWk08dKMTwugGV8VtkAl8VCoHKipzzrGQYRy-UTY5cs4xkLagJpj_Qow4D_kKkW_8sU0zyhFzekY9B3Ml4q6vjYu1uOIou0bLQe4a9wnKNaabAIE7PzzfJpPwKL4d23WCaawDajc5BtRpXUwgMLTlXb2-55JpAafCsdEFnyRVqQYnein_wFMnybVqcIM98CTQ7kfZk_Lv4TN-nMonxI80J3nqUk8zycwJZpzNBEFupG7v2fB2u5Wh-fLLms23wNQuvI2Sr45079oCNrQk62gEIUUq9cNxOEshgU1evt30zp_RWNBtwNrGHYcnCwt9Wwo5IukcMQydutOFRzFC9dVuymwrZxBxcgfo8R9OIknYR_bTLSJ4Z5cszHwt_YJpW_r4Fwp00mTmdOVWUXWToBpNp7RhxkMSKFhxOyzZBAXHmpfm8goNnAKoUBVNavl3i1Doibwlqah2OHPzcTavxsh_o_tMxLo=w2648-h1994-s-no

I bought the tractor for what I thought was a good deal at the time, I knew the 4x4 wasn't working, tore the front diff out to find out the front bearing and pinion had exploded. No big deal, I just pulled out all the debris and shot pinion, it works pretty good with just rear wheel anyways. The clutch was acting iffy when I bought her, just assumed it was the original and due to be replaced, it gave out on me after a few weeks of use. Ughhhhh.... I really don't want to be spending time splitting a tractor, but here I am.... but after a few weeks delay I have a brand new and upgraded clutch, pressure plate, pilot, and release bearing, and she drives as good as new! If I have to rebuild the clutch on the Tucker I at least have some good practice under my belt now.

Also please ignore the open panel in the back, I'm in the middle of wiring up a ground 240 line to the back of the property so I can weld right where the tucker is going to live :)

AIL4fc96eX9lOZbL6x87tNLSUlN76ihawXSjskITu8ykpHb3ARdbTiRNgPt3Dqc9kdOgFgWFzKiQ_S-iPrG4FyW8-op0qwHPrGJcKSY9uB7zgrl5BwWNJU8_Gbs2YVg7myJ3kZgoZqePnk1T3Hb9Lj3fFlmQhVuP-VpXULb7UEHGi306R37cxwcYEYTp9MhBUdm40lHkwgnLKI7T1SgX0a8yfPy2vQ77x1g_LAgKJNQ1-hcH4yvG4dnNUGYjAVLFxcKJv_tBaI57qYl3bHzCbFjl9PF2bRTycWCuWbh9ZUvTUTTGdvBiQ7k9UyFvnpR92ylF2f03mrco6FRpqFOv5dZy9jEiCnxUJsqjs3GbQWN87ZzqeOr0zI9bMprs0wQ9HO4v1W0Y0h2VB8Blc17gWykclsma7QkKgNH3Cn_Q5mlJuueB6s-ojrpBV57Rv34hPgzyqNf2V0l_wazvZ4eAUh261Vy_zF0nj5ax6BFnM5TkEwwvgAg_XMnwr8pAl9cujIOINw6G_mZRaMR3gpgWhFNIsjOaqUDxHTEd8-qHwuwOxvabTQ8oIvsuCcOWnOoVrWceuC3ED6AcHdUind7U41xadFQrrv7ChNQzJDAStRKGbLJ3SN2eNmOgzuapkr02rpY5AhCELAw4eymfnbo03gtFMMK2fc6-S5RxZgdVA_4YvH6qL9K-2Yna38mBvEbn7gCWv6TsmXkc9Nx6MzbKlY-p2X3trOkTP3pV-NjF0gTyOfr2WLjPTe5Ny_iLn8SoMG5trCeNpjwyfrnWcgibl_Jp-iPYW1P6DnLvotSYM9MF8BukzjofwqsRYskeydLM9IEWO-Hdi28DnuUv5gj6NvY54smRR7yf_Nes9Apa9LiDw-3rpogg7bBTDO7U95e4EqBAKuH9XGOD2qmhLI67flYK6Cgc8GU=w2648-h1994-s-no

Question for pontoon owners out there, what's the correct factory depth on the drive teeth? As @redsqwrl noted, someone welded on a bunch of material to mine, and I'm looking to grind it all of to factory spec.

AIL4fc-M07p6ktwE-nW2O_eOjj8lvLZ1TwKnlIl9JEmKl60bhLdHVY22eI8I1r1JTEtjAd4BqYfvP-GFPY3NOD0eELp1UAFbmicowJY2ixrPok8uoXSHEkD3EdUSDqe_T_oZN-25qL8SbMdGFu0lfmSa7p4ouI4TK-74PT26tACCDhOCRP0VZ8WdSk9Ugjvg8bKR51rX2v0-Fh62AT8TtEGS04SPm-e5Ssq59tBm8OZPhgtaNzdocyurOp8chK_lBvoquGHJqtbRbSWrpp5edgO4Lc4atlYiPPuKk5IzAyYeCQyZ_3ZWwIsBaSO136QTM_KtImdjUrIZHUNrvnaMb00M4dmw3mxmC6kanZgo6TNmx9K5kdv5tX1VwEFIBcZC6KuUQoOt5w_xi9XFqtbLJImjaPHnKPqxd4WXF28ppZhRbDDRRkudcUtFn3wTy0XicoP_6JajvfKGNipjLQfADCwmY_7mogvCF5oBemRXHOysqqYUX5pT58MnYjU7-iXrmo76QITwjL23tSIwGqM2072_-eABVAirdkukp0W-JSn5OPNN-IAjyr-ChODXY6SJ2mn_-z8UvIqy9LGn1GxkNFt-HiU6j0CYPhsG_NdsaqNTRU5jpIuMNtwaqMMg1ZS0TDqU_K8QYSsD9mOcEHGAM3SM7n2FpwsLYbbBwf-D0eq-harAUwphC7MOYVse3x7qTWju8G0-vLLEguqqSCRE5uCkeA2Tj8kFGBUlnLzjvA_ZOjiz1n_7FW213PgHlYP1YivmSlWaC7MkBXYXQNUnCCjOYaisiDcuP9sSHK05C3djzjF4djpTcO8s-FEFBHB8OHjoBb_lZe11IpdHUdVTd-jdNfEh128OJ2mKJaeB8KoSZ293zGIQzFSJWYzYa3Cc4T19Bn5EQMnODlJQcZuwsRppL9_ohlc=w1502-h1994-s-no

Started to take off some rollers and disassemble them for cleaning and relubing. I'm actually surprised how good of shape most are and there are only a handful of really bad pizza cutter ones in the group. ~90% are the top type with a removable metal seal and shield, the other 10% are the bottom with a rubber seal that is non-removable as far as I can tell. Rubber gaskets all feel like they're brand new (that's what happens when rubber is encased in lube for it's lifetime) and the races are in top shape.

I'm trying to decide to what degree I need to clean these guys before loading them up with new grease, is it pointless to even tear them apart and clean out the old gunk when I can just let the new stuff push out the old? I thought about using a pressure washer with degreasing agent to really blast out the bearings, then immediately lube them back up to prevent any rust, but again maybe that's overkill?
1689004063121.png

Btw shout out to @GMoose for sending me over the details for the correct grease fitting for these rollers. I think I'm going to weld a nut to a 1/8th so I can just screw on the nut and use my electric grease gun to relub these rollers on mass since they'll be off the tracks. I'm then thinking about designing a quick clamp system for holding the fitting onto the tracks so you don't need to put a bunch of pressure on them when lubing in the future, but that's a bridge to cross later.

Well now back on to the landscaping, hope to have picture of the beautiful new 24x24' metal carport to be the Tuckers new home in the next month or so!
 
Been a while since I've posted an update. Original plan was to have the this winter be the maiden voyage of the Tucker, that obviously isn't going to happen :D Life and new job search has been getting in the way, but I'm still chipping away! Spent the better part of the summer grading and landscaping the corner of my property, rebuilding the fence, and also getting a 20ft container which I'm turning into a mini shop! Purchased a 20x12' carport to work on the cat under when I'm ready as well, right now I have the tracks rolled out under relative protection as I service them.
1706903176553.png
1706903233729.png

My property was never graded with drainage in mind, so I spent a few months with a small tractor moving dirt, rocks, and installing a French drain out to the canal in our back. Heavy duty ground tarp under a bunch of road mix, and this property is look much better than it did a six months ago. And with a shop with power and shelter I will have somewhere to get serious about the cat.

1706903396480.png
1706903427396.png

Taking rollers off to asses their state. Had only a few that took some muscle to get out. Going to be using some anti-seize when installing back to make sure it's never a problem again.
1706903446583.png
1706903586607.png
1706903624944.png

This is where I have my work cut out for me. Fiberglass pontoons are in pretty rough shape on the bottom. The pans are pretty rusted out so I don't think I'll use them again. I think I might design a new welded tubular frame for the bottom that some HDPE will bolt onto. This will reinforce the bottom while simultaneously allowing me easy access to the interior of the pontoons in the future if I need it. HDPE will be simple and easy to replace in the future, should weigh less as well when all is said and done. My two front pontoons are steel and the bottoms are in great shape.
1706903818506.png
1706903836165.png

Hard to say if it will be worth the extra work, but I disassembled all the rollers to remove races/orings/shields so I can do a better job cleaning them, this also allowed me to spray some PB into the handful of rollers that were seized dry with rust and get them working again. Bathed the takeouts in Simple Green ultrasonic bath to try and dislodge the most grime I could, then hand cleaned them all with towels.
1706904052219.png
1706904078565.png

The only 1/4th NPT thread nut I had happened to be brass, so I welded (yes welded) it to a steel 9/16th-18th nut, to make quick work of relubing all the rollers. As you can tell the weld wasn't perfect but it worked for ~200 rollers till it finally failed. I went ahead and ordered some proper fitting to adapt so I can use it in the future. My method for cleaning and servicing the rollers went as bellow.

-Removing shields/races/orings from rollers
-Wire wheel clean all the rollers
-degrease ultrasonic clean the shield/races/orings, hand pat with towels (decided not to do rollers, would be too much work for little gain)
-Reassemble rollers
-Grease rollers to the point there just a little extra grease coming out and spin around a dozen times
-Bake rollers in oven ~280F for 12 minutes, making sure I coated exterior with grease so as there is no dry spots
-Remove rollers from oven and while still hot spun them around another dozen times to help dislodge old grease dirt, place on grease gun again and push old nasty grease out
-Clean up the roller with paper towels and put on the stack!

Again I'm not sure if it was worth the effort taking apart the rollers, so I'll leave that step up to others. What I def concluded wouldn't be worth the effort is cleaning the rollers to the point that they could be painted. At the end of the day any paint would wear off as soon as you drive your cat, so I opted for wire brush cleaning and baking them in the oven with oil. Realistically heat treated steel with oil is going to old up much better than any sort of paint or POR system.
~10 of my rollers were shot beyond repair, 3 rollers missing, another ~10 are missing caps but still are functional, for those I bought a steel punch and plan to weld on new caps and get them up an running. I was able to disassemble some of the shot rollers and steal parts as needed to make more complete rollers. I will be ordering ~30 extra rollers to intermingle with the old ones and to have spares on hand.
1706904934987.png
1706904982563.png

We've had a pretty wild winter in Boise ID as of late. We had the 4th most snowfall in the month of January but also several record high days. 10" of snow on the ground two weeks ago turned into shorts weather as of the other day. I've been enjoying a few backcountry ski days will the powder is good.
1706905008722.png
1706905031367.png
1706905054734.png

Giving the tracks some love. I've seen people sand blast and paint/por, I once again can't justify all that time and work for a component that sees so much wear. I'm taking wheel brush to all the tracks to get rid of the thick rust spots, then hand applying boiled linseed oil with a rag, and baking it on with a propane torch. Boiled linseed polymerizes in a relatively short time like any hard enamel paint, however it has a tendency to get absorbed by the steel and rust and encapsulates it. This is why in my opinion boiled linsead is arguably one of the best rust preventatives on the market, especially for older patinaed metal. I am also going for a rustic look on this cat so the fact I'm maintaining that ratty mopar rustic look is a bonus for me. After blasting with a torch and letting it set for a day the linseed is rock hard.

Well that's it for the latest update! I plan to work on the sprockets and guide rails next. Instead of building new guide rails out of plow steel, I'm simply going to weld more material on them to get them to factory width and call it good. Yeah I know I won't have heat treated steel anymore and it will wear faster, but it's a hell of a lot cheaper and faster to simply weld material on, plus I can always weld more steel on down the road if I need to, this should also make the rollers in theory last longer.
 
Yeah, painting the tracks is great for the first photo shoot. After that, nature brings you back to where you started! It would be cool to have some of that blast cabinet time back. Same with rollers and rail running surfaces.

Rollers, uggg. Interesting idea of heating them up to potentially get old solid crud out. I had a cap pop off this past weekend that was picked up the next day by a buddy. That bearing cover still had a glop of old hard grease on it. Maybe I should have traded blasting for baking??;):) Hopefully it works out for you! Also, even though you squirt them 'full' on the work bench, do not assume they are maxed out. I did the same thing, put on maybe 25 miles last year (due to crap conditions like this year) and still pumped 12 tubes into them after that time. The fun goes away quick when they are on the machine. With the retaining nuts you may not be able to get your homemade grease adapter hooked on . . .

Don't anti-seize the rollers to the track. The roller pins have a flat surface that mates with the grouser. When that gets hogged out to a round hole, it is a real bitch trying to get the roller tightened up. And anti-seize will promote spinning in place. Now that you have freed the 60 year rust bond, they won't be an issue for the time you own the machine. There will be PLENTY of grease coming out to keep them free! My .02
 
Also, even though you squirt them 'full' on the work bench, do not assume they are maxed out. I
haha I know. That was another reason for my bake process, I assumed heating up the grease and spinning them around while they we hot, then inject more grease would help fill any voids. But yeah, certainly going to blast some new stuff in after my first few trial runs. Noted about the adapter not working after the bolts are on, I'll have the snub nose grease fitting on for that.
Don't anti-seize the rollers to the track. The roller pins have a flat surface that mates with the grouser.
Thankfully I didn't have a single roller spin out in the hole on me, certainly want to avoid that from happening. I'll be using antisieze on the roller thread+nut since that's the most important part (since over-torque on the bolt is what causes the holes to strip). My holes now have a light layer of lenseed oil on them now, so that should prevent any serious rust issues in the future allowing for easy roller replacement.
I really appreciate reading through yours and others build logs to give me a sense of what I do/don't want to do for my rollers steps.

There isn't going to be any polish and shine on this cat that's for sure. Going to be funny when I'm all done and everything will more or less look identical to how it started, tracks are still going to look rusted, pontoons will have dings and missing paint :LOL:
 
Starting to rebuild the grousers, and I've noticed they all have a flare. I assume from the factory these were all 90 degrees, can anyone confirm that?

If they are, then I'm going to setup a jig with my bottle press and bend these all back into shape. Seems like a pretty straight forward process, just want to make sure I'm doing the right thing before I start bending all these hardened steel pieces :D

PXL_20240610_173711847.jpg
 
the ears are 90 degrees from the factory, so the roller/tire rides flat on the rail,

the bend may not be at the ear of the casting, could be caused by the cross bar being bend and or welded incorrectly to the casting which is a common issue, need to make sure the link pins move freely when connected to the next grouser, in particular when the track goes around the nose of the pontoon. the grouser will bind up and cause undue wear.

also, take some round bar the same diameter as the link pin, about 20 inches long and run it through the link pin holes in the grouser from one side to the other, and make sure it goes through all 4 holes freely with no distortion, that way left side matches right side, once you start to assembly tracks, when you add each grouser, take moment to check to see if it moves freely by rotating it with the one you added it to, this should tell you asap if all is good, no binding what so ever !

by doing this, the grousers/tracks will move freely over the rails on the pontoons, it will decrease wear/failure greatly

yes, bending in a press is a good way to resolve issues
 
Last edited:
need to make sure the link pins move freely when connected to the next grouser, in particular when the track goes around the nose of the pontoon. the grouser will bind up and cause undue wear.

I was hoping you would chime in PP! :)

This exact thought crossed my mind, I can't imagine anything other than 90 degrees is wanted when the rollers go around the pontoons, so pressing everything out to 90 degrees is most certainly my plan now!
also, take some round bar the same diameter as the link pin, about 20 inches long and run it through the link pin holes in the grouser from one side to the other, and make sure it goes through all 4 holes freely with no distortion, that way left side matches right side

What a great idea! I just so happen to already have a bunch of rod that's perfect, I purchased some and had some new links cad designed and laser cut to build new full link pins, since the previous owner ended up making 2 sets of 1/2 links on each track, I want to get back to full links on everything! I know these won't be hardened steel, but they'll be better than the old metal for a least a decade I figure, then I can always easily weld up some new ones since it's so dirt cheap :D

1718302250298.png
 
They prob put half links to take up the wear on the rails and rollers.

Going back to full links will prob result in a track that’s too long unless you add material back into the rails or replace all the rollers or both.

Welcome to the 30 grouser club.
 
Top