Had an engine failure over President Day Weekend on my KT3. Motor is seized (800 hrs, btw). The cat is back in my garage now undergoing prep work to pull the motor. Like all good tinkerers, I have a spare running 1300 Series I VW motor (in anticipation of a second KRISTI build). I have never pulled or dropped one of these motors Into a KRISTI. Looks like it might be a bit tight both ways, especially side-to-side. I have reviewed what has been posted here in the past, which isn’t a lot. I notice the bad motor has a mount on the diff side to take a hoist chain. Appreciate any first hand accounts. Anxious to be back on the snow.

-
Please be sure to read the rules and adhere to them. Some banned members have complained that they are not spammers. But they spammed us. Some even tried to redirect our members to other forums. Duh. Be smart. Read the rules and adhere to them and we will all get along just fine. Cheers. :beer: Link to the rules: https://www.forumsforums.com/threads/forum-rules-info.2974/
You are using an out of date browser. It may not display this or other websites correctly.
You should upgrade or use an alternative browser.
You should upgrade or use an alternative browser.
KRISTI Engine Swap
- Thread starter Rover’n
- Start date

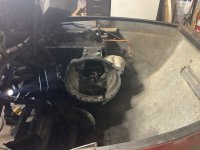
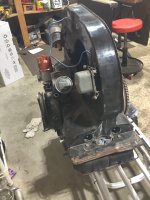
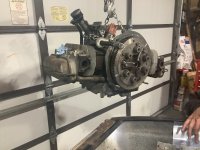
I will take a stab at this if it helps out the KRISTI operators. A couple of views of last night’s tear-down start. Looks like we can just set the hydro res and hoses out of the way, since that system is in good working order. We are thinking of lifting from the top using the hoist bracket (shown) and the solid tower of the generator support (with a fabric strap looped underneath for additional support).
These little boxer motors are supported only by four attachments through the bell housing (no engine mounts per se). The upper tin will be removed, of course, as well as peripheral stuff such as the carb and intake. As you can see, pretty tight on the passenger side and would rather leave the crank pulley in place. Will use a standard engine hoist which should be on-site this weekend.
I have spoken to some old timers who operated these units for Mtn Bell and they said the shops routinely pulled motors, either to service them on the bench or to access things like the clutch or to gain better access to diff components.
Attachments
Last edited:
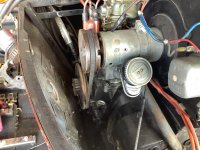
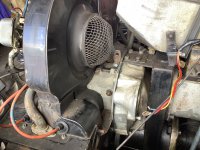
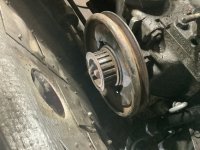
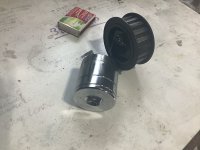
The tear-down of the VW 1300 industrial motor is done and it is pretty close to ready to hoist. The tight spot looks to be the crank pulley, which as you can see also carries the slotted pulley for the hydraulic pump. Unique to this engine is the “starter dog” pulley nut, which accepts a hand crank (also seen on VW buses). Nice feature in a pinch, but a little difficult to remove in-situ. Sure would hate to try to pull that nut and pulley while it’s hanging from the hoist.
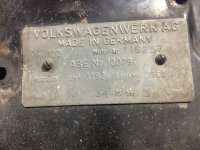
Note pic of the boilerplate. Donor motor waits in the wings. Might have engine hoist in-shop this weekend.
Note pic of the boilerplate. Donor motor waits in the wings. Might have engine hoist in-shop this weekend.
Attachments
I pulled a porsche type motor out of number 180 this summer and it came out, but like you stated it has a path.
Air ducting
Wires, fuel
Firewall (lower)
Exhaust
Hydraulic sub assembly
Oil drain
I mounted my lifting apparatus to the exhaust ports.
Removing that louver like you did would have really helped me. I needed to tip engine down to clear input shaft, then lift
Air ducting
Wires, fuel
Firewall (lower)
Exhaust
Hydraulic sub assembly
Oil drain
I mounted my lifting apparatus to the exhaust ports.
Removing that louver like you did would have really helped me. I needed to tip engine down to clear input shaft, then lift
Thanks, sqwrl. Did you remove the pulley before the yank? That nut looks to be 34 mm, thin-wall, which we do not have in the shop. Probably pick one up today. Wish we had a Porsche to drop in there.I pulled a porsche type motor out of number 180 this summer and it came out, but like you stated it has a path.
Air ducting
Wires, fuel
Firewall (lower)
Exhaust
Hydraulic sub assembly
Oil drain
I mounted my lifting apparatus to the exhaust ports.
Removing that louver like you did would have really helped me. I needed to tip engine down to clear input shaft, then lift
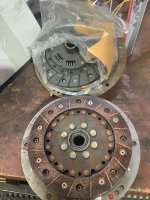
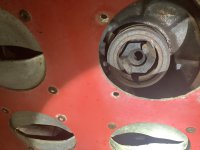
VW engine pulled. A thin-wall 34 mm socket captures the crank nut nicely and that and the starter dog came out with an impact half-inch drive. This gives enough clearance to get past the input shaft w/o removing the pulley. Four bolts to remove, the lower two on studs. One of the uppers supports the starter.
These motors weigh roughly 200 lbs, so not a big lift. The louvre in front of the starter dog was set with small nuts and bolts for easy removal in case the operator wants to hand crank.
Draining the oil, which seems a bit thick and dark given the recent oil change, but do not see any metal shards.
These motors weigh roughly 200 lbs, so not a big lift. The louvre in front of the starter dog was set with small nuts and bolts for easy removal in case the operator wants to hand crank.
Draining the oil, which seems a bit thick and dark given the recent oil change, but do not see any metal shards.
Attachments

Last edited:
peace
New member
During the restoration process of my Kristi, I built an attachment that I can bolt to the two studs where the VW fuel pump normally mounts to the engine. I use that mount and the hole in the engine case near the flywheel (shown in the first pictures in this thread) to attach a load leveler for my engine hoist. I only need to remove the hydraulic pump, hydraulic reservoir, and exhaust system to pull the engine. The load leveler allows me to tilt the pulley side of the engine up enough to remove it from the cat without pulling the hydraulic pump pulley. I built the attachment using a piece of 1/4"x1" flat stock with two holes drilled for the correct stud spacing. I welded a ring to the flat stock that allows me to attach it to the load leveler using a small shackle. If this doesn't make sense, I can take pictures the next time I'm in the shop.
Thanks for the comments, guys.
Was on my way into a remote mtn cabin to join friends and was alone w/ radio contact. I had on plenty of ear protection, as one does, and probably failed to hear early knocking. The unit was not building power as I headed uphill and I thought maybe the track was over-tensioned. Then not maintaining much oil pressure. Headed back to the truck and trailer, about a mile, taking it slow and stopping often. About thirty feet from the trailer the engine seized. I am seeing flattened, thin metal shards in the oil strainer intake, so suspect a spun bearing, possibly from oil pump and/or bypass failure.
Friends from the cabin party joined me to help winch it onto the trailer.
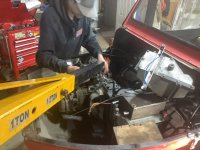
Should have the donor motor in the machine by this evening. As far as snowcat mechanics go, these KRISTIs are basic and simple. Still, a few observations at this juncture.
I am a proponent of original engineering in all my transportation modes, which is why I chose the particular models, KRISTI notwithstanding. Still, the VW air-cooled motor is high maintenance by modern standards. I am flummoxed that one has to pull the motor to change out or clean the oil strainer, or to service the oil bypass. Big Al had always recommended that access holes be cut into the fiberglass tub to accomplish these basic tasks and I will seriously consider that approach.
The exhaust stacks as configured are vulnerable on several fronts. Tress smack them and harmonic vibration rattles the manifold bolts off the threads. There is a lot of flex on the KRISTI with the hydraulics and a relatively delicate frame. Even with the exhaust caps, the stacks are an avenue to allow water to infiltrate the motor. Again, Big Al recommended routing out the sides and along the tracks, which makes a lot of sense to me.
Right now we are bracketing the stacks to the engine elements and I will remember to put a couple of coffee cans on the stacks when left in the weather for any length of time. We’ll see how that all works out.