• Please be sure to read the rules and adhere to them. Some banned members have complained that they are not spammers. But they spammed us. Some even tried to redirect our members to other forums. Duh. Be smart. Read the rules and adhere to them and we will all get along just fine. Cheers. :beer: Link to the rules: https://www.forumsforums.com/threads/forum-rules-info.2974/

Seriously thinking of giving up the snowcat and buying a pair of snowshoes

utahwilson

New member
Pretty disheartening when you drop your cat off a shop to repair the cat. They have it for six months and when you get it back its obvious they never bothered to drive it to see if their work was correct.

1. Clutch adjustment is off (clutch engaged with pedal out) Cannot start the cat unless you push the clutch pedal in.
2. Tracks are not adjusted correctly. Bounce up and hit the fenders, sounds like the fenders are being ripped apart.
3. Someone wired my oil fan the pulsating electric pump and it burned out the fan. Not sure why they did this it was on its own switch. (mystery to me)
4. its takes about 100yards to turn to the right. Turning left is not a problem.

Finally, got a trailer and was planning on heading out this weekend. Snow here in Salt Lake City last week so I took a run through my yard before I loaded it up.

1. Clutch I can manually adjust
2. Tracks - I have the manual and trying to find a wrench to loosen the adjustment nut on the back wheels.
3. had to buy another fan.
4. Adjusting the Variators, I am searching through previous posts.
 
Well That sucks ! You could have bought a Kristi and had the same problems for a whole lot less money :wink:.

Maybe we should trade cats ??
 
I have had the same problems with my truck, I have resorted to fixing everything my self and learning to fix what I don't know. At least then I know it's done right. Sorry for the pain, I know how you feel.
 
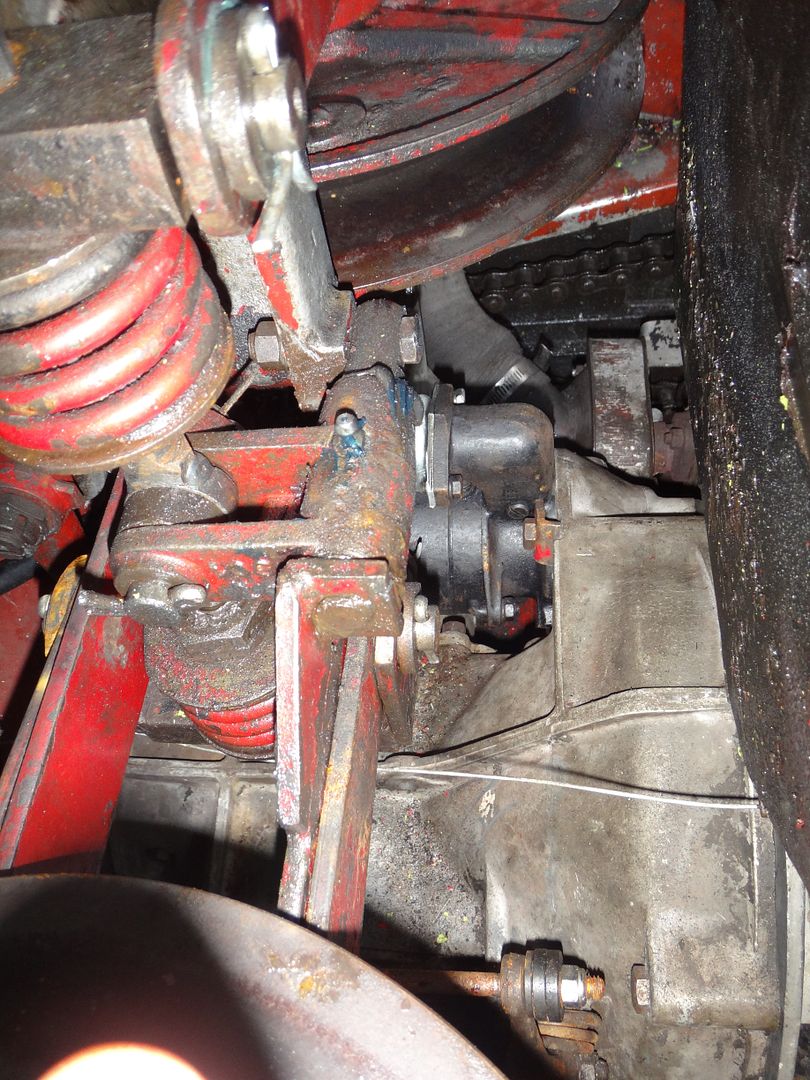
there appears to be a piston that slides in and out off this cylinder. Is the hole on top a missing grease nipple?
 

Attachments

  • photo1.JPG
    photo1.JPG
    75.3 KB · Views: 928
yes it is a grease hole but the pin is held in place by a bolt on the end. you can see it in your picture.the other end is fixed solid in a slot . this should not be pulled out but must swivel . is that large aluminum part broke or are you taking your steering apart?
 
i started on changing mine today. adjust it a little looser than the book says. if your steering wheel is centered the belt should be parellel to your firewall. yes the belt is way to loose. turn the nuts on the lower and upper springs but only a little at a time and both the same amount. if they are not the same you will turn more one way more and the belt will be larger on one end. if properly set your steering wheel will be centered and the belt will have the same diameter going over the shieves on both ends.
 
JimVT thanks for the replies. So... I am missing a grease nipple on that cylinder? I unscrewed one on the variator and tried to put it in, but the hole appears to be smaller. Not sure what you mean by broken aluminum. Here is a bigger picture of the Variator area. I removed the air duct so I could get to the bottom nut easier. 3 solid turns on both nuts and the belt seems to be in spec now. Next question.. on the air duct I have this fan motor. Is this supposed to be used for something? Seems that it would just suck in air from around the variators.

Also, track adjustment Nuts behind the back wheel. Do you know if its a 21MM Nut? I need to pick up a wrench.

Thanks for your help.


http://youtu.be/kmOql5G3v9w
 

Attachments

  • photo11.JPG
    photo11.JPG
    114.9 KB · Views: 906
  • photo21.JPG
    photo21.JPG
    131.9 KB · Views: 913
  • photo22.JPG
    photo22.JPG
    94.3 KB · Views: 909
Hey guys
JimVT- Utahwilson. I see that there is an epidemic called "adjusting the variator belt" . After a few rides on a uphill trails with tight turns and with fresh snow the belt wants some settings.:sad:
I also noticed that the service that I had done with the grease in the nipples, it was too much.
Now i am cleaning the excess of the grease from the sides.
The problem is the belt, there is grease between the variator disc and i will need to thoroughly clean.

Regards Nikos
 
After adjusting the belt last night. I took her out for a spin this morning. I now have the exact opposite reaction. I can turn on a dime to the right, but nothing to the left. Therefore, I would say my adjustments of the two variator bolts are not even. Need to see if I can find the thread. Back it all out and start again.
 
Pretty disheartening when you drop your cat off a shop to repair the cat. They have it for six months and when you get it back its obvious they never bothered to drive it to see if their work was correct.

1. Clutch adjustment is off (clutch engaged with pedal out) Cannot start the cat unless you push the clutch pedal in.
2. Tracks are not adjusted correctly. Bounce up and hit the fenders, sounds like the fenders are being ripped apart.
3. Someone wired my oil fan the pulsating electric pump and it burned out the fan. Not sure why they did this it was on its own switch. (mystery to me)
4. its takes about 100yards to turn to the right. Turning left is not a problem.

Finally, got a trailer and was planning on heading out this weekend. Snow here in Salt Lake City last week so I took a run through my yard before I loaded it up.

1. Clutch I can manually adjust
2. Tracks - I have the manual and trying to find a wrench to loosen the adjustment nut on the back wheels.
3. had to buy another fan.
4. Adjusting the Variators, I am searching through previous posts.

That is very discouraging and speaks very poorly of the company that did the work, which IIRC was Peterson Equipment.

When you take your snowcat to a "professional" you fully expect them to do quality work, and when you get your 'Cat back you should be able to depend on it, period. You count on them to make the necessary adjustments and to replace the worn parts.

Depending on where you are and the weather, a snowcat breakdown can easily turn into a no-kidding "survival situation".
 
Utahwilson

Variator belt tension

Check the tension of the variator drive belt occasionally.
When correctly tensioned, it should be possible to press in the belt by thumb 20 mm (3/4") as shown in fig.1. The tension is checked first when the belt has been run for a short time after the adjustment.


Fig. 1

The belt is tightened by loosening each nut on the screws A in fig.1, the same amount; the screws are by that turned counter-clockwise. The lower nut is slackened from inside the cab through an opening on the right-hand heater and defroster control. Do not adjust the nuts in fig 2. These are properly adjusted when the variator is installed and their adjustment must not be altered when the belt is tensioned.

There are two nuts with A
. The nut at the top and the lower one, as you can see from the pictures

Fig. 2
 

Attachments

  • belt n1.gif
    belt n1.gif
    25.3 KB · Views: 875
  • belt2.gif
    belt2.gif
    20.1 KB · Views: 881
Thanks Nikos. I found the same manual and backed both nuts out counter-clockwise. Same turns on both. I think at this time I need start from scratch. Not sure if I should be clockwise or counter-clockwise at this point.
 
is that pin you showed in the first picture tight? If not it should be. loose you wont get your belt correctly set.i use a 11/8 to adjust the track nut bolts.
what ever you do don't run an over tight belt. you will brake that aluminum part ST125. you may want to check it if that pin is loose.
overgreasing isnt good in that area. i am guilty of that.
 
Wilson you are missing a part had to go look at mine and check it out i'm going to research a previous thread and put it up for you. you are going to have to find a welder to fab up the support for the other side that is missing and weld it up for you
 
couldn't find the post but i did still have the pic on my camra so here is a pic of what you are missing on that shaft.
 

Attachments

  • varriator repair.jpg
    varriator repair.jpg
    58.4 KB · Views: 854
Utahwilson
for tension Variator belt
The Top Nut A, CounterClockwise
The Lower Nut A - Clockwise.

Start from the beginning
The belt is tensioned when you unscrewed the nuts A + A. ok

The best thing you can do, is to tighten again the two nuts, and then follow the manual, unscrew them, but this time you have to watch.
In the same Acount. ok

Regards Nikos
 
Well, it appears that I am missing a part. The bracket is welded to the cyclinder as well as lower arm? Any harm in removing the nut that is holding the shaft to see if the shaft is frozen?

At least the inside looks good. I fixed all the electronics. Put in a quick release for the steering wheel.
 

Attachments

  • photo1.JPG
    photo1.JPG
    125.3 KB · Views: 427
  • photo2.JPG
    photo2.JPG
    88.5 KB · Views: 427
  • photo_inside1.JPG
    photo_inside1.JPG
    123.4 KB · Views: 436
  • photo_inside2.JPG
    photo_inside2.JPG
    150.5 KB · Views: 436
My other issue. Tracks... Left front track is about 1/2" below the fender apex of the sprocket. Right front is a good 3" below the fender at the apex.

Any ideas why this would be this way?
 

Attachments

  • photo_track_left_gap.JPG
    photo_track_left_gap.JPG
    102.6 KB · Views: 433
  • photo_track_right_gap.JPG
    photo_track_right_gap.JPG
    101 KB · Views: 428
  • photo_track_front_left.JPG
    photo_track_front_left.JPG
    151.9 KB · Views: 427
  • photo_track_right.JPG
    photo_track_right.JPG
    159.1 KB · Views: 429
Utahwilson
for tension Variator belt
The Top Nut A, CounterClockwise
The Lower Nut A - Clockwise.

Start from the beginning
The belt is tensioned when you unscrewed the nuts A + A. ok

The best thing you can do, is to tighten again the two nuts, and then follow the manual, unscrew them, but this time you have to watch.
In the same Acount. ok

Regards Nikos

Nikos..tightening the bolts (clockwise top A) (counter clockwise bottom A) This will compress the spring. Then slowly back out equal turns (counter clockwise top) and (clockwise bottom) and after a turn backing vehicle up so variator disks can settle. That sound about right?
 
Take a pic of the front of the cat back far enough to get both front fenders to see if they are on the same plane?????

Cletis
 
Wison, my guess is the shaft is free on your varriator but you can remove the bolt and slide the shaft out. but belt adjustment will be impossable until you get that new support angle back in place. if you have some one work the wheel a bit you can watch that shaft move up and down. as for your tracks hitting the fenders i don't know mine do some times but this happens a lot less since i did my big wheel conversion i'm thinking you don't have enough tension.
 
Don, JimVT is the bracket highlighted in yellow welded to the cylinder? Is the PIN highlighted in red the end of the bolt that slides in the cylinder? I will have to get this fabricated before I proceed.

Thanks
 

Attachments

  • variator1.jpg
    variator1.jpg
    49 KB · Views: 374
I'm going to describe the best i can what you call a cylinder is a hinge that operates your varriator ,the pin slides in to the hole in red and is secured on the other side with a bolt. to dissassemble it you have to remove the bolt and slide the shaft out, the cylinder as you call it should have a grease fitting on it .the origional part was made from 2 pieces of flat bar weded together to form the angle i believe a much stronger piece could be made with a piece of 1/4 inch channel and an end mill than welded on to the varriator.
 
That is very discouraging and speaks very poorly of the company that did the work, which IIRC was Peterson Equipment.

When you take your snowcat to a "professional" you fully expect them to do quality work, and when you get your 'Cat back you should be able to depend on it, period. You count on them to make the necessary adjustments and to replace the worn parts.

Depending on where you are and the weather, a snowcat breakdown can easily turn into a no-kidding "survival situation".


I agee totally with this.....

I would keep track of my time and expences, and when done I would send them a "bill" for what they should have done here.:glare: This should be a clear warning to all snow cat folks that they should heed. In this fast and furious world with the internet, I cann't see how anyone in the snow cat world would risk such a job and the credibility they could have had here with all of us.:glare: It's too bad that they chose to treat you the way they have. I know that if I were considering dealing with Peterson Eqiptment, the deal would now be off....:glare:

They should know Snow Tracs, as I drove their own personal one they built back some years ago, just this past weekend. It's one nice machine, extensively modified. For them to leave you with yours in the shape they did is unexcusable in my opinion.:glare: Yes I am being hard on them, but at this point it looks like they deserve it....You would think they would know about this forum and be watching. But maybe the wheel fell off the bus....

Best regards, Kirk
 
you guys have to remember that most of these machines are old. i have guys looking for work all the time. and have even had some young ones working for me. the thing i have noticed in the mechanic world is a lack of mechanical knowalge, and a dependancy on computers to tell you what is wrong. any one who has talked with me on the phone knows that i like a mechanical system as i can poke and prodd at it and at the verry leaste limp it home. most of the guys working on your machines wern't even in diapers when these were built. my guess the guy incharge of the yellow cat had some snow trac experiance the guy working on wilsons likely had never worked on any thing older than a lmc 1500, and mostly on something newer like piston bullys with all controls being electronic.one has to be famliar with the machine to to see something out of place.you guys working on the old thiokols,steel track tuckers and snot tracks are a dieing breed .you would be amazed how many young school trained mechanics don't even know what points are.
 
Top