• Please be sure to read the rules and adhere to them. Some banned members have complained that they are not spammers. But they spammed us. Some even tried to redirect our members to other forums. Duh. Be smart. Read the rules and adhere to them and we will all get along just fine. Cheers. :beer: Link to the rules: https://www.forumsforums.com/threads/forum-rules-info.2974/

Thiokol Imp 1402 OpenTop # 129 by Nikson

Nikson

Bronze Member
Hey Everyone,

Wanted to thank everyone here who provides and updates info on their projects. They are a great help to guys that start off fresh (like me :brows:)

So to start off...

I've got bored & tired of not being able to get there at times on my Jeep, and it was time to get a "snowcat".

As time went by, I was able to locate one through this forum in Idaho from Bill @ SnoTrans.

I figured that price & timing were right for me to go get it...

IMG_2206.jpg

8JdULrPtPnM5qRfzksujgtMTjNZETYmyPJy0liipFm0


8JdULrPtPnM5qRfzksujgtMTjNZETYmyPJy0liipFm0

SNOWCATTHIOKOL1402IMP
 
First Impressions

for its age, I figured it was in a pretty decent shape,

P1010212.JPG


after all... it is a 1965 :clap:

Engine ran like a champ, although bunch of loose wires were "hanging around", no sign of alternator, no lights or fuel gauge :wink:

P1010217.JPG


here is a video of the first test drive - literally first time...

[ame="http://www.youtube.com/watch?v=FP89-SK8J9I&feature=share&list=UUiTvqT1musPzdkZJT3OyHHg"]1965 Thiokol Imp 1402 - # 129 - YouTube[/ame]
 
Looks like you had fun. Please don't make a habit of letting passengers ride while you ld/unld. Bad time for things to happen.:flowers:
 
plan for this fall is to do a minor TLC on the engine/train/tracks in order to be able to see what it is capable of doing in stock form, how much better it will perform in the snow vs Jeep, etc.

started off with removing the tracks & pressure washing the whole tub real well. Lots of pealing of paint, but its aluminum, so I guess its not a big problem.

Took the engine out, popped off head to clean up, along with all of the fuel/ignition system.

pretty nasty :(

P1010287.JPG


P1010446.JPG


P1010462.JPG


P1010468.JPG


Some carburetor cleaner & elbow grease... and I like the output...

P1010491.JPG
 
Engine works

Heads cleaned out nicely...

although while removing one of the plugs, thread ended up being stripped and partly came out with the plug itself (as usual it was the last one of the 4) :hammer: Dropped by a local tool shop, picked up the tap in the right size, redid the thread - back to looking like new, don't really see the plug giving me much trouble down the road.

P1010492.JPG


while cleaning up the distributor assembly, didn't think about taking a picture and marking off its position, i guess that repair manual will come in handy to learn how to set the timing.

P1010495.JPG


Carb cleaning was next after everything else...

P1010496.JPG


pretty nasty, eh? :)

P1010503.JPG


Overall pretty happy with the way things are turning out to be, definitely hope to have it up and running in the snow this winter...
 
You should be in good shape for the snow. Those old Wisconsin motors are tough. Pay attention that you have a good tight fuel system as they like to vibrate a bit.
 
List of things I would like to upgrade/replace/update:

1. Ignition Coil
part number?

2. Distributor Cap/Rotor
part number?

3. Spark plug Wires
part number: YL100A Magneto/Wire Set

4. Carburetor gasket kit (Zenith 12098/L63)
part number?

Anyone has any actual links/item numbers for any of these, feel free to help out, seems like eBay has lots, but not everything...

Will keep updating as new pictures/info comes in.

:clap::clap::clap:
 
You should be in good shape for the snow. Those old Wisconsin motors are tough. Pay attention that you have a good tight fuel system as they like to vibrate a bit.

Noted,

Definitely will have to make some rubber motor mounts, since it just seems like it was sitting on some track rubber squares...
 
RE: Alternator

Alternator... is there one???

side view

IMG_2318.jpg


my understanding that 4 wires that hang out on their own from the starter's side of the engine might be the actual "flywheel's" build-in alternator...

Anyone got anything to say on that?
 
Re: Alternator

Alternator... is there one???

side view
my understanding that 4 wires that hang out on their own from the starter's side of the engine might be the actual "flywheel's" build-in alternator...

Anyone got anything to say on that?


You are right about the 4 wires being from the generator of the engine, with in the flywheel. I cannot tell you witch wire does what, or what the output of this setup is. If I were a guessing man, I would say that it puts out less than 40 ampes, so don't get too carried away with lights..

Regards, Kirk
 
Re: Alternator

You are right about the 4 wires being from the generator of the engine, with in the flywheel. I cannot tell you witch wire does what, or what the output of this setup is. If I were a guessing man, I would say that it puts out less than 40 ampes, so don't get too carried away with lights..

Regards, Kirk

Cool, so I was guessing right... :)

As far as lights, I will be using some RIGID LEDs, so their consumption is minimal.

Will the flywheel alternator be enough to keep the starting battery charged up though, that would be the question now... ???

Thanks for input.
 
it should work just fine i wouldn't worry your other optiom could be a dual battery isolator run all your accessorys off one battery and the starter and engine off the other one
 
it should work just fine i wouldn't worry your other optiom could be a dual battery isolator run all your accessorys off one battery and the starter and engine off the other one

My concern is just how well will the alternator keep up with charging the battery up at 20-30AMP rate.
 
i'm not shure what the output is on the charging system my guess it is a nonregukated type like a boat or snowmachine motor where voltage and amperage is relitive to rpm with a capicator of sort to limit over votage. most snow cats are like boats and the engine is run pretty hard and should recharge the battery in an hour or so if you are going to put lots of draw on it like 100 watt lights and electric heater than look into moumting a delcotron 50 amp alternator on it, it would be simple to do. the external alternator would also be required if you planned on a lot of idle time with an electrical load
 
Yeah, thats what I figured,

Since the battery with be "fresh" everytime I head out to the mountains, being deep cycle (Optima YellowTop), it should last me through the weekend with its charge.

There are necessary components on the engine (rectifier, etc) to run the charging system, so hopefully this 10-20AMP stator will be able to keep up with it.

Have been googling for any "homemade" alternator attachments on engines, but no luck so far.
 
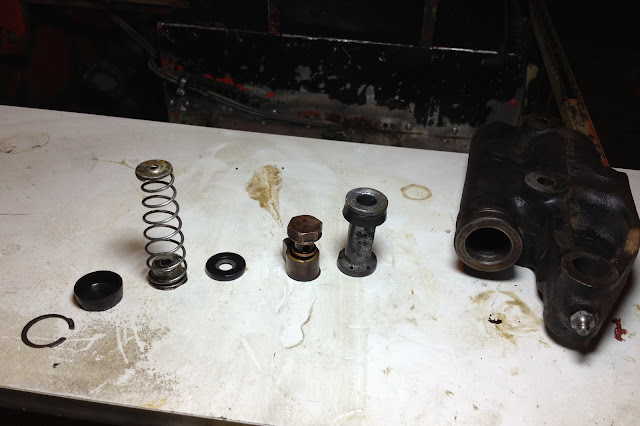
Re: Wagner Master Brake Cylinders

Was able to search the web and find a rebuilt kit from NAPA AutoParts (kit number 387) - about $20.

One of the cylinders looked like it was rebuilt not too long ago.

IMG_2376.jpg
 
Re: wheels

Front idler wheels got pretty trashed up, running the cat with no air in them,

P1010603.JPG


hammer & vise, along with a wirebrush on Dewalt...

P1010604.JPG


P1010608.JPG


Decided to go with the "SafetyOrange" color scheme for some of the interior & exterior...

P1010620.JPG
 
Re: Interior & Motor paint

interior got a little bedliner after some scraping & brushing...

P1010609.JPG


Just love how this stuff covers anything & everything and sticks to it like there is no tomorrow... :)

P1010610.JPG


while that stuff was drying, put some high heat paint... and came out with something pretty cool as well (IMHO) :)

P1010614.JPG
 
Re: Zenith Carb 12098 / Gasket Kit K2033

Mailman brought another present - Carburetor Gasket kit for the Zenith 12098 carb - its the K2033 ($30). If you google it, most likely might even find something just a few bucks cheaper.

Kit came with everything needed to refresh the old carb, with some extras to spare.

IMG_2385.jpg


Picture speaks 1000 words - choke shaft seal... OLD vs NEW

P1010633.JPG


I guess just got to make sure everything goes back together as it was taking apart... - "the RIGHT side in" :brows:

p.s. this one just scared me... although there were no leaks...

P1010638.JPG
 
BrakeSteer station dried up in time with the bedliner...

lets put 'er in...

P1010641.JPG


Now thats a bit better - Refreshing - to say the least

P1010643.JPG
 
Re: Flywheel removal / Stator access

Came to a "roadblock" - first one on this trip... :)

Cant get the flywheel to come off...

any suggestions from anyone...

p.s. already tried - applying heat, soaking in WD40/PB Blaster (over a week), hitting the crank with a hammer using a 2x4, and all those while the engine is on top of the "rolling" cart...

SO anything else i might have not tried yet???:hammer::hammer::hammer:

P1010618.JPG
 
may be drill and thread the holes than use a 2 way puller if it dosn't come right a swift hit to the puller usualy wll free it up
 
may be drill and thread the holes than use a 2 way puller if it dosn't come right a swift hit to the puller usualy wll free it up

Drilling any holes will cause the flywheel to be off weight balance, causing bearing wear that I would not want to deal with at the moment... (IMHO)

Unless...:hammer:
 
Check in a Wisconsin manual and see if the flywheel is not threaded on the shaft with left hand threads. You have to fish the key out first to spin it off. And be very careful you don't break any fins as that will throw it out of balance.
 
Check in a Wisconsin manual and see if the flywheel is not threaded on the shaft with left hand threads. You have to fish the key out first to spin it off. And be very careful you don't break any fins as that will throw it out of balance.

Per manual, its just hanging on a Woodruff key behind it...

I'm guessing it might not ever been removed in 50yrs, so just got really "set in" there... :(
 
You can do what you want my opinion would be 2 5/16 holes drilled tward the center won't throw off balance to much. But it's not my machine good luck
 
I have used tapered wedges around the OD to apply pressure and then heated the center and put ice cubes on the shaft. Then a good whack with a brass hammer usually pops it.
 
You can do what you want my opinion would be 2 5/16 holes drilled tward the center won't throw off balance to much. But it's not my machine good luck

Dont get me wrong, I appreciate your opinion, especially since i've thought about it myself, but few other mechanics that I've spoken about this, highly recommended otherwise...

Although that seems to be possibly the last thing on the list...
 
A good can of freeze spray maybe on the shaft and
some slow patient heat on the flywheel ?
Works like a charm for press fits :biggrin:

X 2 keep an eye on the fins ! :doh:
 
Top